In this video, I will show you how to set up network-wide ad-blocking and tracking protection using pfSense and pfBlocker-NG. Because it is nobody’s business what you are doing on the internet!
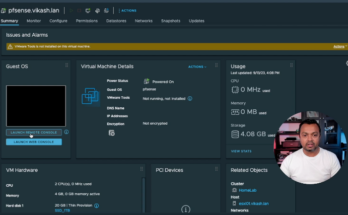
pfSense is a very powerful firewall and in this video, I will show you how to run pfSense Plus on VMware vSphere 8. By virtualizing pfSense you can now take advantage of the flexibility already there when using VMware vSphere 8.
I have internet and IPTV from KPN (local ISP) here in the Netherlands. I chose not to use their router but instead use pfsense. The internet configuration part is pretty straight forward but if you want to get routed IPTV working you have to configure specific settings in pfSense. In this video I will show you how I have set this up for my situation. If you need to setup routed IPTV on pfSense as well, use this video as a guideline and check what the specific VLANs and IP ranges are for your ISP.
In this blog post I will show you how to setup pfBlockerNG python mode with pfsense. Nearly a year ago I made a blog post here explaining why I was moving away from pfBlockerNG to Pihole. The main reason was that pfBlockerNG could not show all the blocked DNS requests. This made is difficult to troubleshoot why some app or (iot) device was not working properly. Read my blog post here for all the details.
In recent times, the developer of pfBlockerNG, BBcan177, has given a major update to pfBlockerNG. With the integration of python into pfBlockerNG, it is now possible to show all DNS requests that are blocked. I’ve always loved the combination pfSense and pfBlockerNG. I think it is a great setup for protecting your network and keeping all the ads and tracking away, making a beter and safer internet for all the users on your network (kumbaya-mode). Plus you only need one device for routing and adblocking.
Requirements
For this blogpost I used the following versions:
pfSense ce 2.4.5-RELEASE-p1
pfBlockerNG-devel 3.0.0_10
Install pfBlockerNG package
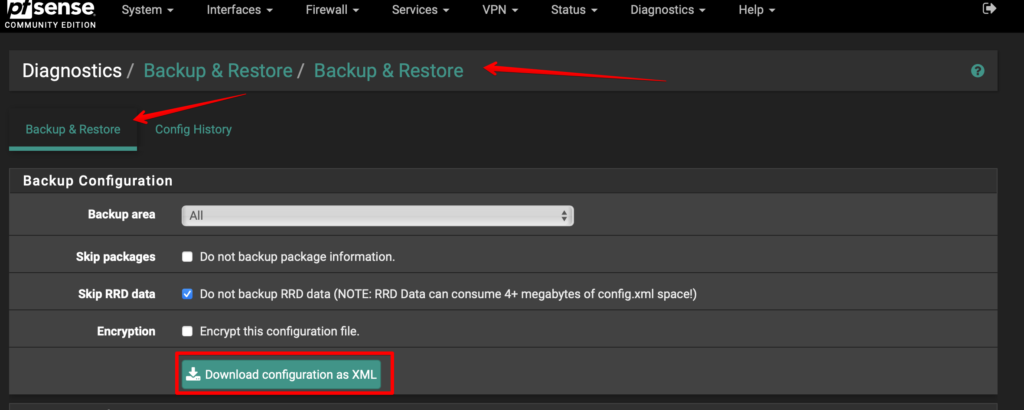
Before you start with configuring pfBlockerNG make sure you pfSense firewall runs fine and internet is working as expected for all the devices on your network. If this is the case then continue to make a backup of this running setup. Always a good idea of having a backup before making changes. To do this go to Backup ->Backup & Restore. Click on Download configuration as XML. Safe this file in a secure place.
Backup & Restore pfSense configuration
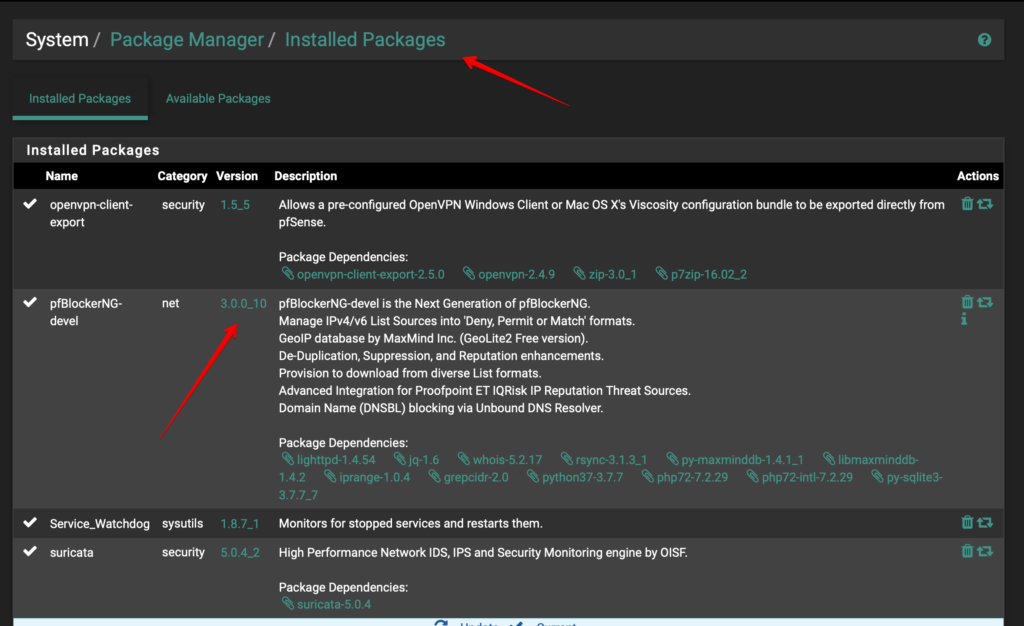
Then go to System -> Package Manager -> Available Packages. Search for pfBlockerNG. This part is very important. You need to install pfBlockerNG-devel package. Click on the green Install button behind pfBlockerNG-devel to install the package. After installing the package it should be in the list of Installed Packages:
pfSense Installed Packages
Configuring pfBlockerNG-devel
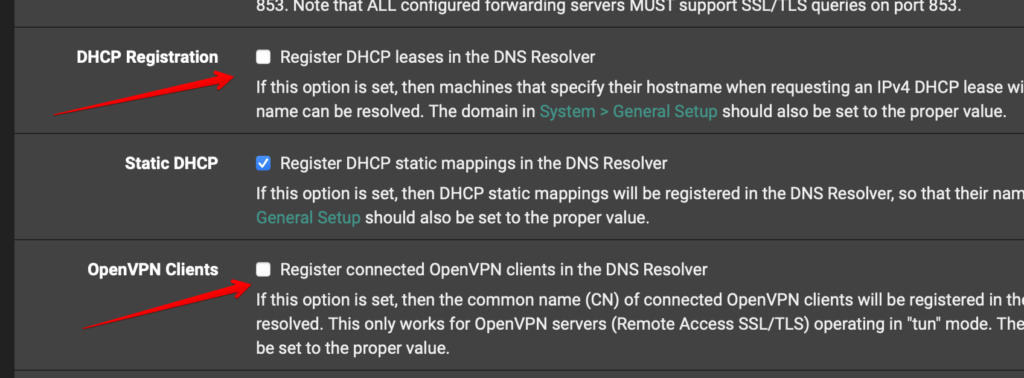
Before you start you should know that using the new python mode you to disable some setting in Unbound DNS Resolver (if you are using that in pfSense). Disable the following options in Unbound Resolver:
DHCP Registration: Register DHCP leases in the DNS Resolver
OpenVPN Clients: Register connected OpenVPN clients in the DNS Resolver
pfBlockerNG has some checks to make sure that the options above are disabled when you enable python mode but I would strongly advise to disable them before starting to configure pfBlockerNG.
Unbound Resolver options to disable for python mode
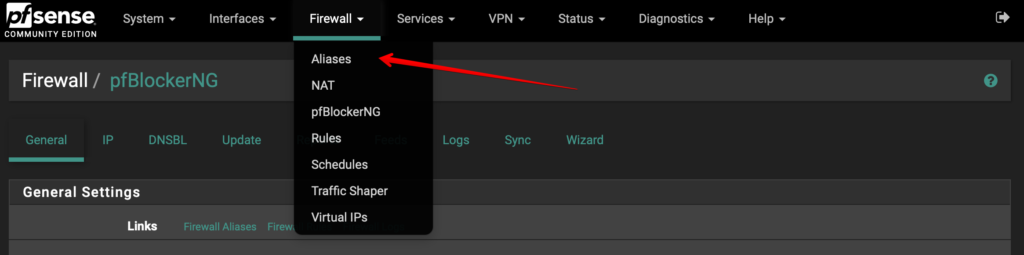
After you’ve installed you will find it in the menu Firewall -> pfBlockerNG:
Menu Firewall -> pfBlockerNG
When you open pfBlockerNG for the first time you will be presented with a wizard. I just skip this because I like to setup pfBlockerNG manually with my own settings. Let me share them with you 🙂
Configure IP settings
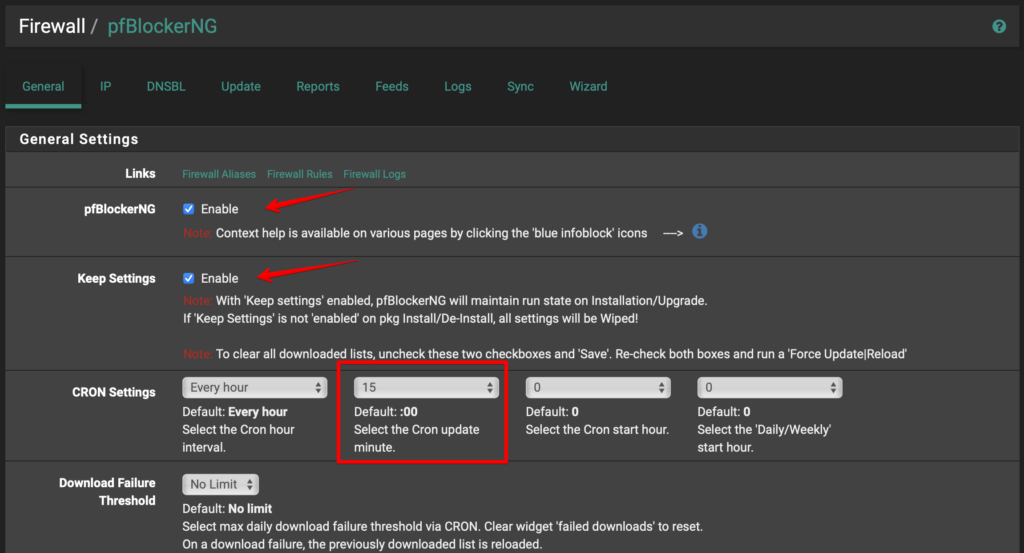
I will share my production configuration with you so I will blur out some things. Let’s start by the following settings. In the General tab I enable the checkboxes for pfBlockerNG and Keep Settings. The Keep Settings option wil make sure that your pfBlockerNG configuration stays in place when upgrading or when you make a backup of your pfSense configuration. I also change the cron update settings here just be spread the cronjobs load. You can leave this default and everything will just run fine :).
pfBlockerNG General Tab settings
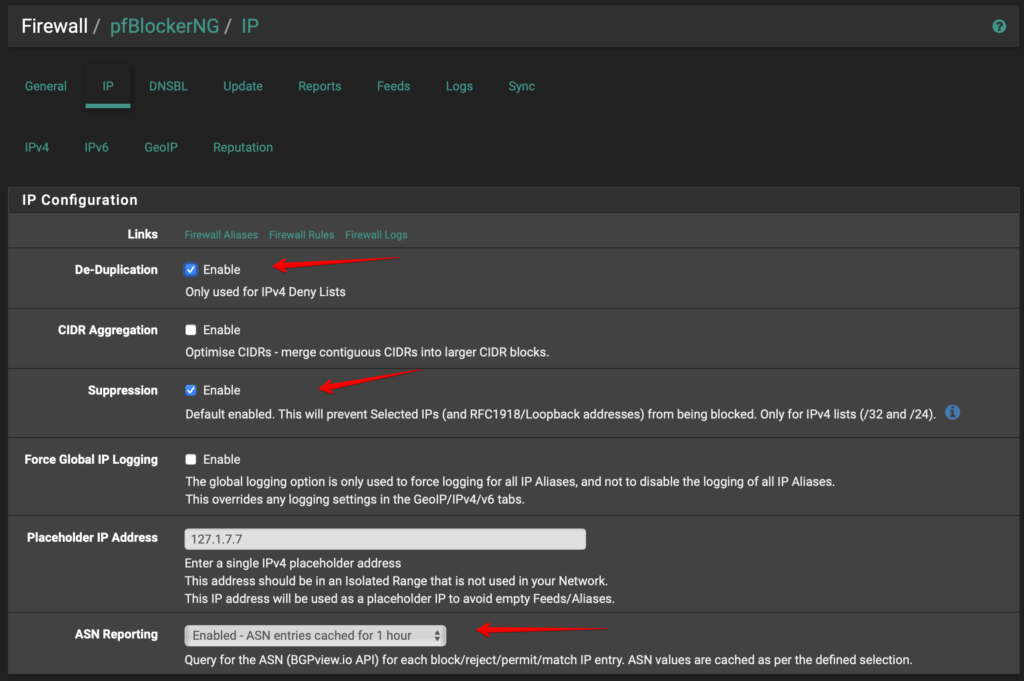
pfBlockerNG can be used for IP blocking (malicious IP’s) and DNSBL (DNS sinkhole). Let’s go over my settings for IP blocking. Go go the IP tab. The first section is IP Configuration. I pretty much the basic settings here. I have a couple of IP blocklists configured and the De-Duplication option will make sure that there are not duplicate IP’s in blocklist pfBlockerNG builds. Make sure that The Placeholder IP Address is not being used in your network. The default of 127.1.7.7 should be fine. Here are my settings:
pfBlockNG IP Configuration
Next is MaxMind GeoIP configuration. You need to register and get a valid license key and you can register here for free. I use MaxMind GeoIP to block certain countries. If you don’t host services behind your pfSense router (like a webserver) you probably don’t need the country blocking because pfSense will default block all inbound connections. Security is all about layers and having this option is another layer of security. Here are my settings:
pfBlockerNG MaxMind GeoIP configuration
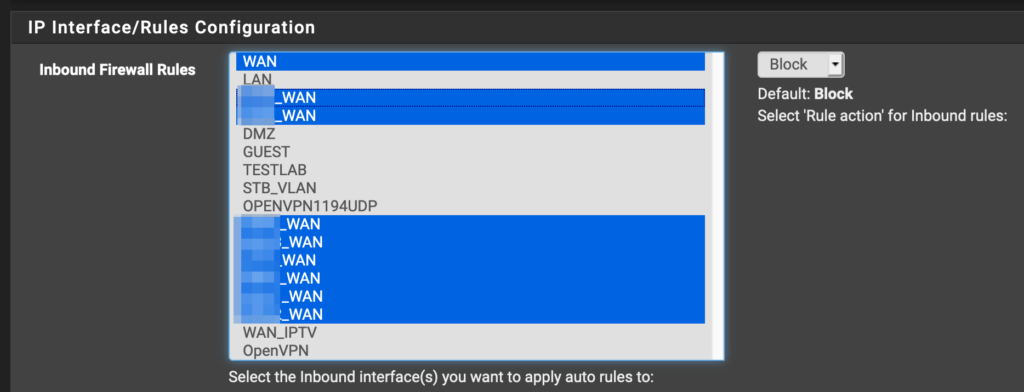
Next is Inbound Firewall Rules. These apply to any interface which is used to get internet traffic to you network. Here you select your WAN interface and if you have VPN client connections going to your VPN provider, select those here too. I use several VPN connections to VPN providers and those interface names end with _WAN. The screenshot below shows what I have selected here:
pfBlockerNG Inbound Firewall Rules
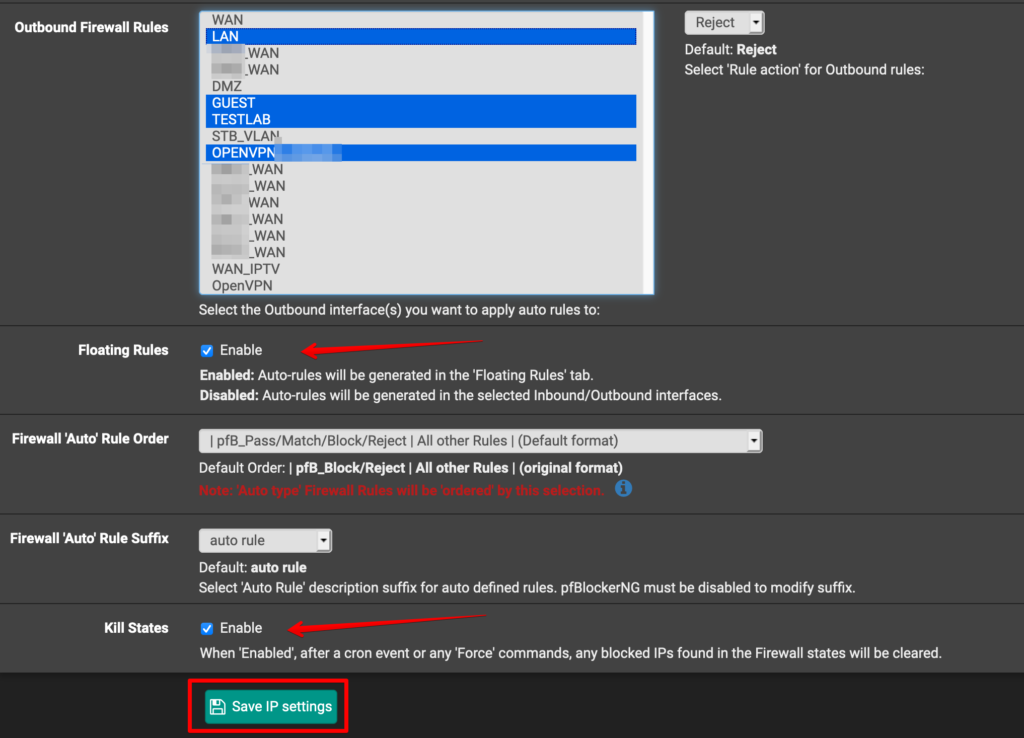
Next is Outbound Firewall Rules. These apply to any interface which you have on your local network. I have several local networks like a guest and a testlab network. I am running a OpenVPN server on pfSense and I treat that network also as a local network. Here are my settings:
pfBlockerNG Outbound Firewall Rules
I have also enabled the Floating Rules option because I like it that I can find all the firewall rules in one place. Kill States is enabled because IP blocklists are being updated several times a day and you want pfBlockerNG to kill any state to a blocked IP immediately. Don’t forget to hit the Save IP settings when you are done here.
Enable some IP feeds
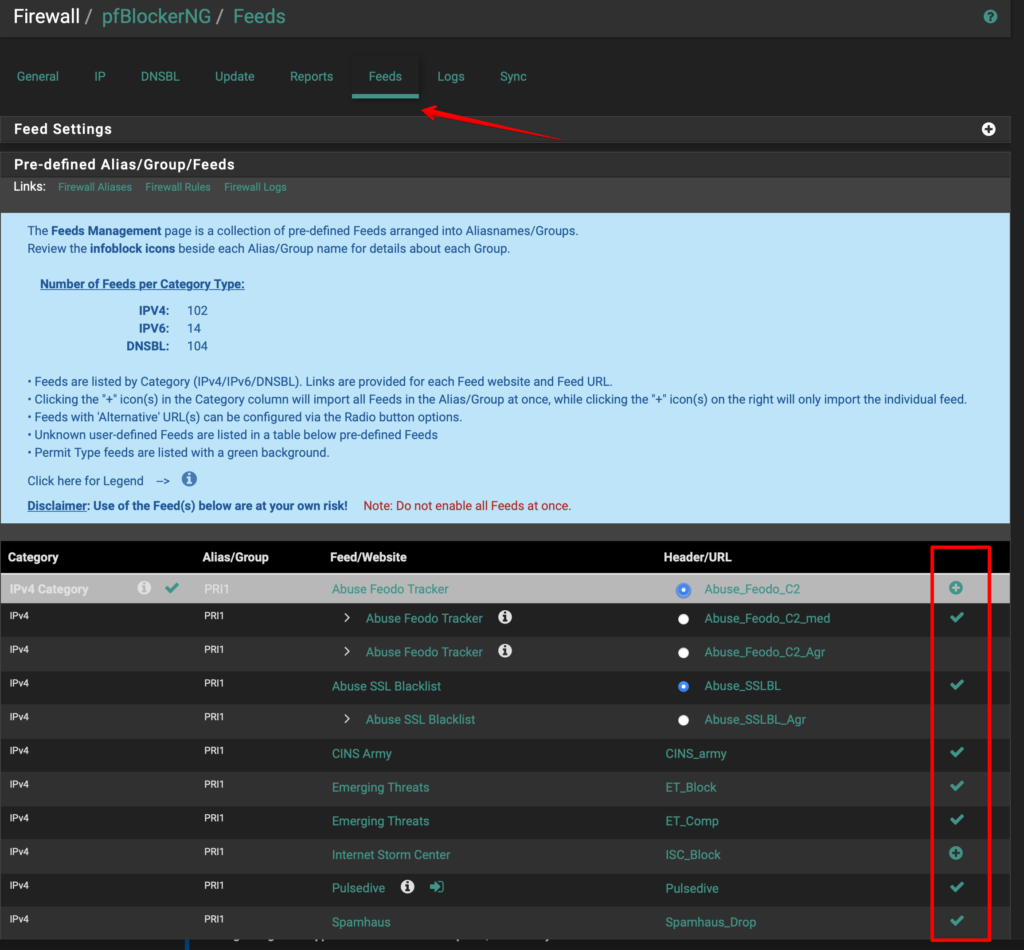
To let pfBlockerNG do block malicious IP’s you need to enable some IP feeds. pfBlockerNG has a nice selection of IP feeds you can enable. Go the Feeds tab and I would suggest to enable the PRI1 feed category and start from there. Remember the more feeds you enable the greater the chances are that you will break the internet :). Proceed with care is my advise and only enable extra feeds after doing extensive testing. This is not a set-and-forget approach! It’s more a set-test-monitor-forget approach. Check my screenshots here:
pfBlockerNG Feed Settings
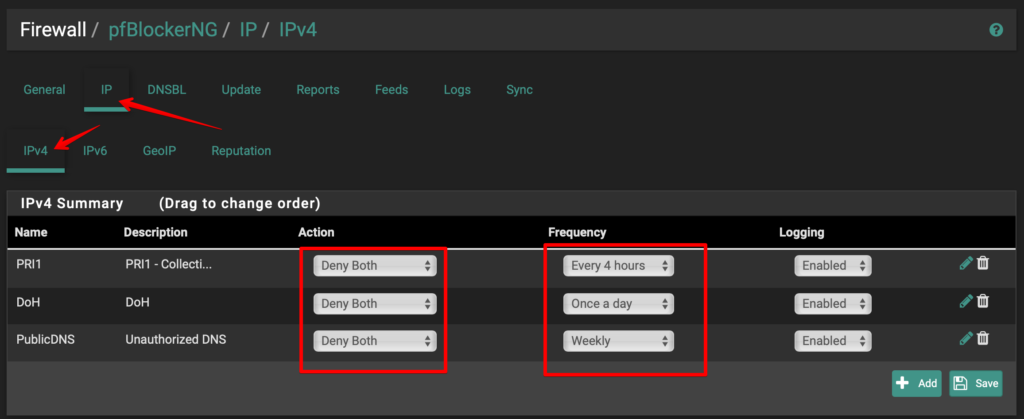
You just have to click on the + sign and pfBlockerNG will add the feeds. Afterwards you can find the feeds you enabled in the IP -> IPv4 tab. I have done some renaming and sorting here. Feel free to make you own adjustments. Here’s what mine looks like:
pfBlockerNG IP -> IPv4 Summary
I have changed the Action here to Deny Both. This means that pfBlockerNG will block incoming and outgoing communication to a blacklisted IP. I have also changes the Frequency of the updates. The PRI1 category is being updated a few time a day and I want pfBlockerNG to be on top of the changes so I chose to update it every 4 hours. The others in my list have more to do with Public DNS servers and DNS-over-HTTP. In my experience they don’t change that much. I want to make clear that I don’t use IPv6 in my network. I have disabled it in pfSense and blocking it in my Firewall rules. I don’t have need for it at the moment and I don’t want to complicate things.
GeoIP blocking
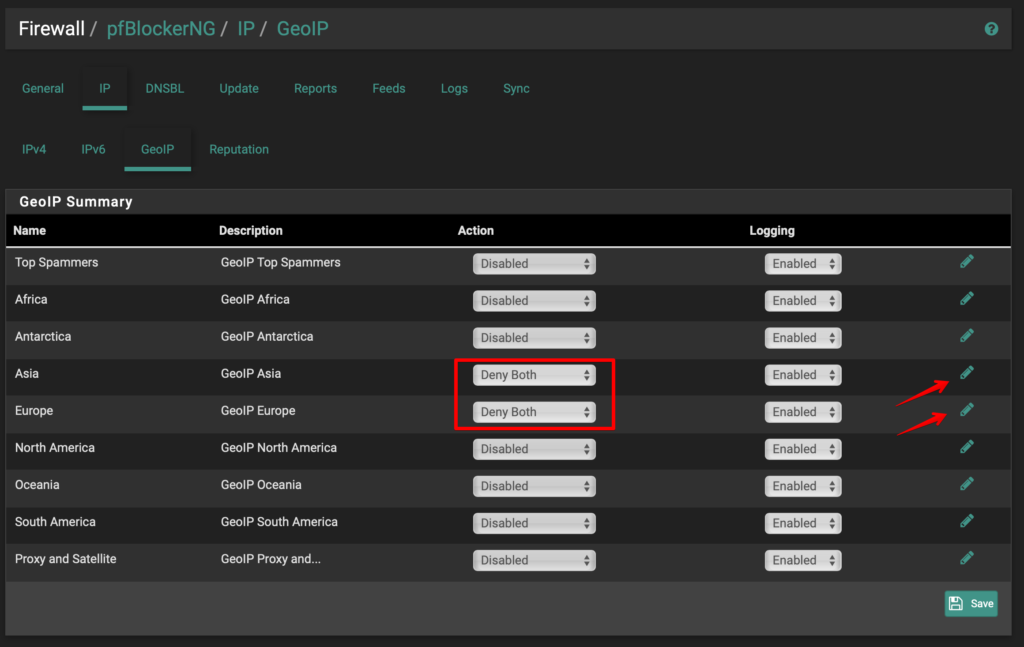
While you are in the IP -> IPv4 tab click on the GeoIP tab if you want to block specific geographical regions or separate countries.
pfBlockerNG IP -> GeoIP
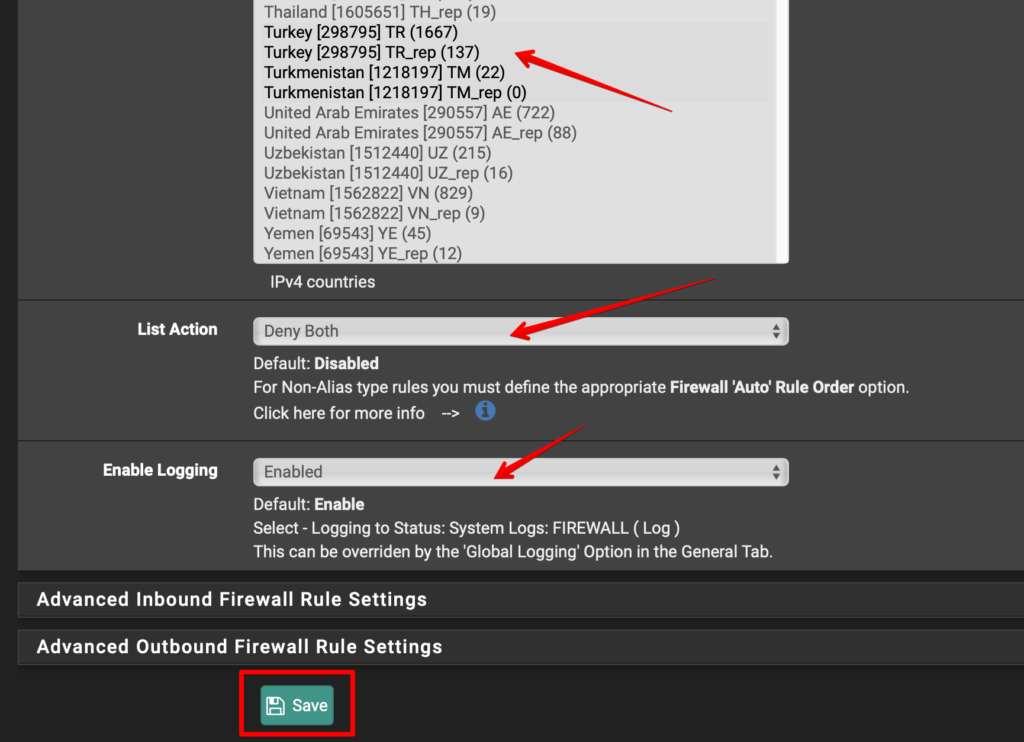
You will notice here that I have the Action set to Deny Both. But I don’t block the whole region. I block specific countries and you can choose which countries you want to block by clicking on the pencil icon. Then select the countries and enable List Action and Loggin and click on Save:
pfBlockerNG – GeoIP block specific countries
This is all I configure for the IP blocking part. Let’s move to the DNSBL part.
Configure DNSBL settings
I assume you know what DNSBL blocking does so I won’t go into the details here. It blocks malicious and/or unwanted adverts domains. Recently pfBlockgerNG got a huge update and DNSBL is now able to use python mode. This new python mode makes it a lot faster and also shows all the DNS requests which are being blocked! This is for me the major option to get rid of my Pihole setup. I want my pfSense doing everything in my network and adding pfBlockerNG to my setup gives me a single place to secure my network and keep ads and malicious traffic out of the door. You can read about all the changes in pfBlockerNG here.
To configure the DNSBL settings click on the DNSBL tab. There are a lot of options here and this can be overwhelming. These are the settings I have enabled or configured and I think this should give you a good starting point:
Enable DNSBL: checked (otherwise DNSBL will not be enabled :P)
DNSBL Mode: Unbound python mode. This is the major new option! We need this.
DNS Reply Logging: checked. This will show you all the DNS queries which are answered by Unbound.
DNSBL Blocking: checked. This option must be selected as soon as you choose Unbound python mode.
CNAME Validationchecked: This option to make sure that an ad domain cannot “bypass” DNSBL by using a different dns name.
pfBlockerNG – DNSBL options
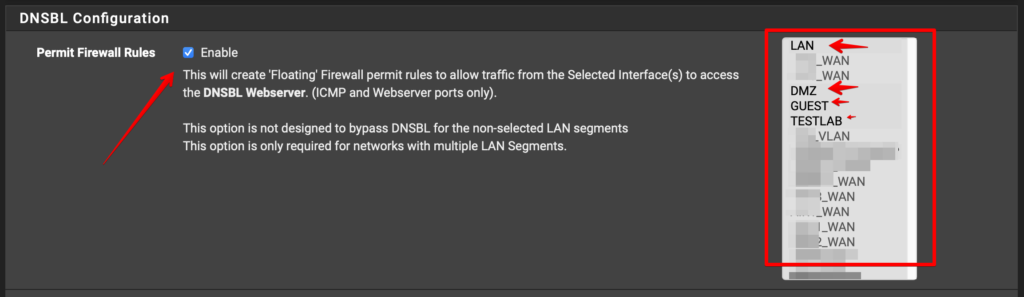
Scroll down to the DNSBL Configuration section and check Permit Firewall Rules. This will create rules in the Floating in your Firewall. I like having these in one place :). Also select all your internal networks here. This will enable pfBlockerNG for those networks. Here are my settings:
DNSBL Configuration – Permit Firewall Rules
As you can see I have several internal networks (LAN, Guest, DMZ, TestLAB) and I want pfBlockerNG to be enabled on all of those.
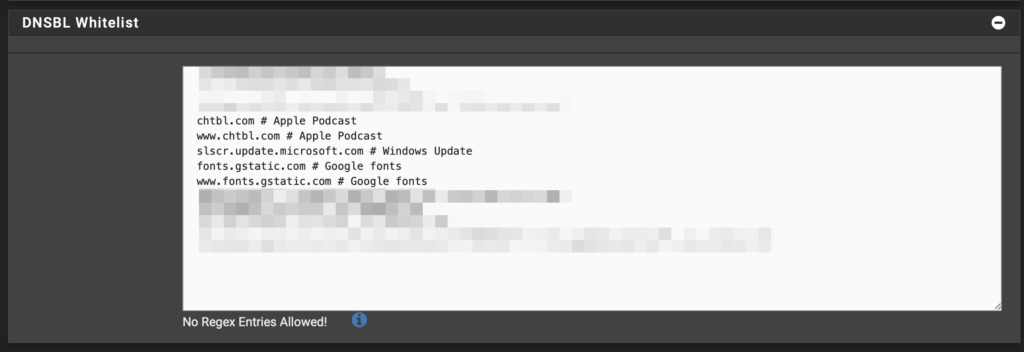
DNSBL Whitelist
Click on the + sign to open this section. In this section you can add domains you don’t want to be blocked. Like when you have a lot of Apple devices in your network you want to whitelist *.apple.com. Adding domains in the whitelist makes sure that even when these domains are in some DNSBL feed you have enabled (see next section) they will still be allowed (whitelisted) by pfBlockerNG. You can add domains here manually or using the Reports tab in pfBlockerNG. In the screenshot below you can see some examples I have added to my whitelist:
pfBlockerNG – DNSBL whitelist
Those are all the options I have set for DNSBL. Scroll to the bottom of this page and click on Save DNSBL settings.
Enable some DNSBL feeds
Now go to the Feeds tab and scroll down to the DNSBL category. Here you can enable different DNSBL feeds by clicking on the + sign:
DNSBL category – Enable feeds
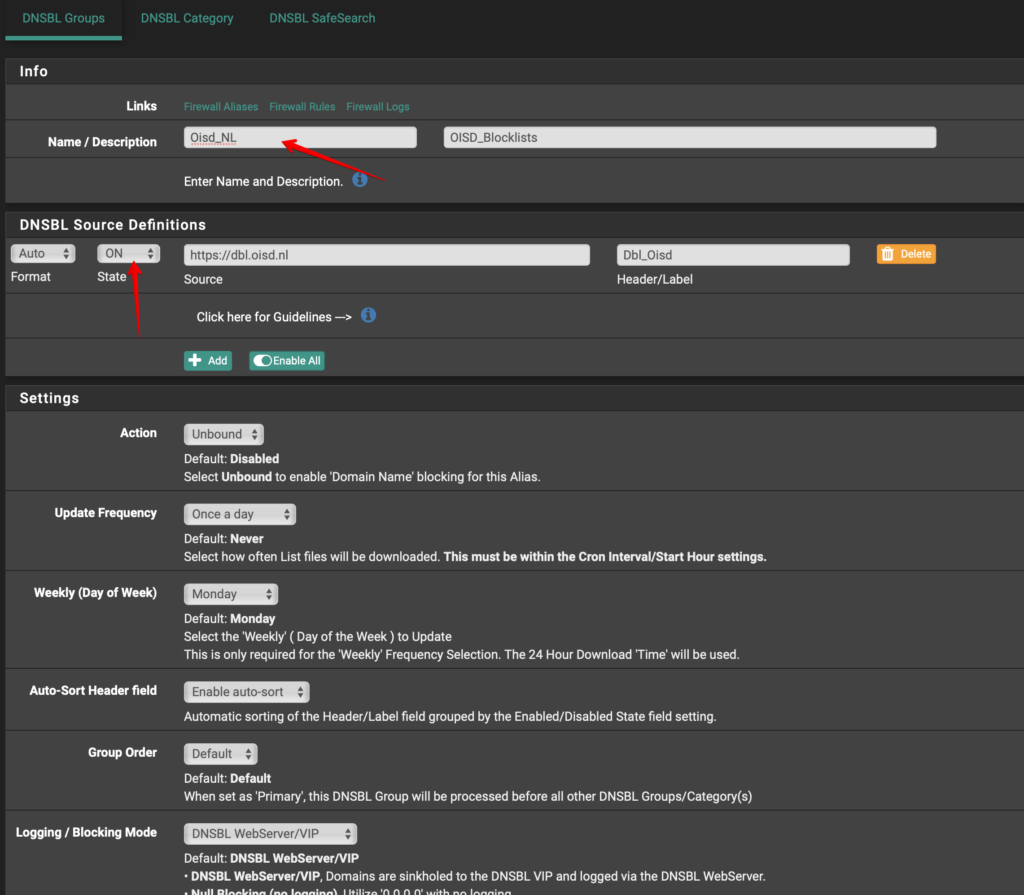
I want to remind you again that the more feeds you enable the bigger the chance is that you will break the internet for users on your network :). And you will find that for some services to work you will have to whitelist certain domain names like I explained above. The feeds you enable are listed in the DNSBL Groups section. Here you can review what feeds you have enabled or disable and remove an enabled feed.
pfBlockerNG – DNSBL Groups
By clicking on the pencil icon and the end of the line you can edit those specific groups. The names of the groups will be different for you, I just renamed them for my ease:
pfBlockerNG – Enable or disable individual feeds
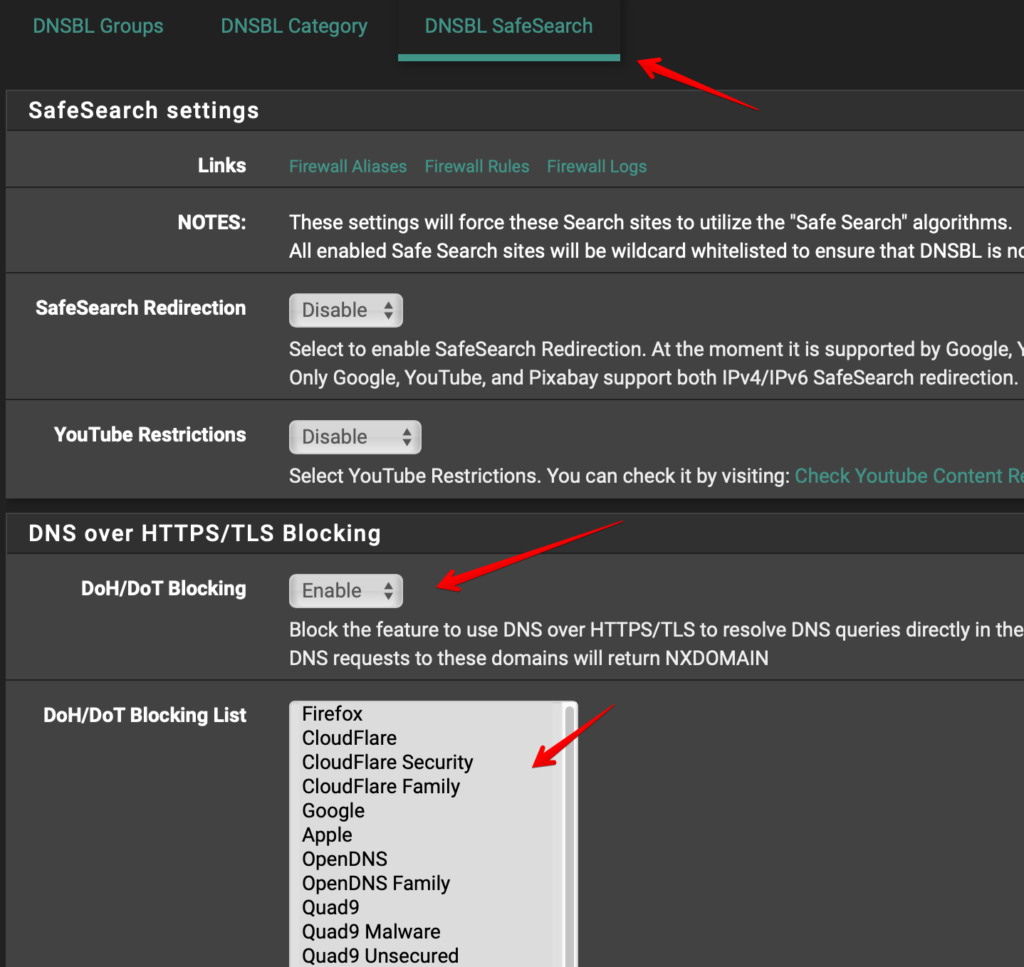
DNS over HTTPS/TLS Blocking
This version of pfBlockerNG also has a very extensive list with known public DNS servers who are supporting DNS over HTTPS. DNS over HTTPS is a serious privacy and security risk so you want to enable this because you don’t want devices in your network using these DNS servers and bypassing pfBlockerNG’s adblocking and pfSense’s DNS server. Go to the DNSBL SafeSearch and enable DoH/DoT Blocking. Then select all the DNS servers from the list you want to block and click on Safe:
pfBlockerNG – DNS over HTTPS/TLS Blocking
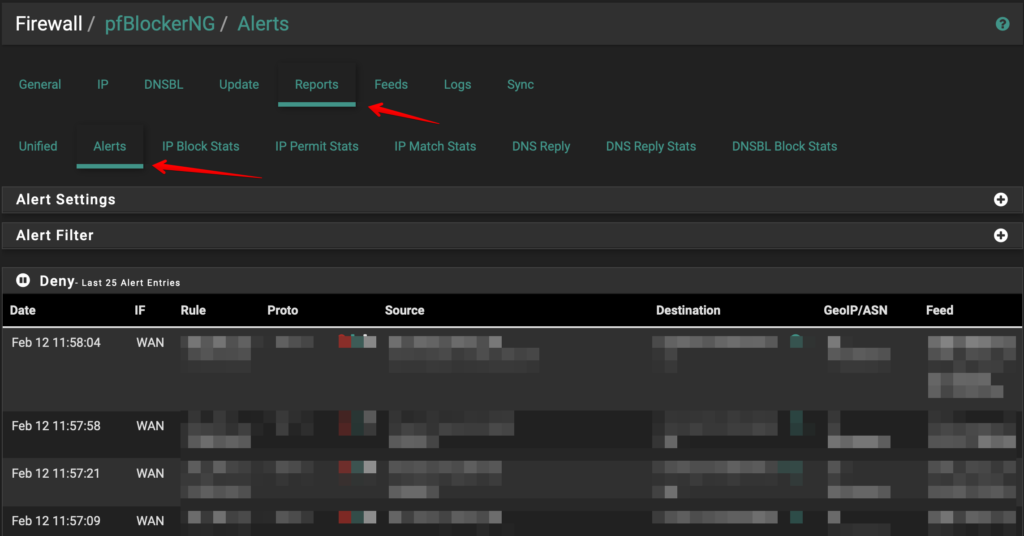
The Reports tab in pfBlockerNG
The Reports tab is very important. It will give you an overview of what IP’s or DNS names are blocked by pfBlockerNG. It will also tell you the source device of the DNS or IP request thus making troubleshooting easy. Here you can investigate if pfBlockerNG is the reason why a certain app or website is not working properly for devices on you network:
pfBlockerNG – Reports tab blocked IP overview
The fist section shows you the IP’s being blocked and the section below that will show you DNS requests being blocked. Whitelisting an IP or DNS is simply a matter of clicking on the + sign before the DNS name or IP:
pfBlockerNG – Reports tab blocked DNS overview
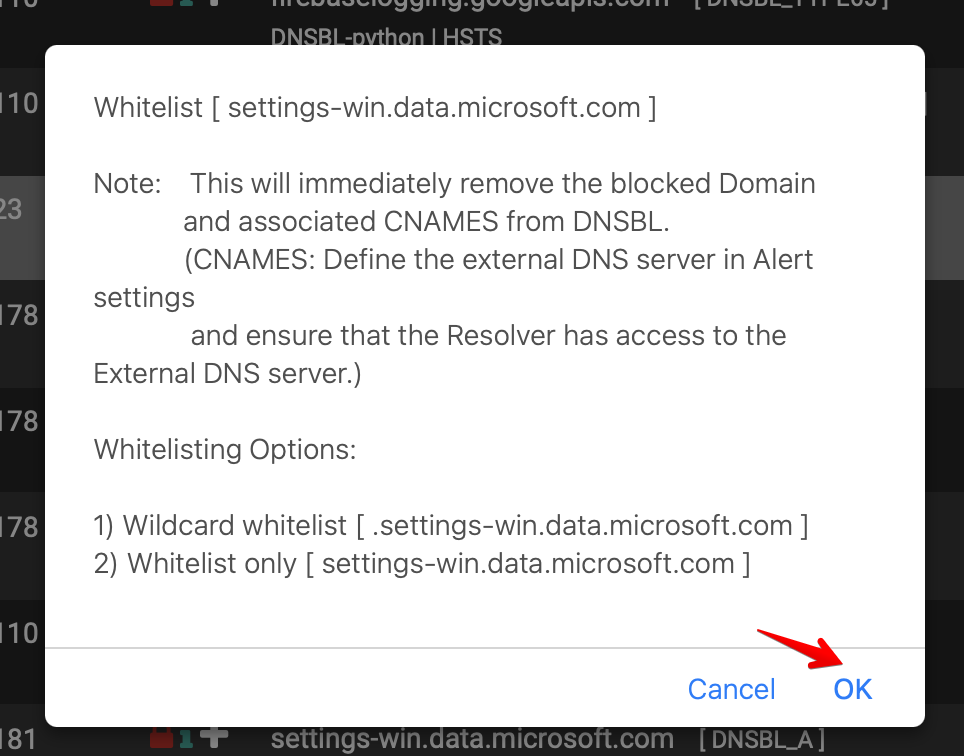
When you click on the + sign pfBlockerNG will ask you if you know for sure you want to whitelist this domain. Click OK:
pfBlockerNG – whitelisting DNS example
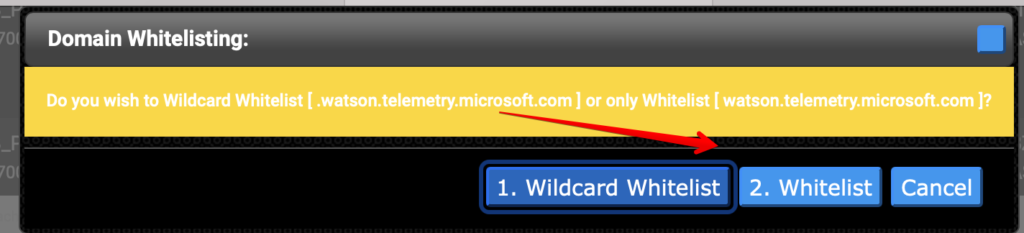
Then it will ask you if you want to whitelist this domain only or add a wildcard for the domain:
pfBlockerNG – Wildcard whitelisting
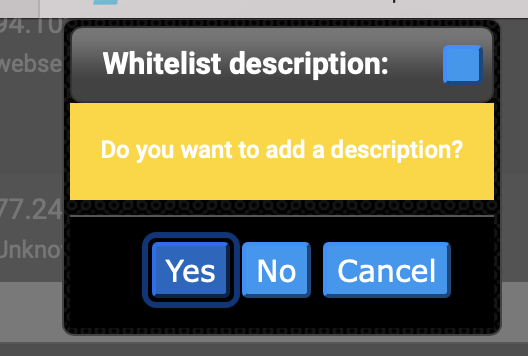
After that you will have the option to add a description. If you don’t want a description just click on No and that’s it. The pfBlockerNG will no longer block that domain:
pfBlockerNG – Whitelist description
If you want to review the domains you have whitelisted you can just review them in the DNSBL Whitelist section in the DNSBL tab like I explained above.
With the settings and configuration options explained in this blog you should be off to a great start in keeping those ads, trackers and malicious websites out of your network. This is all you need to setup pfBlockerNG python mode with pfSense. pfBlockerNG has a lot more options but I don’t think you need all the features to be safe. The Reports tab is your friend for troubleshooting. Thank you for reading and good luck!
In this post I will show you how to properly configure ProtonMail Bridge SMTP config with Apple Mail on macOS Big Sur. Online privacy is something I am very concerned with and that’s why it was a logical move for me to switch to ProtonMail. You can argue why not self host? Well for my personal situation I think setting up and maintaining a mailserver is just not worth my time. I am happy to pay ProtonMail and have my mind at ease.
If you found this post you most likely already know what ProtonMail Bridge is. Let me quote them because it basically explains it all:
ProtonMail Bridge is an application available to all paid users that enables the integration of your ProtonMail account with popular email clients, such as Microsoft Outlook, Mozilla Thunderbird, or Apple Mail. Bridge runs in the background by seamlessly encrypting and decrypting messages as they enter and leave your computer. The app is compatible with most email clients supporting IMAP and SMTP protocols.
The situation at hand
I must say I love their webmail solution but I still prefer using a dedicated mail app on my MacBook. Since I am on macOS I use Apple Mail because I fulfils my every need for a simple straight-forward mail client. I am hoping that they eventually develop a dedicated app for macOS just like the app on iOS (I hope you read this ProtonMail :)). Anyway, after installing the ProtonMail Bridge app I followed their manuals for setting up Apple Mail. You can find their manuals here. Basically ProtonMail Bridge creates a profile which you have to accept and install. This profile then automatically configures Apple Mail. Great!
To make sure that everything works I rebooted my MacBook before starting Apple Mail. Immediately my ProtonMail mails and folders started to show up in Apple Mail. Very nice! Then I wanted to test if I could send emails from Apple Mail but I just got an error that there was no SMTP server configured….what now?
Manual setup SMTP server settings
So it turns out that the profile which is created with the ProtonMail Bridge app on your MacBook does not install a SMTP server configuration for Apple Mail. I then went to the website of ProtonMail to check their knowledge base. I did not find any articles there on how to setup a manual configuration on Apple Mail. They do have a article which you can use here but no SMTP configuration in there.
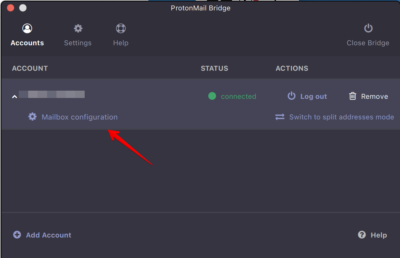
BUT if you open up ProtonMail bridge and click on your account you will see a Mailbox configuration option:
ProtonMail Bridge main window
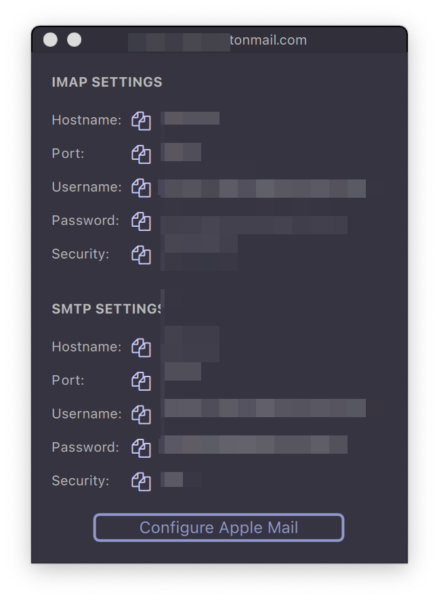
Click on Mailbox configuration to reveal the SMTP information required for Apple Mail:
ProtonMail Bridge Mailbox Configuration window
What is this error?
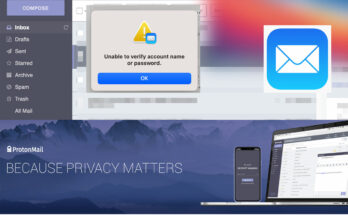
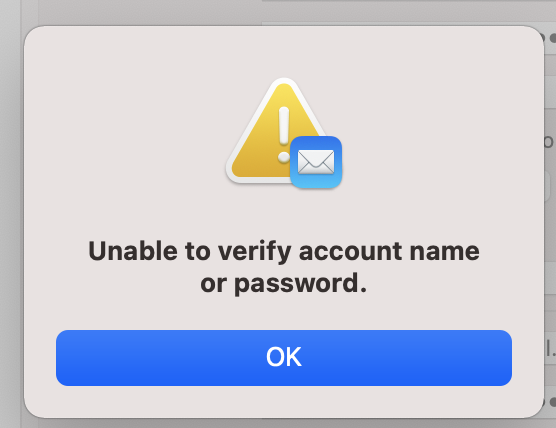
So if you just get the information from the window as described above and enter it in Apple Mail you will get the following error “Unable to verify account name or password.”:
Apple Mail SMTP server error with ProtonMail Bridge
This happens because ProtonMail bridge creates a local SMTP server with default settings for ProtonMail. These defaults are:
Hostname 127.0.0.1
SMTP port 1025
Username <generated during account setup>
Password <generated during account setup>
Security STARTTLS
Manually entering this information in Apple Mail did not work and just shows the error you see in the image above: Unable to verify account name or password.
Proper setup for SMTP in ProtonMail Bridge
I did try reinstall of the profile and also reboot. This does not work. Also when I reboot my MacBook I get an error from ProtonMail Bridge telling me port 1025 is in use. Clearly this is not a working setup.
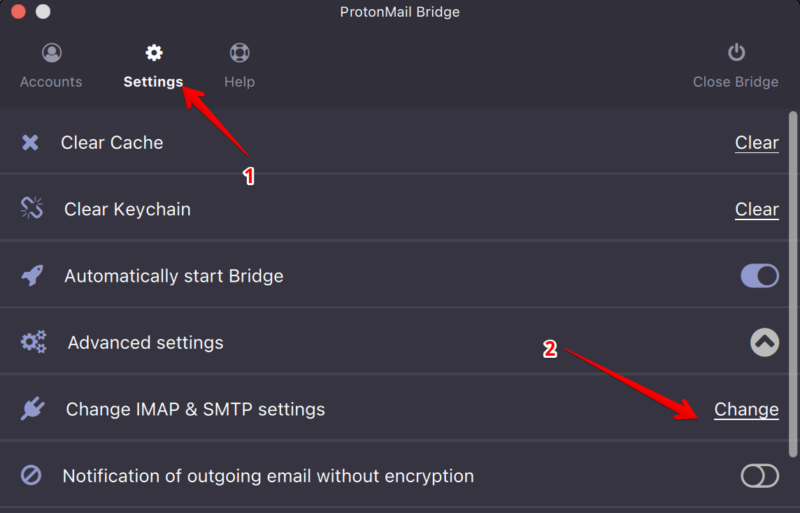
Then the troubleshooting started and I found out what configuration will work! Open the ProtonMail Bridge and click on Settings. Then click on Change IMAP & SMTP settings:
ProtonMail Bridge change server settings
Change the following things:
SMTP port: change this to 2025
SMTP connection mode: change this to SSL
Click on Okay.
ProtonMail Bridge change server and SSL
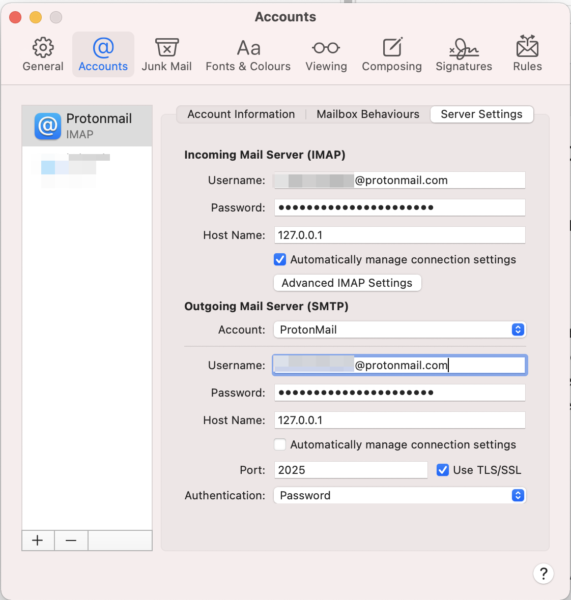
After changing these settings it is very important to reboot you MacBook. I found that only restarting the ProtonMail Bridge app is not enough.
Proper setup for ProtonMail SMTP server in Apple Mail
Now that your Mac is rebooted is time to setup SMTP with the new settings in Apple Mail.
Open Apple Mail and then go to Preferences. The go to the Accounts Tab. In the left column select your ProtonMail account and then click on the Server Settings tab.
In the Server Settings tab you need to enter the following information in the Outgoing Mail Server (SMTP):
Account: select your ProtonMail account
Username: <yourProtonUserName>
Password: this is the password shown in ProtonMail Bridge Mailbox configuration window
Proper SMTP settings for ProtonMail in Apple Mail on macOS Big Sur
With the settings above and the adjustments in ProtonMail Bridge app you should now be able to send mails using ProtonMail in Apple Mail! ProtonMail is already amazing and with this little addition I hope you can enjoy it much more :). This is everything you need to setup ProtonMail Bridge SMTP config with Apple Mail on macOS Big Sur.
I’m a big fan of Pi-hole and have been using it to get rid of advertisement and tracking. Check my blogpost here if you want to know how to set Pi-hole up. It’s an amazing piece of software to protect your online privacy and provide network wide ad-blocking. In my day job I’m an IT-consultant for enterprise IT-solutions and in this post I will show you how to use Pi-hole with Microsoft Active Directory and protect all your domain joined clients from advertisement, tracking and also keep your clients secure from those malware websites.
Of course, you need to test this extensively before rolling it out in your infrastructure. I cannot stress this enough. The solution described in this blogpost did not show any kind of strange unexpected behaviour in my testlab but every infrastructure is different. Especially with endusers and applications there may be some challenges. So test before you implement!
Requirements
Microsoft Active Directory depends on Active Directory-Integrated DNS Service and Active Directory-Integrated DHCP Service. In this scenario all your domain joined clients are getting their IP-addresses and DNS settings from the Microsoft DHCP server. The DNS settings is used by the domain joined clients to talk to the Active Directory for DNS lookups and Active Directory related tasks. My testlab is running on Windows Server 2019 Active Directory and DNS Service, but this should also work if you are running a Windows Server 2016 environment. The requirement list is:
Microsoft Windows Server 2019
Microsoft Active Directory 2019
Microsoft Active Directory-Integrated DNS 2019
Microsoft Active Directory-Integrated DHCP Server 2019
Pi-hole Server
Domain joined client(s)
Let’s get started
They key Pi-hole feature we will be using in order to get this working is called Conditional Forwarding. I will explain in this post later on how we will use this feature.
DHCP Server settings
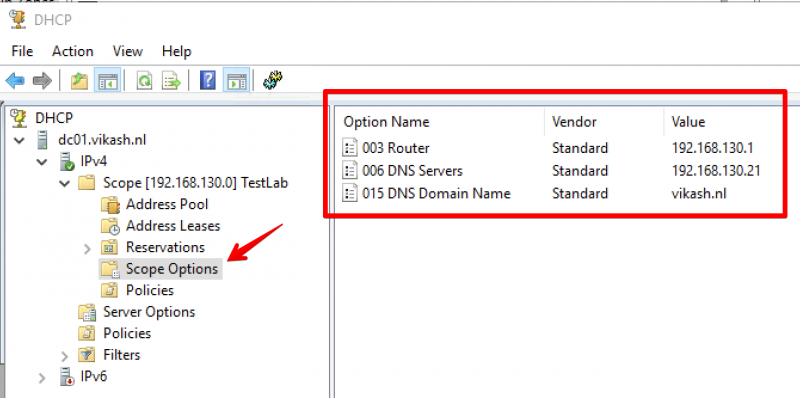
My DHCP Server is running on my Active Directory Domain controller. I’m sure a lot of you have the same setup which is fine. In the DHCP Server we have to specify certain options like DNS Servers and DNS Domain Name. My DHCP server is running on IP-address 192.168.130.10. My DNS Domain Name is vikash.nl. For DNS Servers fill in the IP-address of your Pi-hole Server. My Pi-hole server is running on IP-address 192.168.100.21.
On your DHCP server open the management console for DHCP Server and expand the scope options. Make sure the values match your network infrastructure:
Pi-hole Server settings
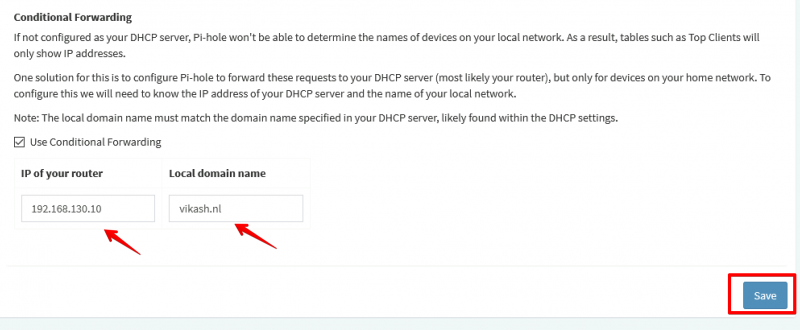
Now I will show you how to use Pi-hole with Microsoft Active Directory. The idea here is provide the Pi-hole Server as the DNS server to your domain joined clients. Then in the Pi-hole Server settings we will enable the option called Conditional Forwarding. Here we have to enter the IP-address of our Active Directory-Integrated DHCP server and also a Local Domain Name. This local domain name has to be your Active Directory name. In my case that is vikash.nl. What will happen now is that if the Pi-hole gets DNS requests from clients that need to resolve something.vikash.nl it will forward that request to our DHCP server which is also our Active Directory Domain controller. This makes sure that all the Active Directory related communications between my domain joined clients and Active Directory are completed successfully.
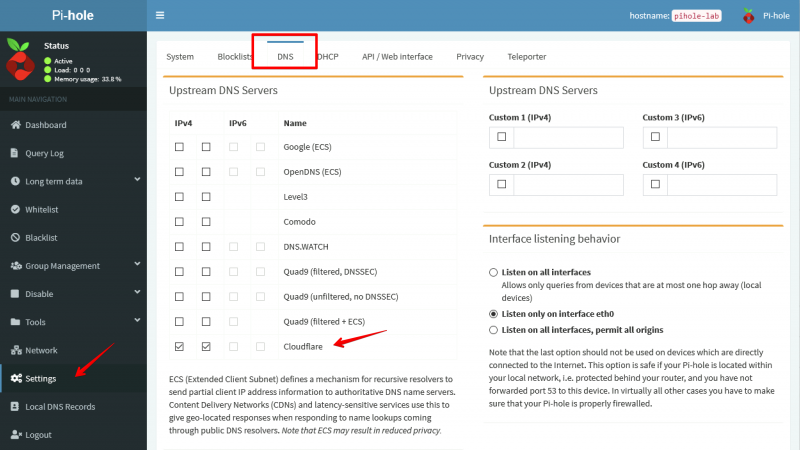
On the Pi-hole server go to Settings and select the DNS tab:
As you can see in the screenshot above I am using Cloudflare DNS Servers as my Upstream DNS. You can use any DNS Server as your upstream DNS. This basically means that for all DNS requests not related to vikash.nl the Pi-hole server will resolve those using Cloudflare. That is exactly what we want because it will make sure that internet is still working for all our domain joined clients. At the same time we will be able to see all the DNS requests in the Pi-hole Server Query Log for every client. This gives us control to protect our domain joined clients from ads, tracking or even malware.
In the DNS tab scroll to the bottom of the page and enter the DHCP server IP-address and the Local Domain Name. My DHCP server is 192.168.130.10 and my Local Domain Name is vikash.nl. Check your network infrastructure for your specific settings and click Save:
Testing
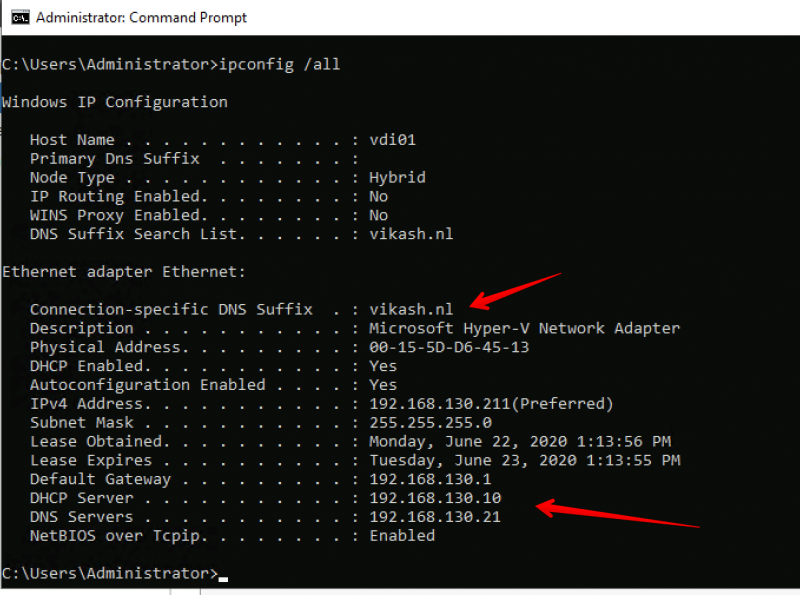
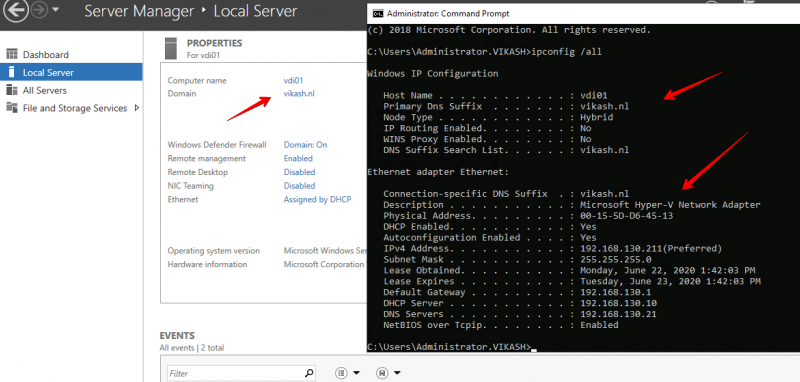
Now let’s make sure that everything works. First we will check that the correct DHCP settings are distributed to a client we want to join to the domain vikash.nl. I will use a Windows Server 2019 as client with the name vdi01.
Check IP-address
Open up a command prompt on the machine and make sure that the client is getting the correct settings from the DHCP server:
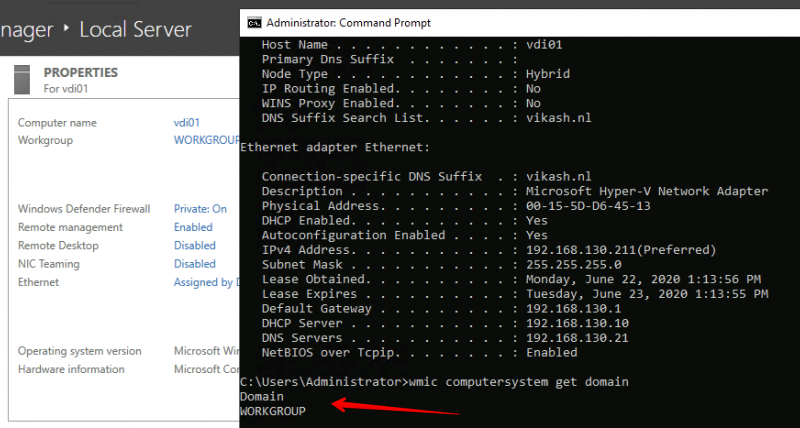
As you can see in the screenshot above the client is getting the DNS Domain Name and the DNS Server settings according to our scope options in the DHCP server. Check that the client is not already domain joined:
Join the client to the domain
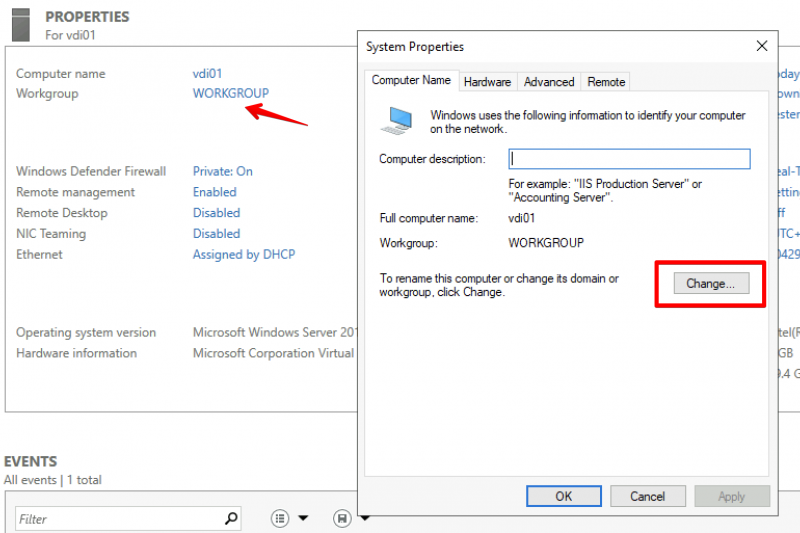
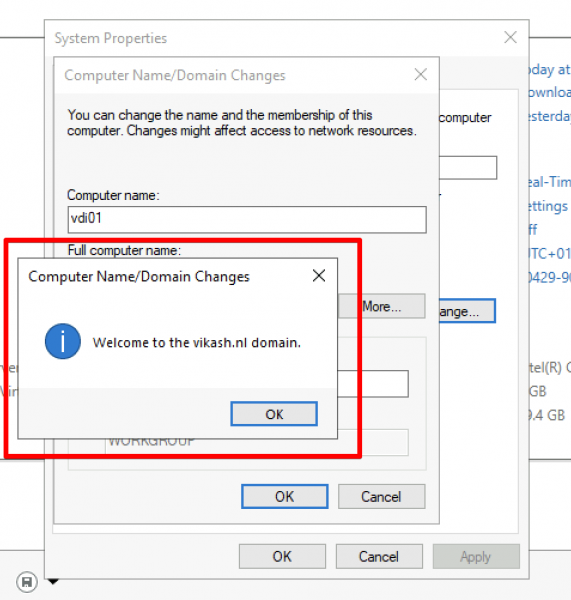
Next step is to join the client (my vdi01) to my domain vikash.nl. Click in the Server Manager on WORKGROUP and then click on Change in the window that pops up:
Select the Domain option here and enter your domain name. Remember that this must be the same as DNS Domain Name entered in the DHCP Scope options and in the Conditional Forwarding on the Pi-hole. In my case this is vikash.nl. Then click on OK.
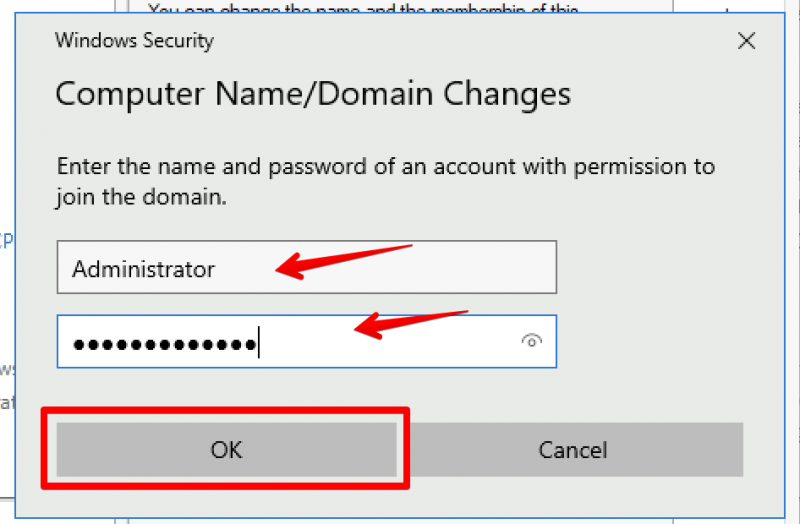
Windows will prompt you to enter Domain credentials which are allowed to do a domain join. In my testlab I use the domain administrator account for that. Enter the credentials and click on OK:
You will get a prompt from Windows telling you that the domain join was completed successfully. It looks like everything is working :). Click on OK and reboot you client.
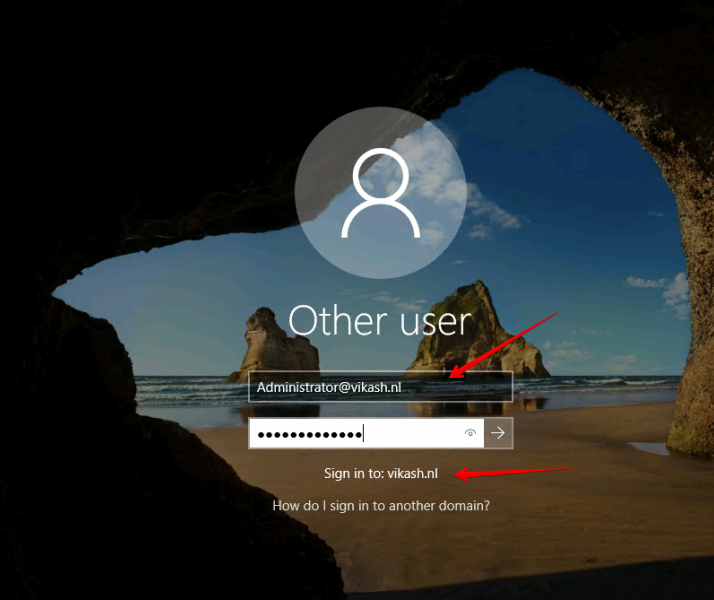
After the client reboots login using a domain account:
Check that everything is ok and the client is a member of the domain:
Check Pi-hole Query Log
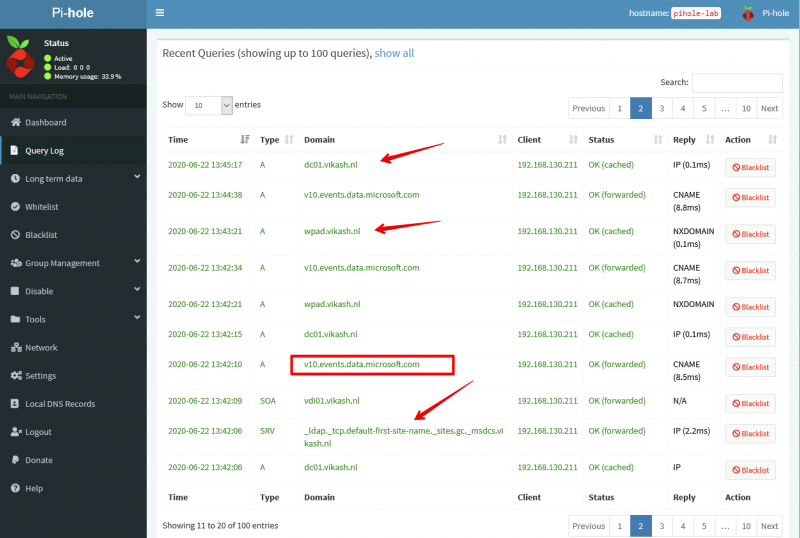
We can see the magic happening when we check the Query Log on our Pi-hole Server. Open the admin page of Pi-hole server and select the Query Log in the left menu:
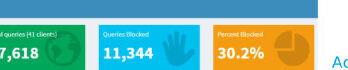
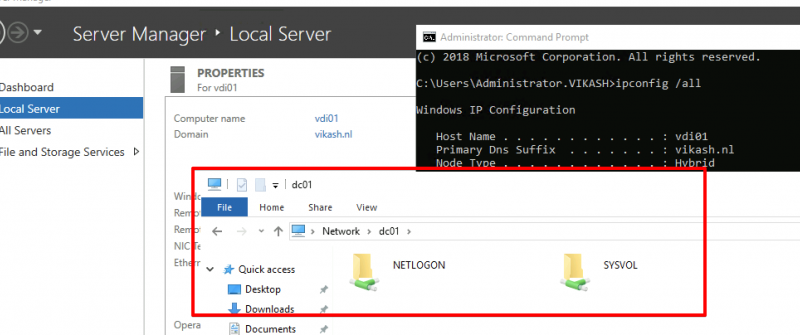
As you can see in the screenshot above my client with IP-address 192.168.130.211 (vdi01.vikash.nl) is able to resolve internet queries as wel as queries related to my domain vikash.nl. Filesharing is working fine as well:
How amazing is this?! We are using Pi-hole with Microsoft Active Directory infrastructure and that means that we can now benefit from the protection of Pi-hole on enterprise level :). Of course this test is limited but imagine the possibilities. You can now provide all your endusers with a ad-free and tracking free internet experience but still be in control if some specific website needs to be unblocked.
This website uses cookies to improve your experience. We'll assume you're ok with this, but you can opt-out if you wish.AcceptRejectRead More
Privacy & Cookies Policy
Privacy Overview
This website uses cookies to improve your experience while you navigate through the website. Out of these, the cookies that are categorized as necessary are stored on your browser as they are essential for the working of basic functionalities of the website. We also use third-party cookies that help us analyze and understand how you use this website. These cookies will be stored in your browser only with your consent. You also have the option to opt-out of these cookies. But opting out of some of these cookies may affect your browsing experience.
Necessary cookies are absolutely essential for the website to function properly. This category only includes cookies that ensures basic functionalities and security features of the website. These cookies do not store any personal information.
Any cookies that may not be particularly necessary for the website to function and is used specifically to collect user personal data via analytics, ads, other embedded contents are termed as non-necessary cookies. It is mandatory to procure user consent prior to running these cookies on your website.