
Table of Contents
In this blog post I will show you how to setup pfBlockerNG python mode with pfsense. Nearly a year ago I made a blog post here explaining why I was moving away from pfBlockerNG to Pihole. The main reason was that pfBlockerNG could not show all the blocked DNS requests. This made is difficult to troubleshoot why some app or (iot) device was not working properly. Read my blog post here for all the details.
In recent times, the developer of pfBlockerNG, BBcan177, has given a major update to pfBlockerNG. With the integration of python into pfBlockerNG, it is now possible to show all DNS requests that are blocked. I’ve always loved the combination pfSense and pfBlockerNG. I think it is a great setup for protecting your network and keeping all the ads and tracking away, making a beter and safer internet for all the users on your network (kumbaya-mode). Plus you only need one device for routing and adblocking.
Requirements
For this blogpost I used the following versions:
- pfSense ce 2.4.5-RELEASE-p1
- pfBlockerNG-devel 3.0.0_10
Install pfBlockerNG package
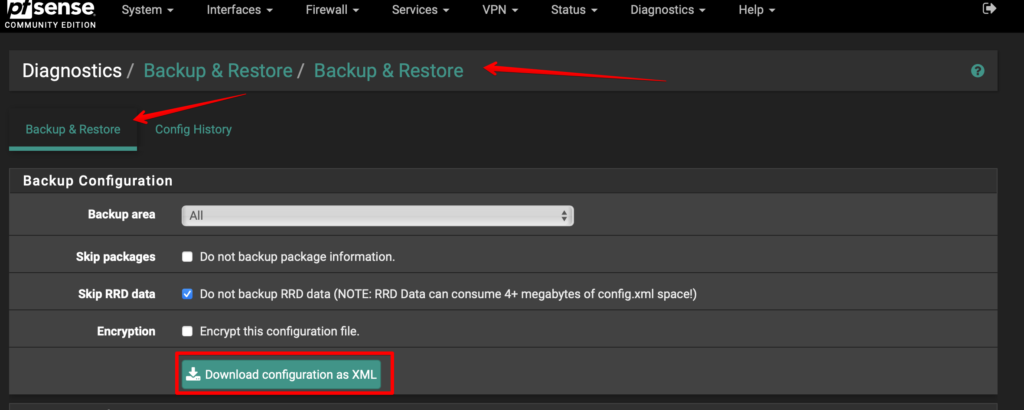
Before you start with configuring pfBlockerNG make sure you pfSense firewall runs fine and internet is working as expected for all the devices on your network. If this is the case then continue to make a backup of this running setup. Always a good idea of having a backup before making changes. To do this go to Backup -> Backup & Restore. Click on Download configuration as XML. Safe this file in a secure place.
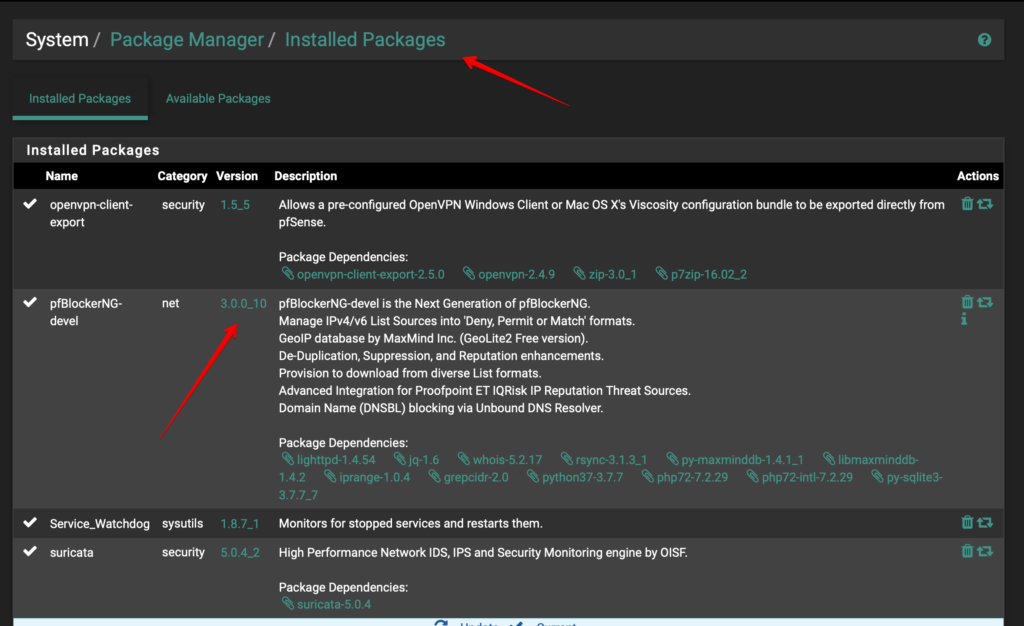
Then go to System -> Package Manager -> Available Packages. Search for pfBlockerNG. This part is very important. You need to install pfBlockerNG-devel package. Click on the green Install button behind pfBlockerNG-devel to install the package. After installing the package it should be in the list of Installed Packages:
Configuring pfBlockerNG-devel
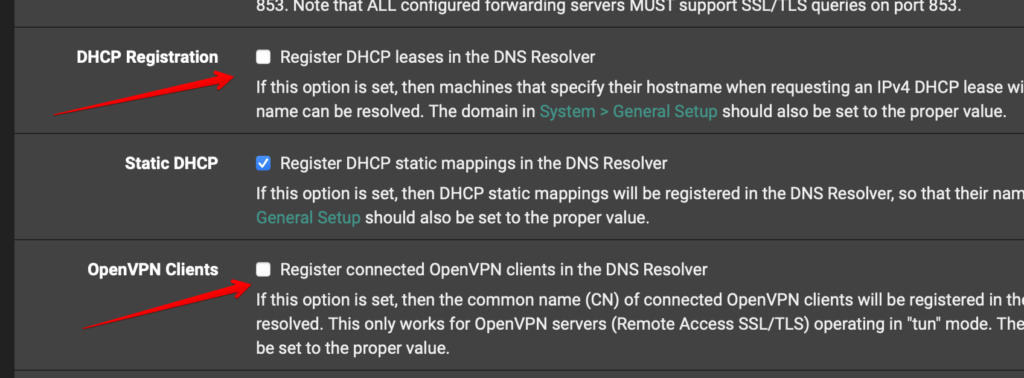
Before you start you should know that using the new python mode you to disable some setting in Unbound DNS Resolver (if you are using that in pfSense). Disable the following options in Unbound Resolver:
- DHCP Registration: Register DHCP leases in the DNS Resolver
- OpenVPN Clients: Register connected OpenVPN clients in the DNS Resolver
pfBlockerNG has some checks to make sure that the options above are disabled when you enable python mode but I would strongly advise to disable them before starting to configure pfBlockerNG.
After you’ve installed you will find it in the menu Firewall -> pfBlockerNG:
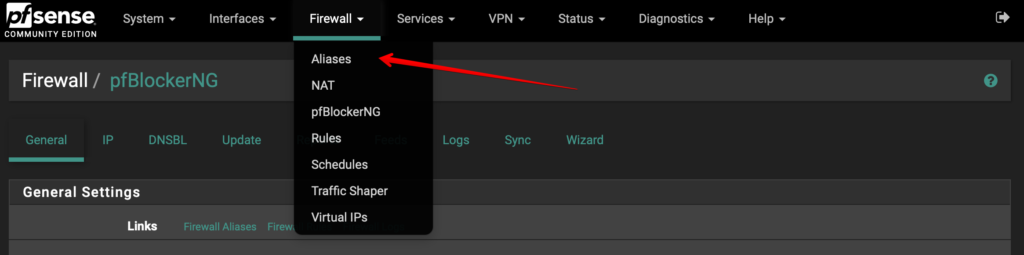
When you open pfBlockerNG for the first time you will be presented with a wizard. I just skip this because I like to setup pfBlockerNG manually with my own settings. Let me share them with you 🙂
Configure IP settings
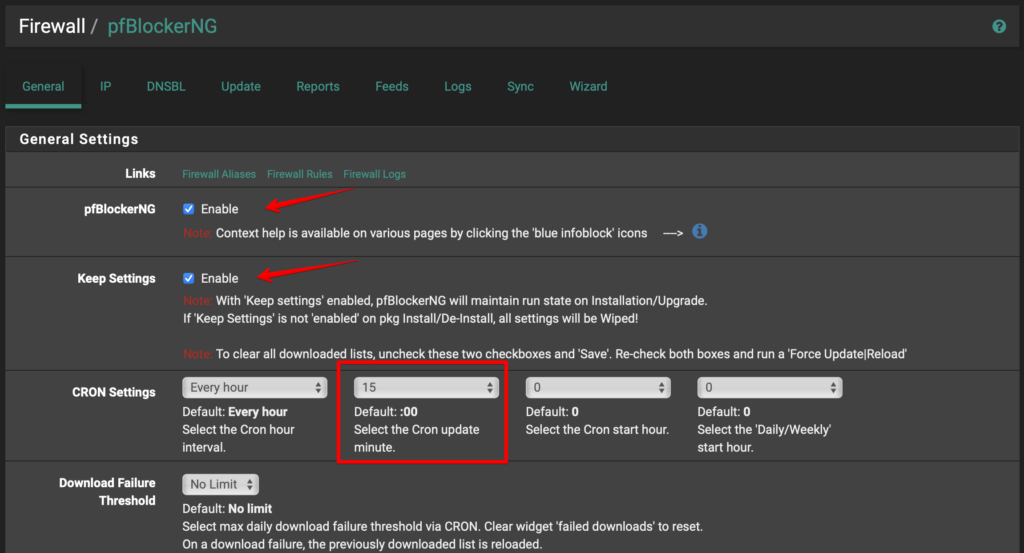
I will share my production configuration with you so I will blur out some things. Let’s start by the following settings. In the General tab I enable the checkboxes for pfBlockerNG and Keep Settings. The Keep Settings option wil make sure that your pfBlockerNG configuration stays in place when upgrading or when you make a backup of your pfSense configuration. I also change the cron update settings here just be spread the cronjobs load. You can leave this default and everything will just run fine :).
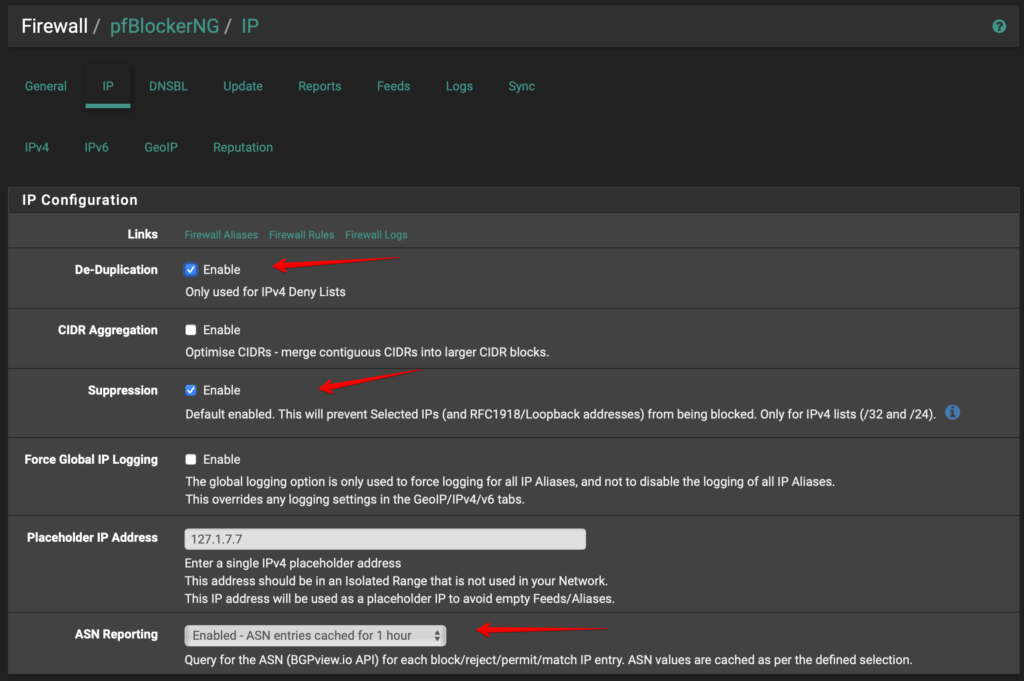
pfBlockerNG can be used for IP blocking (malicious IP’s) and DNSBL (DNS sinkhole). Let’s go over my settings for IP blocking. Go go the IP tab. The first section is IP Configuration. I pretty much the basic settings here. I have a couple of IP blocklists configured and the De-Duplication option will make sure that there are not duplicate IP’s in blocklist pfBlockerNG builds. Make sure that The Placeholder IP Address is not being used in your network. The default of 127.1.7.7 should be fine. Here are my settings:
Next is MaxMind GeoIP configuration. You need to register and get a valid license key and you can register here for free. I use MaxMind GeoIP to block certain countries. If you don’t host services behind your pfSense router (like a webserver) you probably don’t need the country blocking because pfSense will default block all inbound connections. Security is all about layers and having this option is another layer of security. Here are my settings:

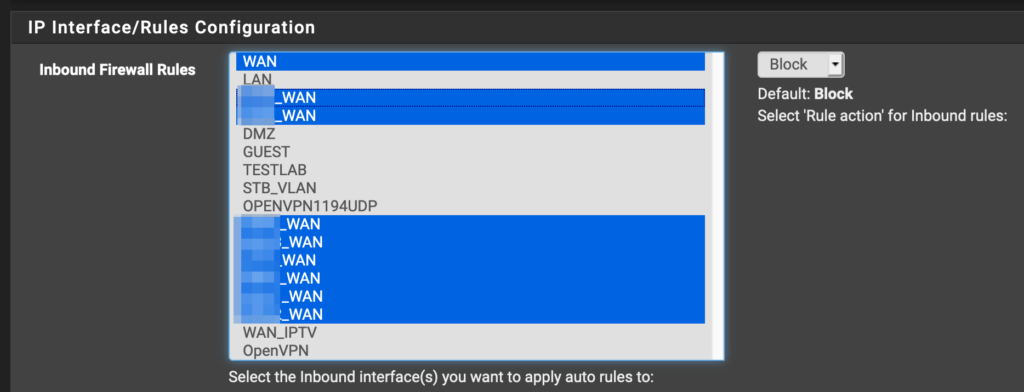
Next is Inbound Firewall Rules. These apply to any interface which is used to get internet traffic to you network. Here you select your WAN interface and if you have VPN client connections going to your VPN provider, select those here too. I use several VPN connections to VPN providers and those interface names end with _WAN. The screenshot below shows what I have selected here:
Next is Outbound Firewall Rules. These apply to any interface which you have on your local network. I have several local networks like a guest and a testlab network. I am running a OpenVPN server on pfSense and I treat that network also as a local network. Here are my settings:
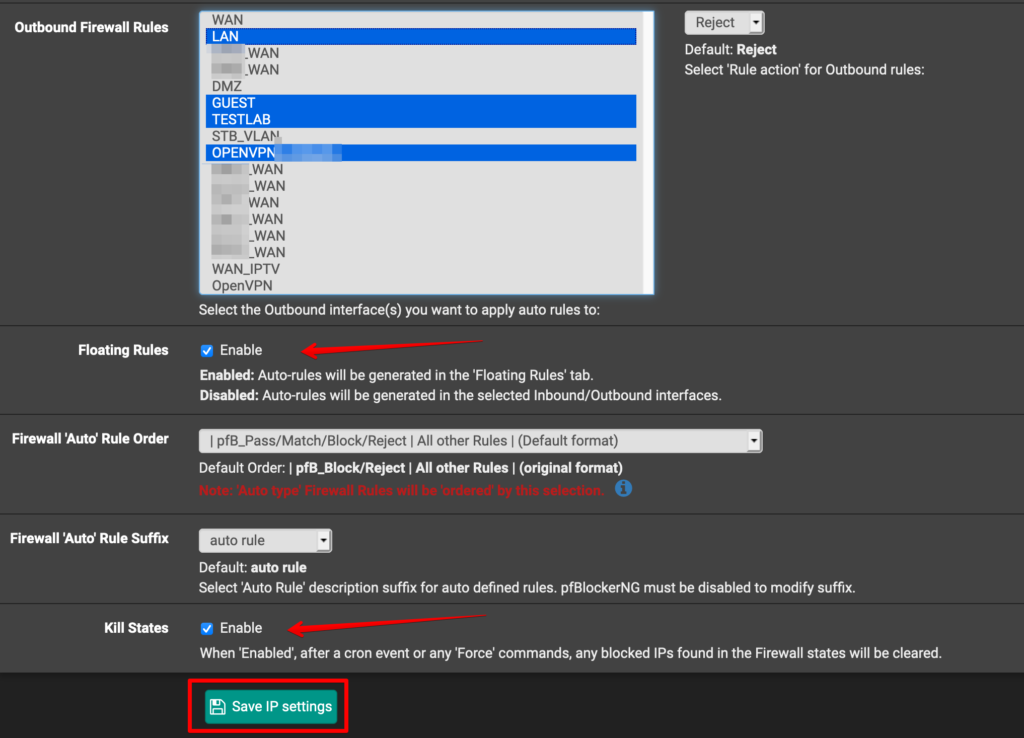
I have also enabled the Floating Rules option because I like it that I can find all the firewall rules in one place. Kill States is enabled because IP blocklists are being updated several times a day and you want pfBlockerNG to kill any state to a blocked IP immediately. Don’t forget to hit the Save IP settings when you are done here.
Enable some IP feeds
To let pfBlockerNG do block malicious IP’s you need to enable some IP feeds. pfBlockerNG has a nice selection of IP feeds you can enable. Go the Feeds tab and I would suggest to enable the PRI1 feed category and start from there. Remember the more feeds you enable the greater the chances are that you will break the internet :). Proceed with care is my advise and only enable extra feeds after doing extensive testing. This is not a set-and-forget approach! It’s more a set-test-monitor-forget approach. Check my screenshots here:
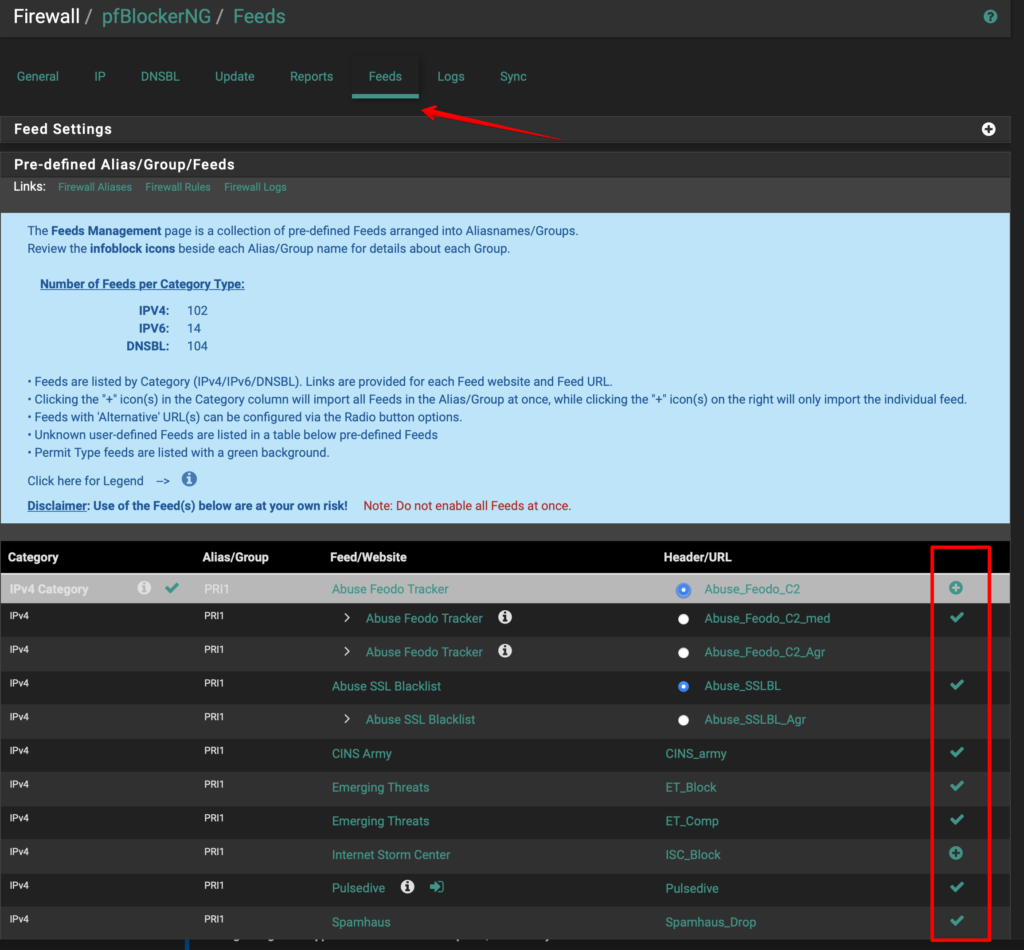
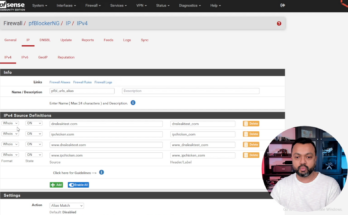
You just have to click on the + sign and pfBlockerNG will add the feeds. Afterwards you can find the feeds you enabled in the IP -> IPv4 tab. I have done some renaming and sorting here. Feel free to make you own adjustments. Here’s what mine looks like:
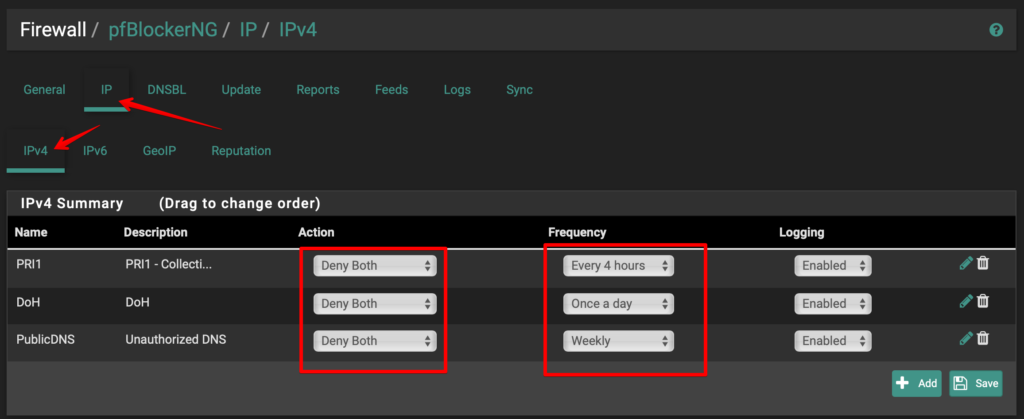
I have changed the Action here to Deny Both. This means that pfBlockerNG will block incoming and outgoing communication to a blacklisted IP. I have also changes the Frequency of the updates. The PRI1 category is being updated a few time a day and I want pfBlockerNG to be on top of the changes so I chose to update it every 4 hours. The others in my list have more to do with Public DNS servers and DNS-over-HTTP. In my experience they don’t change that much. I want to make clear that I don’t use IPv6 in my network. I have disabled it in pfSense and blocking it in my Firewall rules. I don’t have need for it at the moment and I don’t want to complicate things.
GeoIP blocking
While you are in the IP -> IPv4 tab click on the GeoIP tab if you want to block specific geographical regions or separate countries.
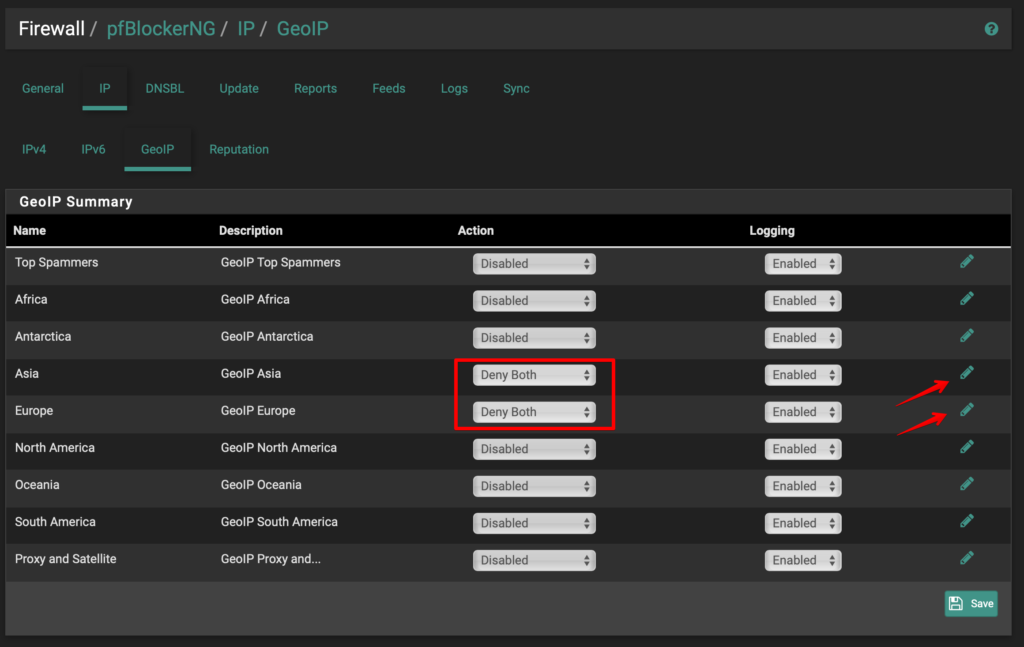
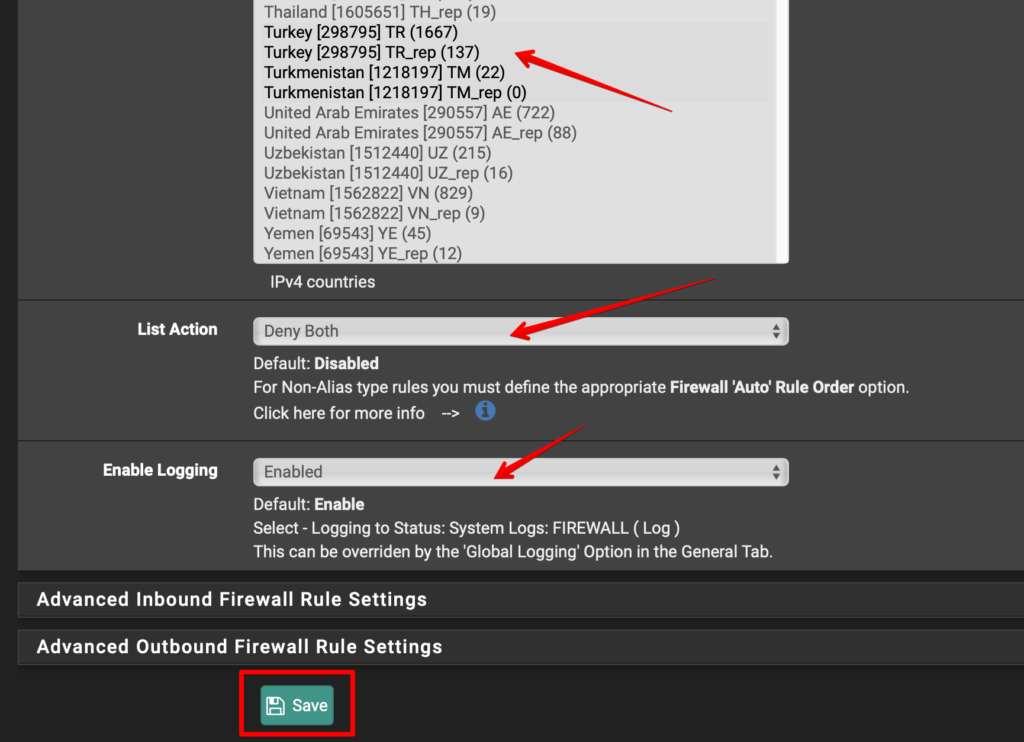
You will notice here that I have the Action set to Deny Both. But I don’t block the whole region. I block specific countries and you can choose which countries you want to block by clicking on the pencil icon. Then select the countries and enable List Action and Loggin and click on Save:
This is all I configure for the IP blocking part. Let’s move to the DNSBL part.
Configure DNSBL settings
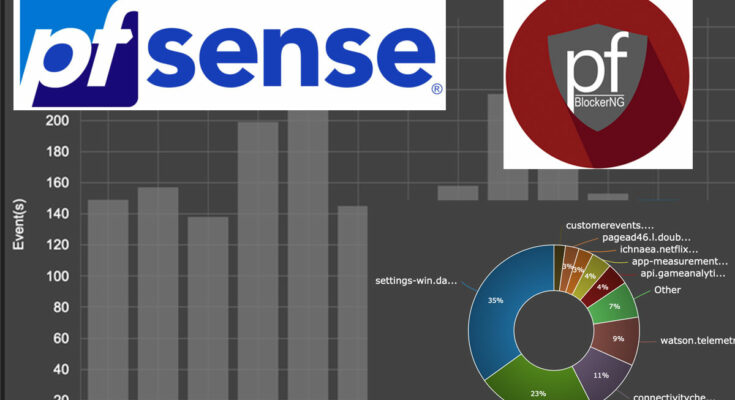
I assume you know what DNSBL blocking does so I won’t go into the details here. It blocks malicious and/or unwanted adverts domains. Recently pfBlockgerNG got a huge update and DNSBL is now able to use python mode. This new python mode makes it a lot faster and also shows all the DNS requests which are being blocked! This is for me the major option to get rid of my Pihole setup. I want my pfSense doing everything in my network and adding pfBlockerNG to my setup gives me a single place to secure my network and keep ads and malicious traffic out of the door. You can read about all the changes in pfBlockerNG here.
To configure the DNSBL settings click on the DNSBL tab. There are a lot of options here and this can be overwhelming. These are the settings I have enabled or configured and I think this should give you a good starting point:
- Enable DNSBL: checked (otherwise DNSBL will not be enabled :P)
- DNSBL Mode: Unbound python mode. This is the major new option! We need this.
- DNS Reply Logging: checked. This will show you all the DNS queries which are answered by Unbound.
- DNSBL Blocking: checked. This option must be selected as soon as you choose Unbound python mode.
- CNAME Validation checked: This option to make sure that an ad domain cannot “bypass” DNSBL by using a different dns name.

Scroll down to the DNSBL Configuration section and check Permit Firewall Rules. This will create rules in the Floating in your Firewall. I like having these in one place :). Also select all your internal networks here. This will enable pfBlockerNG for those networks. Here are my settings:
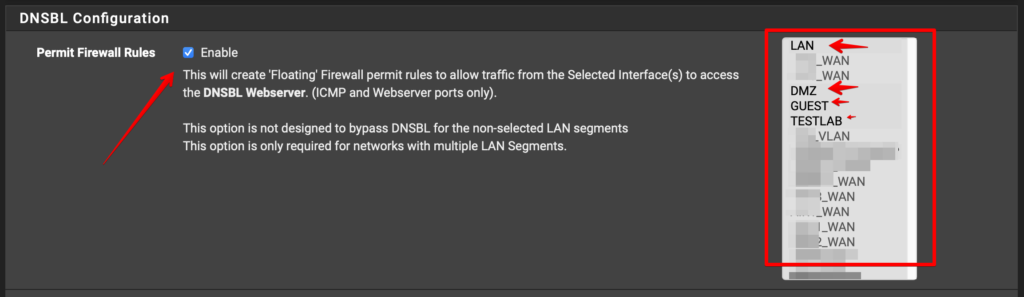
As you can see I have several internal networks (LAN, Guest, DMZ, TestLAB) and I want pfBlockerNG to be enabled on all of those.
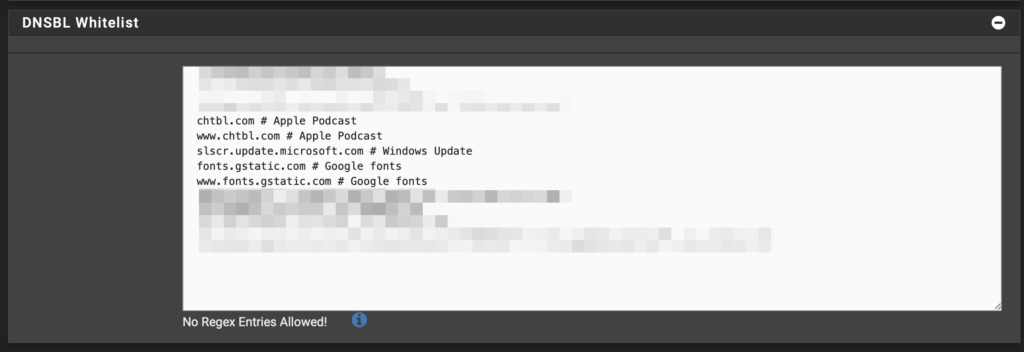
DNSBL Whitelist
Click on the + sign to open this section. In this section you can add domains you don’t want to be blocked. Like when you have a lot of Apple devices in your network you want to whitelist *.apple.com. Adding domains in the whitelist makes sure that even when these domains are in some DNSBL feed you have enabled (see next section) they will still be allowed (whitelisted) by pfBlockerNG. You can add domains here manually or using the Reports tab in pfBlockerNG. In the screenshot below you can see some examples I have added to my whitelist:
Those are all the options I have set for DNSBL. Scroll to the bottom of this page and click on Save DNSBL settings.
Enable some DNSBL feeds
Now go to the Feeds tab and scroll down to the DNSBL category. Here you can enable different DNSBL feeds by clicking on the + sign:

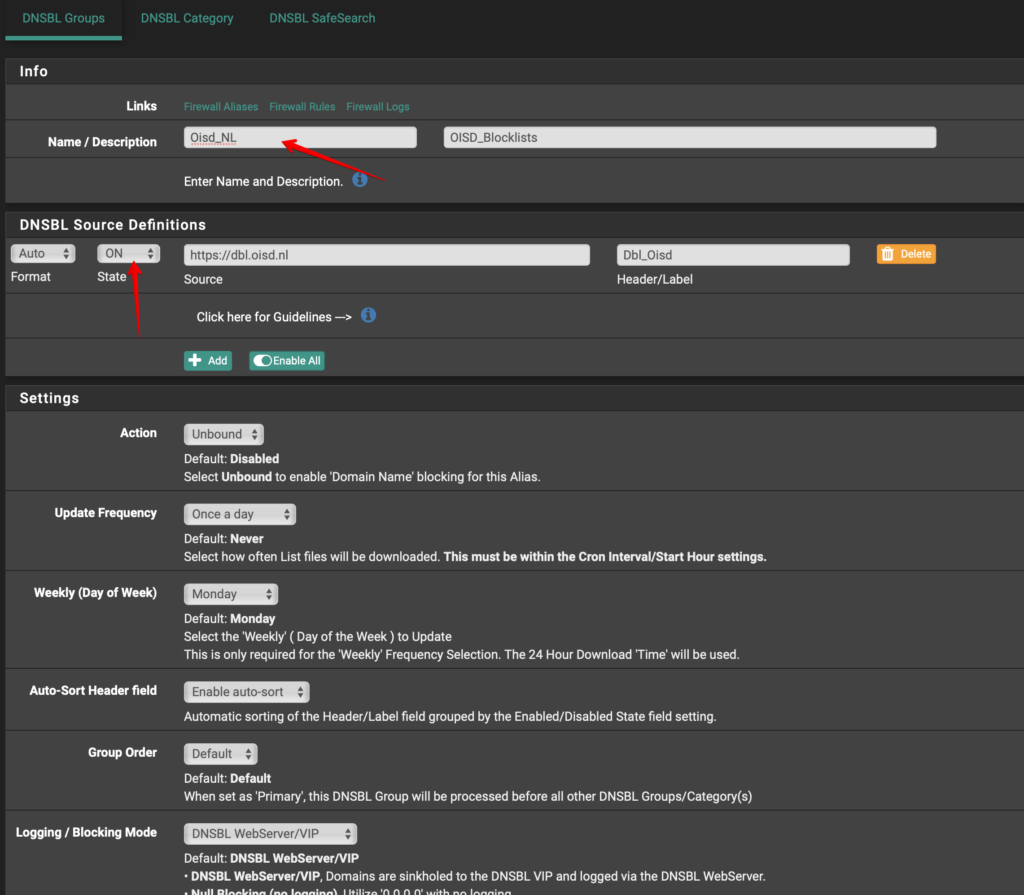
I want to remind you again that the more feeds you enable the bigger the chance is that you will break the internet for users on your network :). And you will find that for some services to work you will have to whitelist certain domain names like I explained above. The feeds you enable are listed in the DNSBL Groups section. Here you can review what feeds you have enabled or disable and remove an enabled feed.

By clicking on the pencil icon and the end of the line you can edit those specific groups. The names of the groups will be different for you, I just renamed them for my ease:
DNS over HTTPS/TLS Blocking
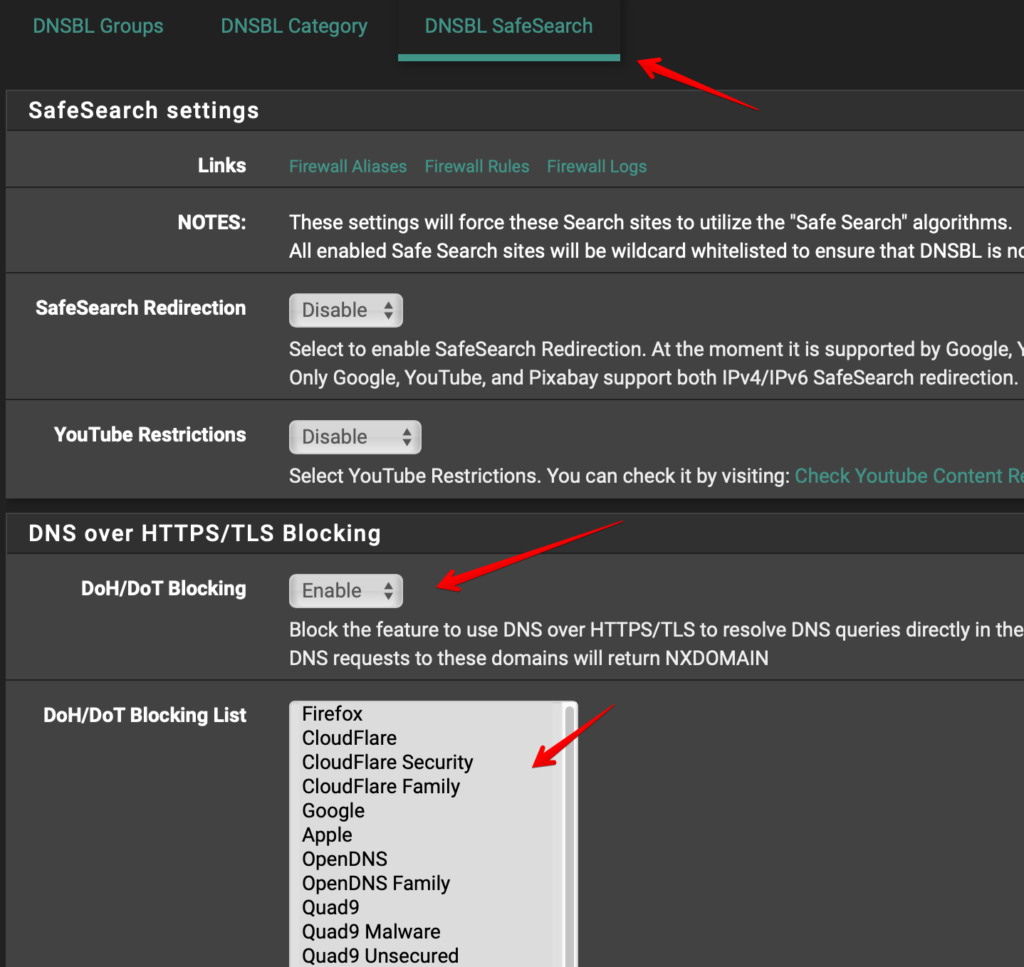
This version of pfBlockerNG also has a very extensive list with known public DNS servers who are supporting DNS over HTTPS. DNS over HTTPS is a serious privacy and security risk so you want to enable this because you don’t want devices in your network using these DNS servers and bypassing pfBlockerNG’s adblocking and pfSense’s DNS server. Go to the DNSBL SafeSearch and enable DoH/DoT Blocking. Then select all the DNS servers from the list you want to block and click on Safe:
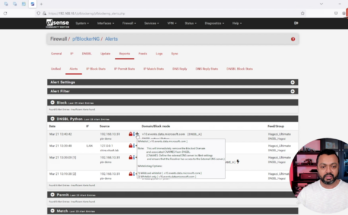
The Reports tab in pfBlockerNG
The Reports tab is very important. It will give you an overview of what IP’s or DNS names are blocked by pfBlockerNG. It will also tell you the source device of the DNS or IP request thus making troubleshooting easy. Here you can investigate if pfBlockerNG is the reason why a certain app or website is not working properly for devices on you network:
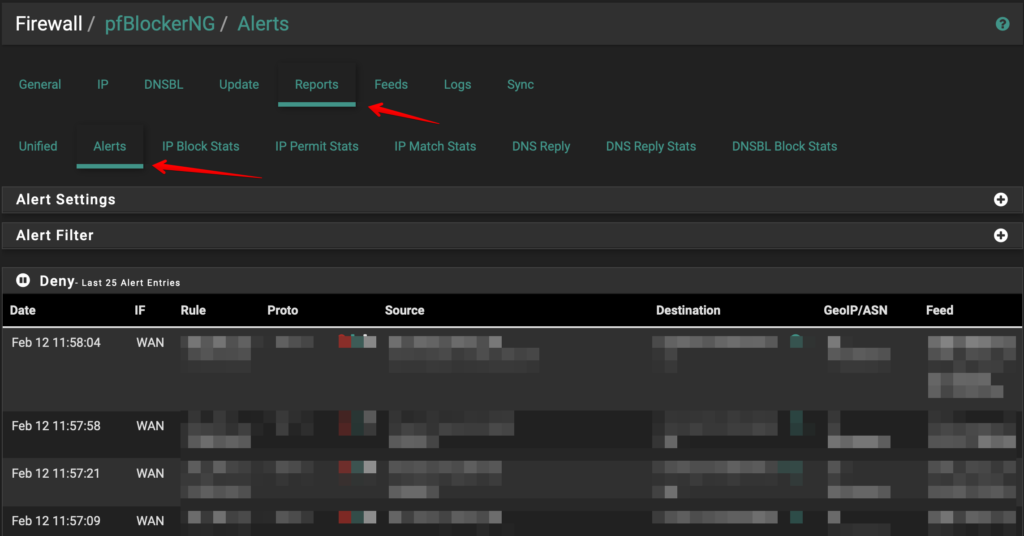
The fist section shows you the IP’s being blocked and the section below that will show you DNS requests being blocked. Whitelisting an IP or DNS is simply a matter of clicking on the + sign before the DNS name or IP:

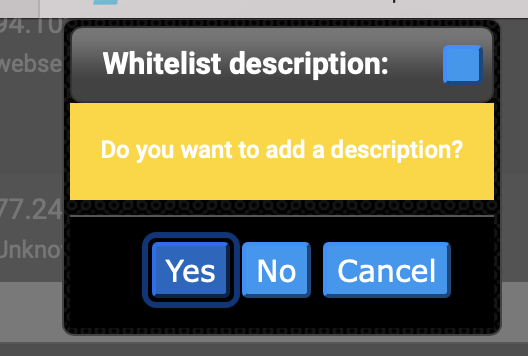
When you click on the + sign pfBlockerNG will ask you if you know for sure you want to whitelist this domain. Click OK:
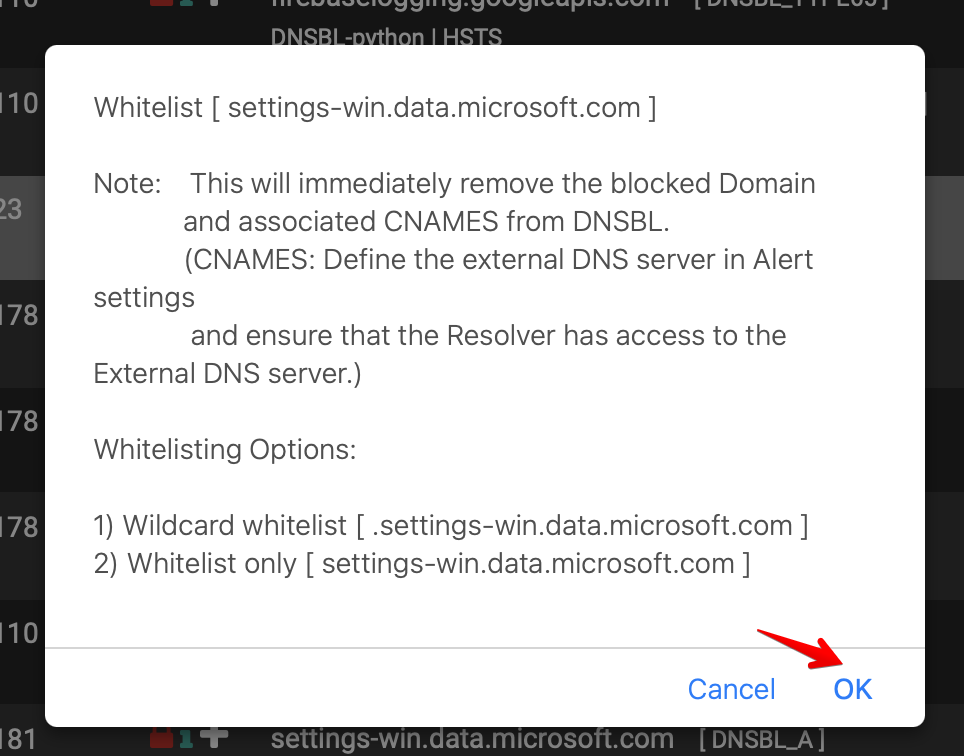
Then it will ask you if you want to whitelist this domain only or add a wildcard for the domain:
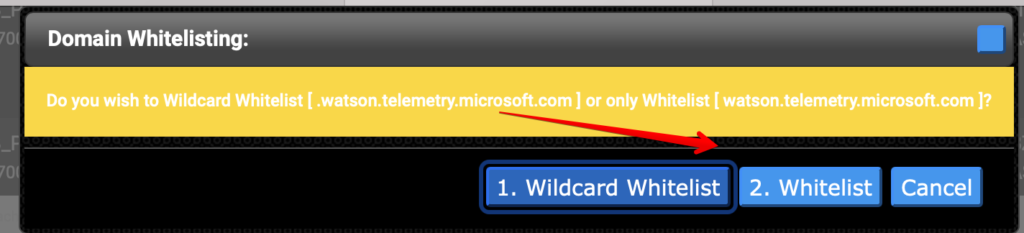
After that you will have the option to add a description. If you don’t want a description just click on No and that’s it. The pfBlockerNG will no longer block that domain:
If you want to review the domains you have whitelisted you can just review them in the DNSBL Whitelist section in the DNSBL tab like I explained above.
With the settings and configuration options explained in this blog you should be off to a great start in keeping those ads, trackers and malicious websites out of your network. This is all you need to setup pfBlockerNG python mode with pfSense. pfBlockerNG has a lot more options but I don’t think you need all the features to be safe. The Reports tab is your friend for troubleshooting. Thank you for reading and good luck!
Thanks for the tutorial. I also recommend trying Sensei/Zenarmor developed by Sunny Valley Networks. It has a Free Edition which is a very powerful web filtering and application control engine. https://www.sunnyvalley.io/docs/