

Table of Contents
In a previous blog post of mine here I showed you that I am using Pi-Hole to protect my network and moved away from pfBlockerNG. In this blog post I will show you how to setup Pi-Hole to protect your network and privacy.
What is Pi-Hole?
“Pi-Hole is is a DNS sinkhole that protects your devices from unwanted content, without installing any client-side software.” That is a quote from the documentation website of Pi-Hole and that basically says it all. If you want to know all the details Pi-Hole is then check you their website. Now there is the term “DNS sinkhole”.
DNS sinkhole…what now?
To be able to understand what a DNS sinkhole is you have to first understand what DNS is and does. DNS is short for Domain Name System and it basically does the same thing phonebook does. It translates numbers to names because numbers are a lot harder to memorize. When you want to visit www.vikash.nl your computer will put that request out to a DNS server on your network which will translate that name to the IP address where www.vikash.nl is living. This is also called a DNS query. Pi-Hole is a DNS server so if you setup a Pi-Hole on your network it will answer the DNS queries for all the devices in your network and this means that you can redirect DNS lookup to anywhere you like. You now have the power to redirect DNS queries to ad-serving networks to an alternate IP address basically eliminating those from showing on any device connected to your network :). This process is called DNS sinkhole and also how Pi-Hole works. If you want to read more about it check out this Wikipedia article.
What will Pi-Hole protect you from?
What makes the Pi-Hole unique from your-basic-DNS-server is the fact that it can pull in Blocklists from the internet and based on those build a database of domains which are serving ads, tracking privacy or even serve malware and ransomware! How cool is that. Ads in general are not a problem but nowadays even ads are used to deliver malicious payloads to your computer. Of course you can whitelist websites you want to support and allow Pi-Hole not to block the ads from them.
To sum up the Pi-Hole will use Blocklists to protect your network. Those Blocklists are on the internet and most of them are free. In this blog post I will share the Blocklists I use.
Requirements
Pi-Hole is a magnificent piece of software and it even can run on a Raspberry Pi Zero (hence the name Pi-Hole). If you have a spare raspberry pi laying around set it up. The raspberry pi are running off SD card and those are limited in read and write cycles. That’s why I would suggest to run in on something more robust. I am running it on a Ubuntu 18.04 server virtual machine which is running on Hyper-V 2016 host. This has been rock-solid performance wise and it enables me to make regular virtual machine backups in case something goes wrong like with an update. So my shoppinglist is:
- Ubuntu server 18.04 with static IP address
- Access to your internet router to change DNS server settings
Let’s get started
I will assume you have setup an Ubuntu server with a static IP address. This static IP address should be in the same network as where the rest of your devices are. Usually this is your normal LAN. So in my case my local network range is 10.100.150.100 to 10.100.150.200. I am using pfSense as my router so for me it looks something like the screenshot below:

Login to your Ubuntu server using SSH and make sure everything is updated. To do this use the following commands:
sudo apt-get update
sudo apt-get upgrade
Basic configuration
Once everything is updated and running it is time to setup Pi-Hole. This process is very simple. Just execute the following command:
sudo curl -sSL https://install.pi-hole.net | bash
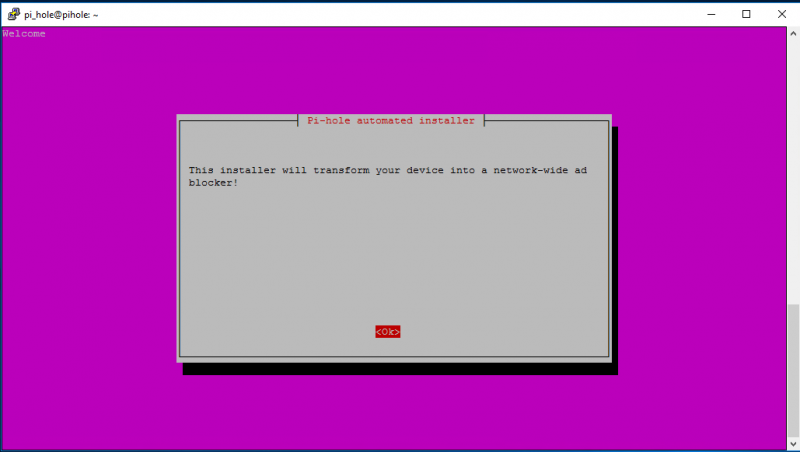
You will see the installation of Pi-Hole starting. Hit Enter for OK.
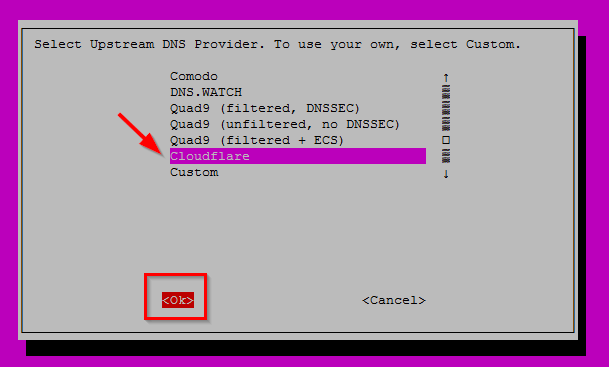
There will be a couple more screen where you just hit Enter for OK. Then you will arrive at the screen below asking you what upstream DNS server you are using. I choose to use Cloudflare. All my traffic is going trough my VPN provider anyway. The reason you need to enter a DNS server here is because Pi-Hole will be used as a caching DNS server on your LAN. So when the Pi-Hole receives a DNS query from a device on your LAN it will check if the hostname requested is in it’s own local DNS database (the one build using the Blocklists). If not then it will forward the request to it’s upstream DNS server which then will answer with the correct IP address. However if the hostname is in the DNS database of Pi-Hole it will sinkhole it.
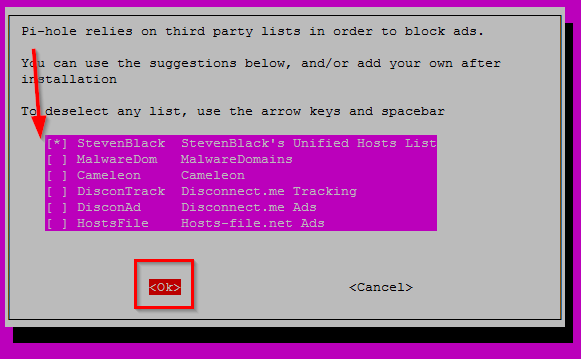
Now you will be asked what default Blacklists you want to enable. I will not be using the default Blacklists but don’t disable everything here! Enable at least one of the default Blacklists because this create the necessary files for Pi-Hole to work properly. So I just select one and hit Enter for OK:
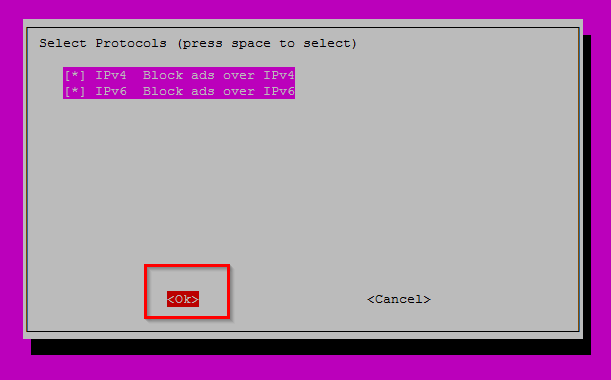
Select both IPv4 and IPv6 and hit Enter for OK:
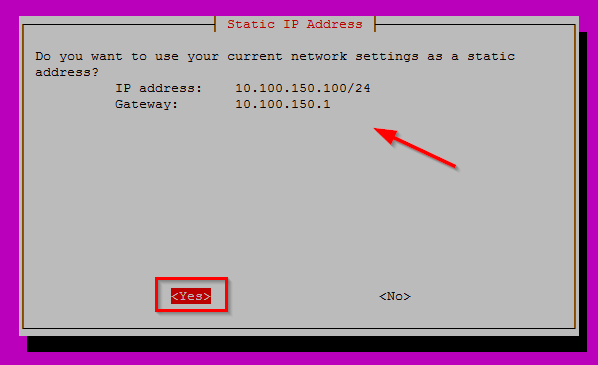
Next step it will inform you that you should have the IP address setup as static. Note that this IP address is also the IP address which all your devices will use as their DNS server. We will set that up later. For now just hit Enter for OK:
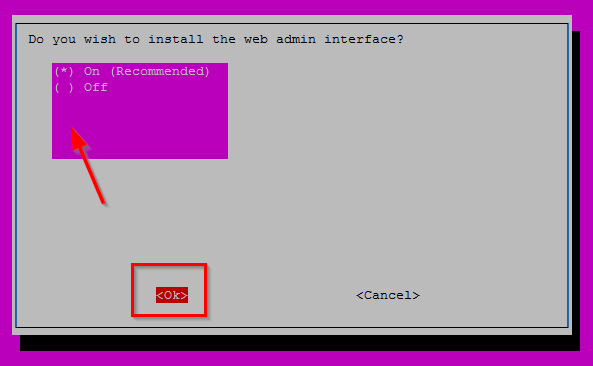
Choose to install the admin interface. Pretty important for management and configuration. Hit Enter for OK.
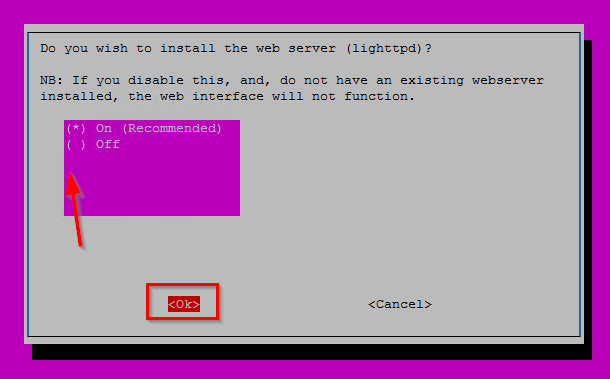
On the next screen choose to install lighttpd webserver. This is the webserver where the management UI is running on. Hit Enter for OK.
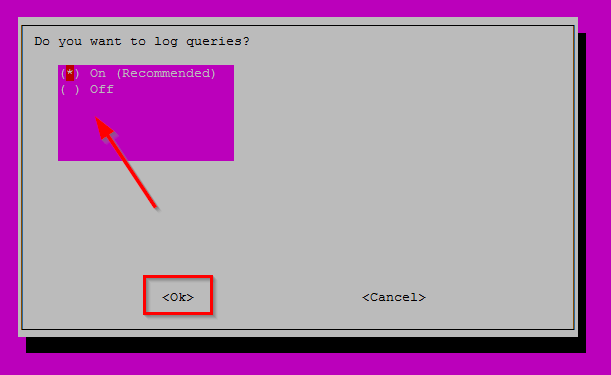
In the next screen choose to log the DNS queries which will be handled by Pi-Hole. This is one of the major features for me and I think the Pi-Hole UI is way ahead of the competition on how to display what is happening in your network in a easy way. Check my blog post here about why I think that.
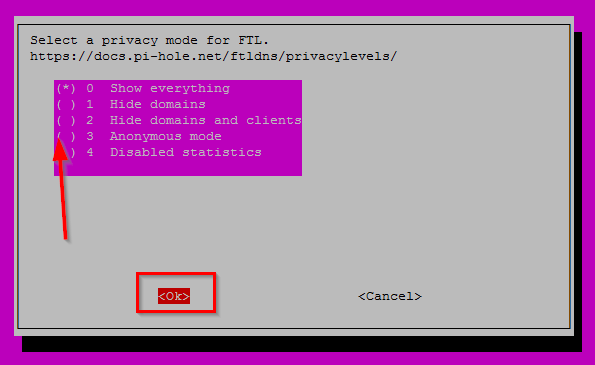
In the next screen choose to Show everything. This is one of the biggest features (again).
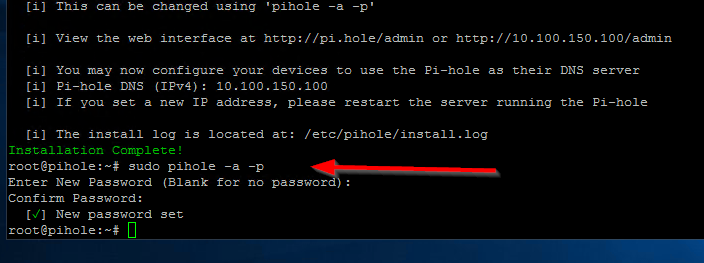
After some more default OK screen Pi-Hole will retrieve packages and start the setup. When it is finished you will be presented with a screen where the admin password is displayed and also the URL to the admin page. This password is used to login to the Admin Webpage. Just hit Enter for OK.
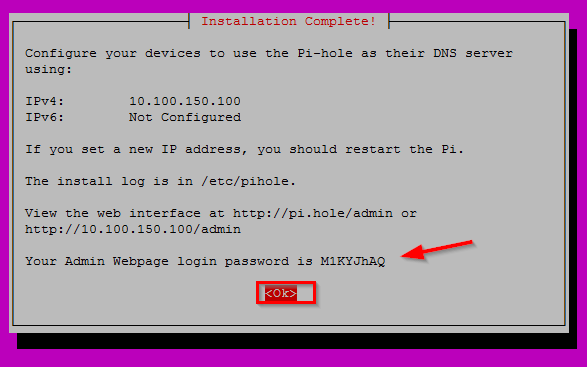
The first thing you want to do is change this password. At the command line enter the following command to change the password for the Admin Webpage:
sudo pihole -a -p
Advanced configuration
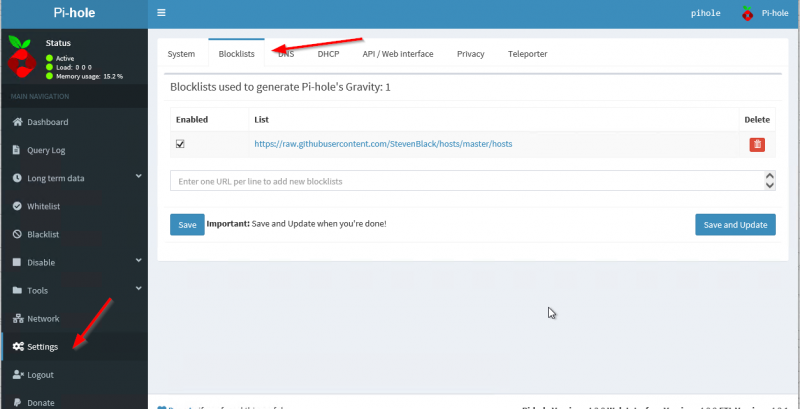
Let’s dive into the advanced configuration settings. Open your webbrowser and login to the Admin Page. Then go to Settings -> Blocklists. This is where the magic will happen and were we will tell Pi-Hole what Blocklists we want to use in order to build the local DNS database for domains we will sinkhole.
A word about Blocklists
Blocklists are used to build the local DNS database and based on that the Pi-Hole will sinkhole certain DNS queries. Be advised that this can (and probably will) break the internet at your home! I want to stress this very much! Depending on what Blocklists you use you will discover that certain websites or apps are not working anymore. I know for example that many Blocklists are blocking all of Facebook or Instagram for privacy reasons and after adding those Blocklists to your Pi-Hole you will not be able to open those websites or use those apps. Luckily (as I mentioned before) we are able to Whitelist certain domains on Pi-Hole. Whitelisting means that regardless of whether a certain domains appear in a Blocklist, it will not be blocked.
That’s why Whitelisting is a major part of implementing Pi-Hole in your network. Especially the first few days / weeks you will have to keep a close eye on the domains which are being sinkholed and add domains to the Whitelist as needed.
My Blocklists
Below are the Blocklists I use. Again, make sure that you understand that this is not a set-it-and-forget-it kind of feature. You will have to “babysit” the Pi-Hole configuration in order to tweak your Whitelist. Below is my Blocklist:
https://openphish.com/feed.txt
https://adaway.org/hosts.txt
http://sysctl.org/cameleon/hosts
https://s3.amazonaws.com/lists.disconnect.me/simple_ad.txt
https://s3.amazonaws.com/lists.disconnect.me/simple_tracking.txt
https://hosts-file.net/ad_servers.txt
https://www.squidblacklist.org/downloads/dg-ads.acl
https://pgl.yoyo.org/adservers/serverlist.php?hostformat=nohtml
https://ransomwaretracker.abuse.ch/downloads/RW_DOMBL.txt
https://ransomwaretracker.abuse.ch/downloads/RW_URLBL.txt
http://theantisocialengineer.com/AntiSocial_Blacklist_Community_V1.txt
https://osint.bambenekconsulting.com/feeds/c2-dommasterlist-high.txt
https://s3.amazonaws.com/lists.disconnect.me/simple_malvertising.txt
https://s3.amazonaws.com/lists.disconnect.me/simple_malware.txt
https://isc.sans.edu/feeds/suspiciousdomains_High.txt
https://www.malwaredomainlist.com/hostslist/hosts.txt
https://mirror1.malwaredomains.com/files/justdomains
https://mirror1.malwaredomains.com/files/immortal_domains.txt
http://winhelp2002.mvps.org/hosts.txt
https://www.stopforumspam.com/downloads/toxic_domains_whole.txt
https://raw.githubusercontent.com/Dawsey21/Lists/master/main-blacklist.txt
https://someonewhocares.org/hosts/hosts
https://dbl.oisd.nl/
https://pastebin.com/raw/2VKWfAqM
https://raw.githubusercontent.com/Perflyst/PiHoleBlocklist/master/SmartTV.txt
https://raw.githubusercontent.com/crazy-max/WindowsSpyBlocker/master/data/hosts/spy.txt
https://heuristicsecurity.com/dohservers.txt
https://phishing.army/download/phishing_army_blocklist_extended.txt
https://raw.githubusercontent.com/oneoffdallas/dohservers/master/list.txt
https://raw.githubusercontent.com/CHEF-KOCH/Audio-fingerprint-pages/master/AudioFp.txt
https://raw.githubusercontent.com/CHEF-KOCH/Canvas-fingerprinting-pages/master/Canvas.txt
https://raw.githubusercontent.com/CHEF-KOCH/WebRTC-tracking/master/WebRTC.txt
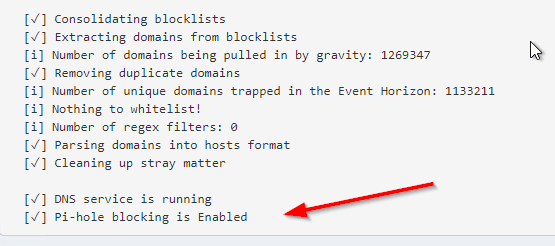
Login to the Admin Webpage and go to Settings and then select the Blocklists tab. Delete the one blocklist feed we have here from the setup earlier. Then enter all the Blocklist feeds from above and click on Save and Update. Wait for it to update.

After a successful update you will be presented with a resume of the Blocklist feeds update and then you are “in business”. Pi-Hole is now ready to protect your network and all the devices on it.
My Whitelist
Managing the Whitelist is very important as I said before. To get you started on a base-Whitelist below you have my own Whitelist. It should give you a very good basic starting point.
www.youtube.com
youtu.be
youtube.com
ocsp.digicert.com
www.howtogeek.com
feeds.feedburner.com
hosts-file.net
feeds.feedblitz.com
www.security.nl
photos-ugc.l.googleusercontent.com
ytimg-edge-static.l.google.com
codeload.github.com
cdnjs.cloudflare.com
www.cdnjs.cloudflare.com
gitlab.com
www.gitlab.com
clients1.google.com
www.clients1.google.com
clients.l.google.com
forms.office.com
prod.forms.office.com.akadns.net
office365.com
vmware.com
netatmo.com
netatmo.net
ae01.alicdn.com
www.ae01.alicdn.com
global-image.aliexpress.com
global-image.aliexpress.com.gds.alibabadns.com
us1111.alicdn.com.edgekey.net
graph.facebook.com
www.graph.facebook.com
api.facebook.com
star.c10r.facebook.com
media.licdn.com
www.media.licdn.com
graph.instagram.com
www.graph.instagram.com
instagram.c10r.facebook.com
neatocloud.com
github.com
webhook.logentries.com
To add the above domains to the Whitelist click on Whitelist in the Admin Webpage and enter the list above. When you click on Add here the list is immediately active. So any changes you make here will be immediately active and you don’t need to update anything.
How to whitelist hostnames
Check your Whitelists by clicking the menu on the left of the Admin Webpage:
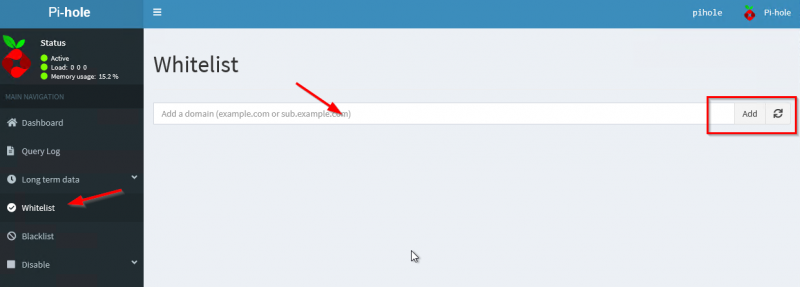
Just add my Whitelist list and click on Add.
If you encounter a website or app that is not working anymore after setting up Pi-Hole chances are that something is sinkholed (blocked by Pi-Hole). If you click on the Query Log on the menu you will get a very nice overview of the DNS queries which are allowed or blocked. You can even search for queries for a specific device in your network. Very powerfull interface!
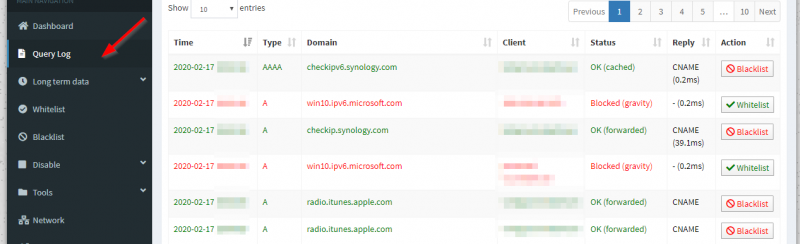
The interface explains itself basically. If you see something being blocked and you want to whitelist it, just click on the Whitelist button behind it and all is done! That simple.
Adjust router to serve Pi-Hole as DNS Server
Now you are all set with Pi-Hole and it is time to change your router settings so it tells all the clients in your LAN that Pi-Hole is the DNS server now. I will use pfSense as my example here but in general these steps should also translate to the brand router you have.
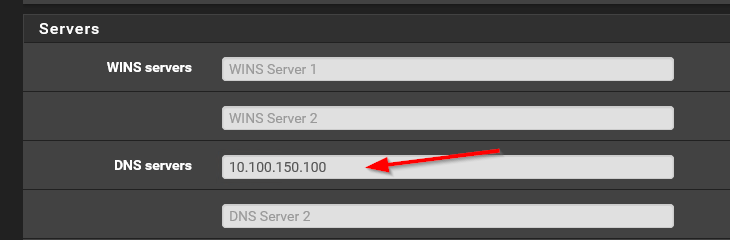
The main idea is to go into the DHCP settings in your router and change the DNS server there to the IP address of the Pi-Hole. Make sure that there are no other DNS servers entered there beside the Pi-Hole and soon you will see devices in you LAN querying Pi-Hole for DNS lookups. For pfSense go to Services-> DHCP Server-> LAN. Scroll down to the Servers section and enter the Pi-Hole in the first DNS servers field. Leave the rest blank.
Apply some tweaks
Pi-Hole updates it Blocklists every sunday. I made a change here to update is every day. I do this because domains are constantly being added and removed from several Blocklists I use and by updating them frequently I can make sure that I don’t miss some critical domain updates. When installing Pi-Hole a user is created on your server names pihole. This user has a cron job which updates Pi-Hole Blocklists.
On the command line on your Ubuntu server to edit the cron file for the pihole user:
nano /etc/cron.d/pihole
Edit the line that contains pihole updateGravity . If you want it to run for example every day on 2 AM change the line to this:
00 2 * * * root PATH="$PATH:/usr/local/bin/" pihole updateGravity
Run systemctl restart cron for the changes to take effect. This may be changed back to default when Pi-Hole get’s a system update so you have to watch for that.
Pi-Hole version update
Once in a while Pi-Hole will release a new version. When you login to the Admin Webpage you will get a notification in the bottom of the page like so with the words Update available! glowing in red:

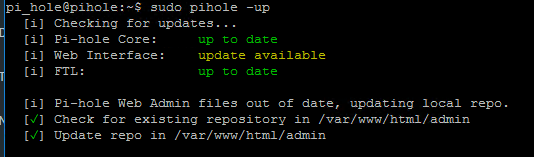
To apply the update you will have to login to your Pi-Hole using SSH and enter the following command:
sudo pihole -up
You will see that everything is updated and you are good to go:
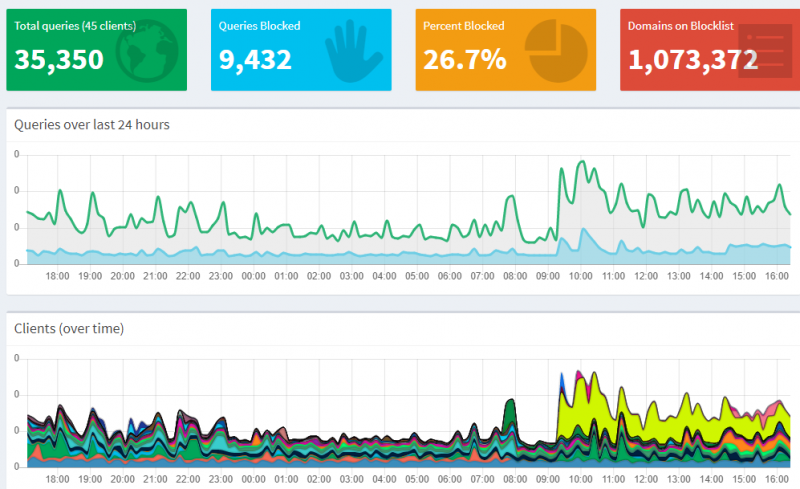
Some cool stats
I have Pi-Hole running for some time now and I want to share some cool stats. Here is the overal stats page which give you a detailed overview of how my Pi-Hole is doing in my network:
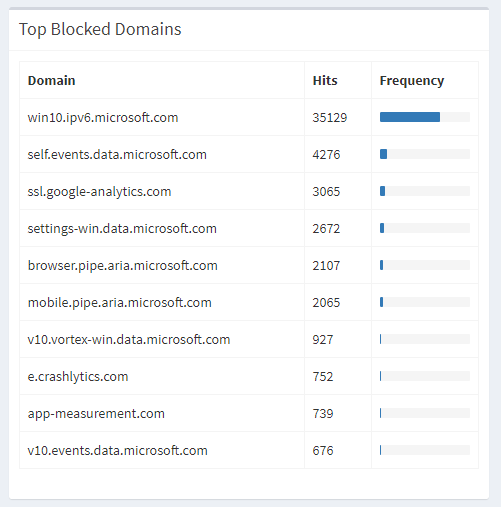
Here are the top blocked domains in my network and how Pi-Hole is protecting me against leaking telemetry data to a big tech company.
Wrap up
Overall using Pi-Hole has made me more aware of privacy and gives me the ability to protect all the devices in my network from ads, privacy tracking, malware and ransomware. In order of first-line defense I think this is a valuable addition in protecting your privacy and data.
If you implement Pi-Hole in your network and break the internet I cannot be held responsible for it. I want to stress again that it is very important to keep a close eye on your Query Log to make sure that something isn’t being wrongfully blocked. Pi-Hole has a lot of more options and features but I believe with this blog post I have make sure that you have the basic configuration drilled down in order to keep your network safe and maintain your online privacy.
One Comment on “Setup Pi-Hole to protect your network and privacy”