Moved from pfBlockerNG to Pi-Hole

Reading Time: 6 minutes

The ad-free internet can exists!

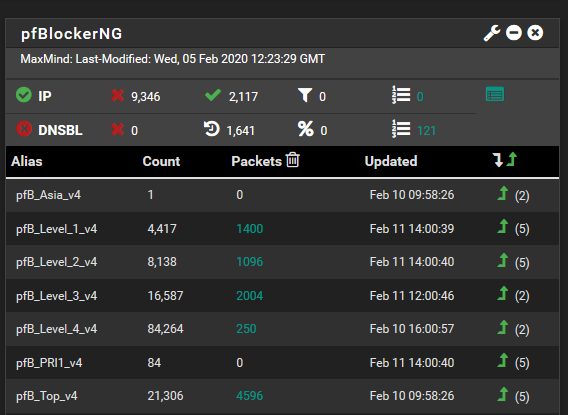
For a while now I have pfSense firewall running at home. I really love the performance, stability and security pfSense provides. It is just rock-solid! But let me tell you why I moved from pfBlockerNG to Pi-Hole. What I also love in pfSense is the ability to install packages and add even more useful features to the platform. So I went ahead and installed the pfBlockerNG-devel package. At the time of writing this blog post the latest version of pfBlockerNG-devel is 2.2.5_29. Note the “devel” in the name because this is the branche of pfBlockerNG which is actively being developed.

Ads on themselves can be OK I think. It all depends on how ads are being used and in the end you need to find funding. After all this site is also using ads. Adding pfBlockerNG allows you not to only block ads but also block web tracking and ransomware. That there is added security and privacy you get when using pfBlockerNG. It will do this for your whole network using something called DNSBL (short for Domain Name System-based Blackhole List). Every device in your network will benefit from this and be protected. But pfBlockerNG does so much more like also giving you the ability to block internet traffic coming from certain IP addresses. These IP addresses translate to specific countries and regions so it can be very handy in protecting your network from all those hackers trying to get in your network.

I went ahead and set up both and for some time everything was working well. I enjoyed ad-free and tracking-free internet on all the devices in my LAN. But then something happened…

The internet broke down (well a little bit)

I have several iOT devices at home including Ikea Tradfri smart lights. Suddenly these lights because unreachable in the Apple Homekit App on my iPhone. The rest of my Homekit enabled iOT devices were doing fine. The first time this happened I thought it is probably a bug so let’s power cycle the Ikea Tradfri gateway. This was a success and the Ikea smart lights were available again. Nice!

Not so nice when I discovered an hour or so later that the Ikea Tradfri smart light were unreachable again. So now I’m thinking that maybe pfBlockerNG is blocking some hostname (the DNSBL feature). This is possible because maybe one of the DNSBL feeds I am using has got an update and some hostname which Ikea Tradfri gateway uses is bow blacklisted. Luckily pfBlockerNG gives you the ability to whitelist hostnames.

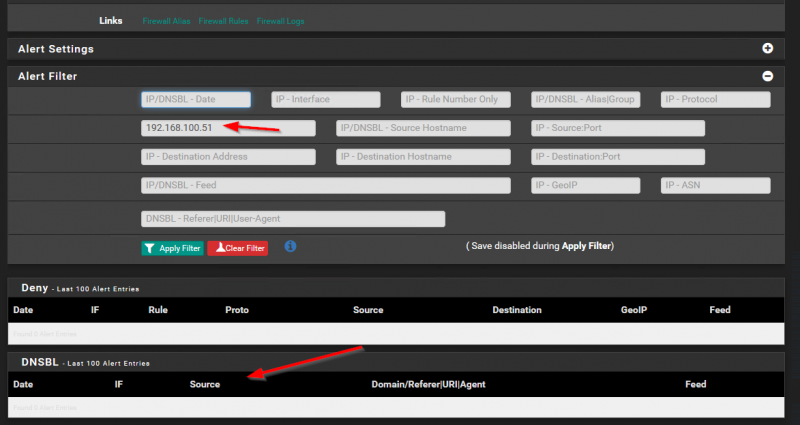
I went into the management interface of my pfSense firewall and selected the Reports tab in pfBlockerNG settings. The Reports tab shows a very nice list of hostnames which have been blocked by pfBlockerNG. There is a nice filtering option as well. See the screenshot below.

Moved from pfBlockerNG to Pi-Hole - vikash.nl - 01

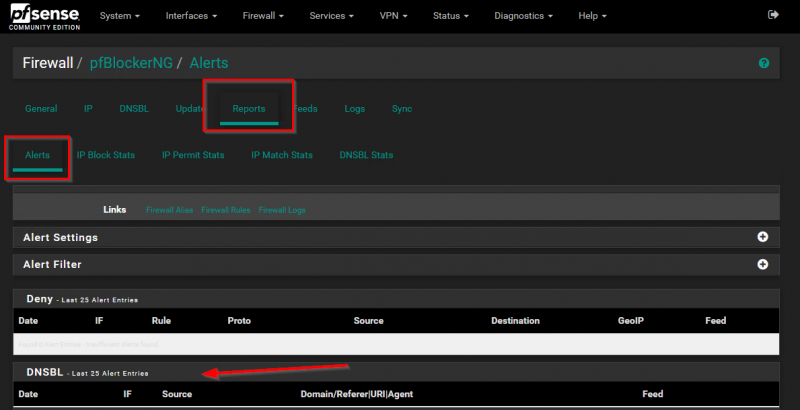
My Ikea Tradfri gateway has 192.168.100.51 as IP address. This is static setup in the DHCP server on my pfSense. So I enter this IP address in the Alert filter to see if pfBlockerNG is blocking DNS requests from my Ikea Tradfri gateway. The result was 0 so according to pfBlockerNG nothing from my Ikea Tradfri gateway was blocked. See screenshot below.

Moved from pfBlockerNG to Pi-Hole - vikash.nl - 02

But still I had the same behavior. When I power cycle the Ikea Tradfri gateway all is well for a short time and then is just becomes unavailable. I continued my investigation and decided to replace the USB power adapter of the Tradfri gateway. That didn’t help. By now I was thinking that I have tried everything but to replace the unit. I went to Ikea and got a new Tradfri gateway. I set it up and went trough the painful experience of connecting all my Tradfri lights and switches to the new gateway. I was just wrapping up when I saw that all my Ikea lights were unreachable again! Imagine my frustration.

Bring on Pi-Hole!

OK now I was furious. Even after replacing the Ikea Tradfri gateway I had the same problem. I was getting more convinced that is has to be something in my network. First step for me now was that I wanted to know all the DNS queries the Ikea Tradfri gateway was making. I tried debugging that in Unbound resolver on my pfSense but there were so many DNS requests flying by that it made troubleshooting nearly impossible.

I needed another DNS server, one specifically for my Ikea Tradfri gateway. And I needed it quick. Since I had a Raspberry Pi lying around I went the Pi-Hole route. Just download the correct image from the Pi-Hole website, extract to the SD-card and startup your new DNS server. Within a couple of minutes I was up and running with Pi-Hole. I loaded the exact same DNSBL lists I was using on pfBlockNG on the Pi-Hole. Using DHCP reservation I managed to set -Pi-Hole as the DNS server on the Tradfri gateway.

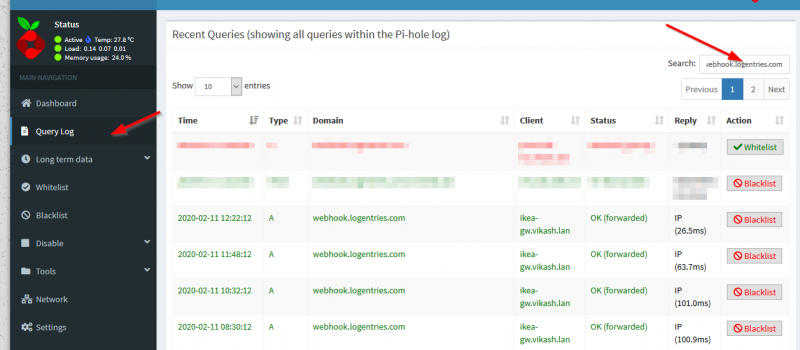
Pi-Hole showed me all the DNS queries the Tradfri gateway was doing, which ones were allowed and which ones blocked. I was specifically interested in DNS queries being blocked. I saw immediately that a lot of DNS queries were being blocked to webhook.logentries.com. That DNS query did not came up when I was troubleshooting on pfBlockerNG to find out the blocked queries. I added webhook.logentries.com to the Pi-Hole’s whitelist and waiting a couple of hours. Ikea smart lights were working fine now. Even after 24 hours all my Tradfri lights were now working fine.

Now let’s remove webhook.logentries.com from the Pi-Hole’s whitelist I thought and see what happens. Within the hour my Tradfri lights were offline again. Root cause found :).

Why I made the switch to Pi-Hole

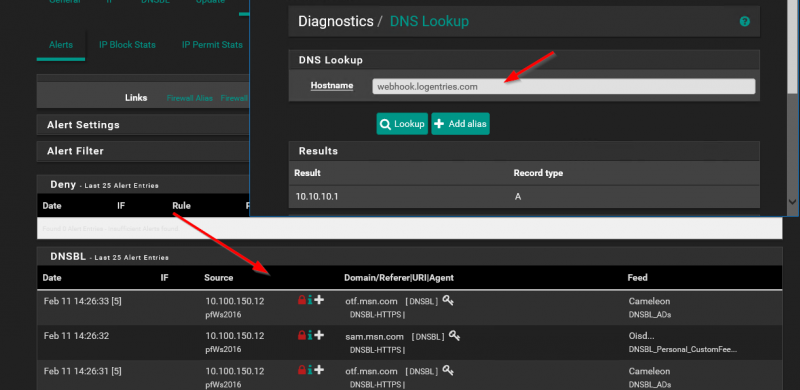
I began to investigate why pfBlockerNG was not showing the blocked DNS queries. I discovered that when I did a DNS lookup on pfSense with pfBlockerNG enabled the request for webhook.logentries.com was being “sink holed” to pfBlockerNG, but it was not showing up in the Reports tab as blocked (or allowed). Check the screenshots below what happens on pfSense.

Moved from pfBlockerNG to Pi-Hole - vikash.nl - 03

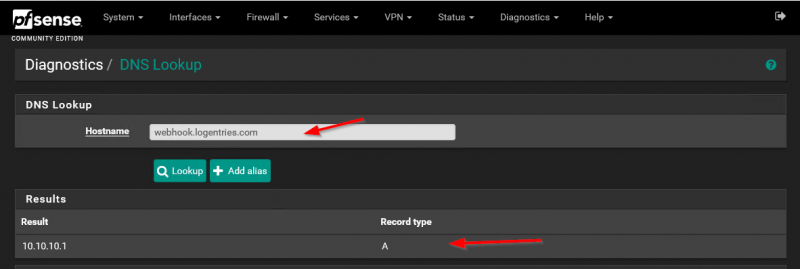
As you can see above the DNS request is blocked by pfBlockerNG because it is “sink-holed” to the DNSBL VIP pfBlockerNG is using (10.10.10.1). But when I check the Reports tab in pfBlockerNG, I don’t see the blocked DNS request.

Moved from pfBlockerNG to Pi-Hole - vikash.nl - 04

Now when I do the same DNS lookup against the Pi-Hole I can see the DNS lookup immediately in the Query Log tab:

vikash.nl - 05

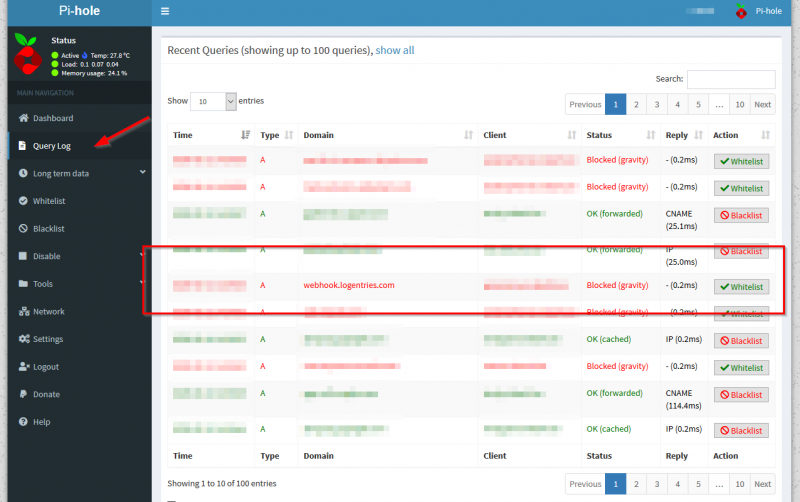
The gui on the Pi-Hole makes it really easy to troubleshoot as it shows immediately which client is doing what DNS queries and which ones are being blocked. The gui is also very easy in filtering options.

Moved from pfBlockerNG to Pi-Hole - vikash.nl

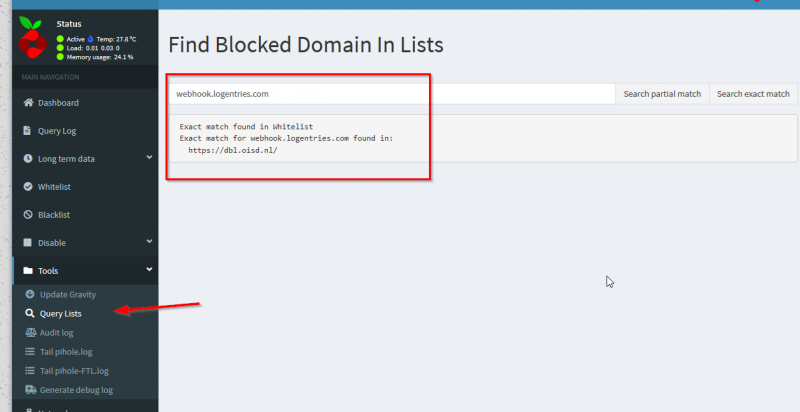
And you can find very easy in which DNSBL feed a certain hostname is so you know what feed is blocking your internet traffic. It even tells you if the dns name is whitelisted. Makes management so much more easy.

This gui compared to pfBlockerNG was refreshing to me. Amazing how much time I spend troubleshooting on pfBlockerNG while the Pi-Hole showed me within minutes what was happening and where the problem was! Great tech :).

In the end

I moved from pfBlockerNG to Pi-Hole. Don’t get me wrong, I still love and use pfBlockerNG. But I now only use it to block IP addresses from certain countries and regions. It is still very useful for that.

Moved from pfBlockerNG to Pi-Hole - vikash.nl

But I don’t use the DNSBL option anymore because I have no faith in it’s reporting capabilities. And that starts to count very heavy when you are troubleshooting why something is not working in your network. Since I started using Pi-Hole I did find some other dns hostnames which were also blocked and were not reported by pfBlockerNG. One of them was to the download server of Ubiquiti for firmwares. Pretty important to know that sort of stuff.

I just can’t be bothered to make tcp dumps of my network traffic on pfSense and then use some kind of tool to analyze and try to find the needle in the haystack. So I recommend you use Pi-Hole for the DNSBL part as it is amazing at that. From the pragmatic perspective it is blazing fast and has great reporting options about what is happening in your network.

Moved from pfBlockerNG to Pi-Hole Read More

pfSense with routed IPTV and OpenVPN client for private internet access

Reading Time: 10 minutes

What I wanted was pfSense with routed IPTV and OpenVPN client for private internet access. You know that there are a lot of prying eyes who are interested in your internet traffic. I think that what you do with your internet is your business only. So I use a VPN provider to route all my internet traffic. When you do that without taking into account a couple of rules, you will break IPTV. Recently I got fiber ( Fiber to the Home – FTTH) internet at home with IPTV included. My ISP now is Xs4all (soon to be KPN). With that service comes a very nice Fritz!box and an IPTV set-op box. The Fritz!box takes care of everything. You just plug the box in and follow a few steps on the manual and you are online. Very nice :). The Fritz!box has 4 network ports. These ports can be used to connect your computer or connect the IPTV set-op box. The Fritz!box will configure the network ports automatically for internet access or tv functionality depending on what device you connect. internet access.

So I wanted to get rid of the Fritz!box for a couple of reasons:

  • use pfSense as my firewall
  • have my WAN IP address directly on pfSense (no double NAT!)
  • use OpenVPN client on pfSense to my VPN provider (for privacy reasons)
  • route all my internet traffic via my VPN provider (Mullvad)
  • be in complete control of my network at home

Getting internet to work with my fiber connection and pfSense was no issue. There is plenty of information on the internet about how to setup PPPoE and all the VLAN stuff. Maybe I will do a blog post about that some day. Routed IPTV however was a different story. I had done some research and quickly discovered that getting routed IPTV to work with pfSense is going to require more effort than the plug-and-play method the Fritz!box was using. Mullvad has a great guide on how to configure pfSense with their services here. But there are no guides out there (at least I could not find them) on how to route all your internet traffic trough you VPN provider while at the same time routing your IPTV traffic outside the VPN tunnel. Note that this is not the same as making an exception for a device in your network to access the internet outside the VPN tunnel! There is routing and IGMP and firewall rules and dhcp options in play with different networks. I will show you how to setup pfSense to route all your internet traffic trough your VPN provider and at the same time make IPTV work!

So I made a little diagram of the situation I had in mind. I decided to get a mini-pc with multiple network ports (6 in total) so I could dedicate network ports for IPTV traffic or internet traffic. There are other options you could use like managed switches but I wanted to keep things lean. The diagram below shows the setup I implemented:

pfSense with routed IPTV and OpenVPN client for private internet access - 01

So basically the layout for the network ports on my pfSense firewall is as follows:

  • NIC 0: WAN / Internet/ Xs4all
  • NIC 1: LAN – to my managed switch for all the devices in my LAN.
  • NIC 2: free (future use)
  • NIC 3: free (future use)
  • NIC 4: IPTV set-op box Bedroom
  • NIC 5: IPTV set-op box Living room

VLANs

As you can see in my diagram above Xs4all is using VLANs. VLAN 4 is used for IPTV and VLAN 6 is used for internet access. That means that I need to have two VLANs coming in on my NIC 0 (WAN) on pfSense. On pfSense management interface go to Interface -> Assignments and then click on the VLANs tab. When you add the VLANs here make sure the correct VLAN tag is entered and choose the correct network interface. Create your VLANs here and make sure they look like the picture below:

pfSense with routed IPTV and OpenVPN client for private internet access creating_vlans

As you can see in the picture below VLAN 4 and 6 are both configured to use interface igb0. igb0 is the name pfSense gave NIC 0 on the mini-pc I am using. Make sure to check the name pfSense assigns to the network interfaces on your hardware. Description is optional so use it as you see fit. In the end our configuration should look something like my config below:

pfSense with routed IPTV and OpenVPN client for private internet access - 03

WAN configuration

WAN configuration consists of 2 parts. The first part is the internet access part and the second one is for IPTV.

Internet WAN side

I am not going to deep dive in the WAN configuration part. Internet access is living in VLAN 4 and there is some PPPoE configuration involved. In the end the WAN interface will be using NIC 0 and VLAN 6. It looks like this:

pfSense with routed IPTV and OpenVPN client for private internet access - 04

As you can see my WAN is coming in on igb0.6 with PPPoE. igb0.6 stands for NIC 0 VLAN 6. That is the way pfSense is naming the interfaces combined with the VLAN tag.

IPTV WAN side

Let’s get the IPTV interface on pfSense up and running! I have named the IPTV WAN interface WAN_IPTV. This interface is on igb0 and has VLAN tag 4 assigned. You can see it in the picture above. The next step is configure some DHCP options for this interface. If we don’t do this pfSense will not be able to pick up a valid network configuration and won’t be able to pick up the IPTV feed on from the WAN side. Open the properties of the the interface. In my case it is the interface with the name WAN_IPTV. In the first part of the properties make sure that the interface is enabled and IPv4 Configuration Type is set to DHCP:

pfSense with routed IPTV 06

Now scroll down on this page because we have to make sure that we set a couple of properties here.

pfSense with routed IPTV 07

As you can see in the picture above you have to enable the Advanced Configuration option here. This will enable some options in the Lease Requirements and Requests segment of this page:

  • Send options field: in this field enter dhcp-class-identifier “IPTV_RG”
  • Request options field: in this field enter subnet-mask, routers, broadcast-address, classless-routes

Check the image below:

pfSense with routed IPTV 08

After these options you will see that the WAN_IPTV interface will get an IP address from the ISP.

pfSense with routed IPTV 09

Setup the IPTV interface (for local set-op boxes)

So let’s move on the IPTV. As I said before I am using NIC 4 and NIC 5 for my IPTV set-op boxes. That means that those set-op boxes will be directly connected to that network port. Select the interfaces you will use and assign them a static IP address. Make sure that each interface used for IPTV need to have their own subnet. In my case I will be using the following subnet:

  • 192.168.100.0/24 for my LAN (NIC 1 – igb1)
  • 192.168.112.0/24 for the IPTV set-op box in my Bedroom (NIC 4 – igb4)
  • 192.168.111.0/24 for the IPTV set-op box in my Living room (NIC 5 – igb5)

I know that the subnet I use for IPTV is a little bit big as I only have 1 set-op box on that interface :). Ah well, this works for me and maybe I will adjust it in the future to make it smaller or combine both my set-op boxes on one subnet. For now this works for me. The IPTV interface has to be assigned a static IP address. Make sure yours look something like the picture below:

pfSense with routed IPTV 10

Double check the network ports you will use for your IPTV set-op box. Below is an overview of the IPTV interfaces I will use. As you can see I have assigned the dedicated network interfaces for my IPTV set-op boxes.

pfSense with routed IPTV 11

Next step is to make sure that those set-op boxes will get an IP address when connected to those interfaces. For that to happen I will be running a dedicated DHCP server on each IPTV interface. I know that there are other options, but hey…this keeps is simple and pragmatic :). Luckily pfSense makes it easy to run multiple DHCP servers. After assigning a static IP address on a specific interface you will see that interface appear in the DHCP server configuration page. See the image below:

pfSense with routed IPTV 12

The screenshot below shows how I have setup DHCP on the interface where my IPTV set-op box for my Living room is connected. There is nothing special there. Just specify the range for DHCP here.

pfSense with routed IPTV 13

The same goes for all the set-op boxes which have their own dedicated interface on pfSense.

IGMP Proxy

We have to setup IGMP Proxy because IPTV uses multicast. The multicast traffic needs to be received by the set-op box in order to function properly. The way to get the IGMP traffic from the WAN_IPTV interface (from your ISP) to the set-op box is to let pfSense proxy it. By using IGMP proxy we also can isolate multicast traffic to only the set-op boxes in stead of flooding you whole LAN constantly with it. This in a nutshell is why we use IGMP proxy.

Go to Services and the IGMP Proxy. Enable IGMP Proxy by clicking the checkbox. Then we have to add one upstream configuration for the WAN_IPTV network and a downstream configuration for every set-op box you have.

In my case the WAN upstream interface needs to have 3 networks:

  • 217.166.0.0/16
  • 213.75.0.0/16
  • 10.0.0.0/8

These network are in use for IPTV by KPN/Xs4all. Check your ISP for what network ranges they use for upstream. See the below image:

pfSense with routed IPTV 14

We have to tell the IGMP Proxy Service also where our IPTV set-op boxes live. So for each set-op box we need to configure a downstream interface. My Living room IPTV set-op box has the network:

  • 192.168.111.0/24
pfSense with routed IPTV 15

Make sure you select the correct interface. In the end the IGPM Proxy Service settings should look like this:

pfSense with routed IPTV 16

Routing, firewall rules and NAT

Now we have to setup specific firewall rules, routing and also NAT. This blog post is about using IPTV while routing all your internet traffic trough your VPN provider in order to hide it from prying eyes. But we don’t want to route IPTV traffic trough the VPN tunnel because that will break watching old-fashoned tv using your set-op box.

My pfSense firewall is running a full-blown OpenVPN tunnel (OpenVPN client) 24/7. When my VPN tunnel is down for some reason I want to block all internet related traffic. This prevents leaking internet traffic accidentally when my VPN tunnel is down. This is also called a “kill-switch”. To achieve this I have to set my pfSense Outbound NAT mode in Manual mode and configure addition NAT rules for my IPTV set-op boxes.

NAT Mode

I will not discuss in this blog post what the consequense is in changing NAT mode to Manual. The network configuration in Manual NAT mode requires additional settings and this can be different depending on your VPN provider. If you are using Mullvad they have a terrific guide here. Go to Firewall -> NAT and click on the tab Outbound.

pfSense with routed IPTV 17

For every local network used for the IPTV set-op boxes we have to add specific NAT rules. We have to tell pfSense to send all the traffic from those networks trought the WAN_IPTV interface. In this way the traffic will not get trough the VPN tunnel.

For the IPTV set-op box in my Living room I have added a rule here with the following configuration:

  • Interface: WAN_IPTV
  • Address family: IPv4
  • Protocol: any
  • Source type: Network
  • Source network: 192.168.111.0/24 (the subnet for my IPTV in the Living room!)
  • Destination: Any

See screenshot below:

pfSense with routed IPTV 18

We have to add one very important rule here. The network 224.0.0.0/8 has to added here and also routed trough the WAN_IPTV. Again check your ISP for details on the network. Add it using the following configuration:

  • Interface: WAN_IPTV
  • Address family: IPv4
  • Protocol: any
  • Source type: Network
  • Source network: 224.0.0.0/8 (the subnet for my IPTV in the Living room!)
  • Destination: Any

See the screenshot below:

pfSense with routed IPTV 19

After adding all the rules relevant for your IPTV set-op boxes your configuration here should look something like this:

pfSense with routed IPTV 20

Routing and firewall rules

The next (and last) step is to add the correct routing and firewalling rules. Per IPTV interface we have to add two rules. One is to route the IGMP traffic and the other one is to route the IP traffic. If you go to Firewall -> Rules you should see several tabs there including the ones specifically for you set-op boxes. Select the tab for your set-op box and let’s add the IGMP rule first.

The IGMP rule should have the following configuration:

  • Action: Pass
  • Interface: IPTV_Livingroom (select your set-op box internal network here!)
  • Address Family: IPv4
  • Protocol: IGMP
  • Source: any
  • Destination: any
  • Advanced configuration: check Allow IP options

The Allow IP options is very important to allow multicast traffic. See the following screenshot:

pfSense with routed IPTV 21

The second rule must be configured with these options:

  • Action: Pass
  • Interface: IPTV_Livingroom (select your set-op box internal network here!)
  • Address Family: IPv4
  • Protocol: IGMP
  • Source: IPTVLIVINGROOM net (select the subnet where your set-op box lives in!)
  • Destination: any
  • Advanced configuration: check Allow IP options

You should end up with these rules in the tab for your set-op box:

pfSense with routed IPTV 22

As you can see I have also added some other rules. The one relevant here I think is to block all traffic from the IPTV subnet to your LAN. It’s up to you if you want this. I added that just because :).

So there you have it. You should now have a fully functional network where your IPTV traffic is routed to your ISP and all your internet traffic is seperated and routed trough your VPN provider. This setup also makes it so that when your VPN tunnel is offline your set-op boxes will still work given that your WAN is off course fully up and running. Very nice!

At the end I want to make clear that I am in no way connected or affiliated to the brands or services I named in my blog post.

pfSense with routed IPTV and OpenVPN client for private internet access Read More