I’m a big fan of Pi-hole and have been using it to get rid of advertisement and tracking. Check my blogpost here if you want to know how to set Pi-hole up. It’s an amazing piece of software to protect your online privacy and provide network wide ad-blocking. In my day job I’m an IT-consultant for enterprise IT-solutions and in this post I will show you how to use Pi-hole with Microsoft Active Directory and protect all your domain joined clients from advertisement, tracking and also keep your clients secure from those malware websites.
Of course, you need to test this extensively before rolling it out in your infrastructure. I cannot stress this enough. The solution described in this blogpost did not show any kind of strange unexpected behaviour in my testlab but every infrastructure is different. Especially with endusers and applications there may be some challenges. So test before you implement!
Requirements
Microsoft Active Directory depends on Active Directory-Integrated DNS Service and Active Directory-Integrated DHCP Service. In this scenario all your domain joined clients are getting their IP-addresses and DNS settings from the Microsoft DHCP server. The DNS settings is used by the domain joined clients to talk to the Active Directory for DNS lookups and Active Directory related tasks. My testlab is running on Windows Server 2019 Active Directory and DNS Service, but this should also work if you are running a Windows Server 2016 environment. The requirement list is:
Microsoft Windows Server 2019
Microsoft Active Directory 2019
Microsoft Active Directory-Integrated DNS 2019
Microsoft Active Directory-Integrated DHCP Server 2019
Pi-hole Server
Domain joined client(s)
Let’s get started
They key Pi-hole feature we will be using in order to get this working is called Conditional Forwarding. I will explain in this post later on how we will use this feature.
DHCP Server settings
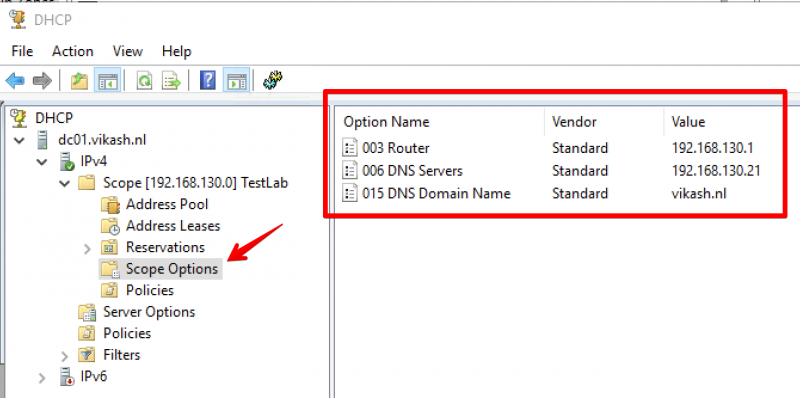
My DHCP Server is running on my Active Directory Domain controller. I’m sure a lot of you have the same setup which is fine. In the DHCP Server we have to specify certain options like DNS Servers and DNS Domain Name. My DHCP server is running on IP-address 192.168.130.10. My DNS Domain Name is vikash.nl. For DNS Servers fill in the IP-address of your Pi-hole Server. My Pi-hole server is running on IP-address 192.168.100.21.
On your DHCP server open the management console for DHCP Server and expand the scope options. Make sure the values match your network infrastructure:
Pi-hole Server settings
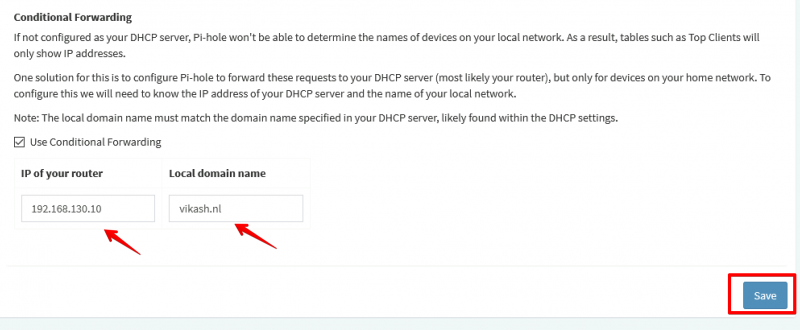
Now I will show you how to use Pi-hole with Microsoft Active Directory. The idea here is provide the Pi-hole Server as the DNS server to your domain joined clients. Then in the Pi-hole Server settings we will enable the option called Conditional Forwarding. Here we have to enter the IP-address of our Active Directory-Integrated DHCP server and also a Local Domain Name. This local domain name has to be your Active Directory name. In my case that is vikash.nl. What will happen now is that if the Pi-hole gets DNS requests from clients that need to resolve something.vikash.nl it will forward that request to our DHCP server which is also our Active Directory Domain controller. This makes sure that all the Active Directory related communications between my domain joined clients and Active Directory are completed successfully.
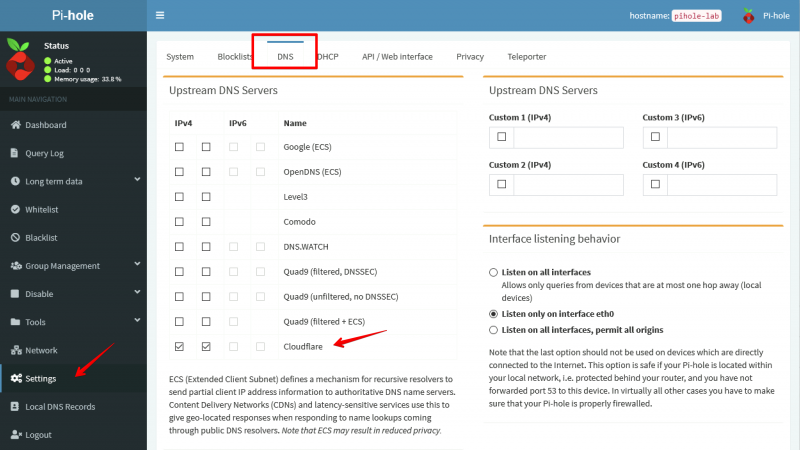
On the Pi-hole server go to Settings and select the DNS tab:
As you can see in the screenshot above I am using Cloudflare DNS Servers as my Upstream DNS. You can use any DNS Server as your upstream DNS. This basically means that for all DNS requests not related to vikash.nl the Pi-hole server will resolve those using Cloudflare. That is exactly what we want because it will make sure that internet is still working for all our domain joined clients. At the same time we will be able to see all the DNS requests in the Pi-hole Server Query Log for every client. This gives us control to protect our domain joined clients from ads, tracking or even malware.
In the DNS tab scroll to the bottom of the page and enter the DHCP server IP-address and the Local Domain Name. My DHCP server is 192.168.130.10 and my Local Domain Name is vikash.nl. Check your network infrastructure for your specific settings and click Save:
Testing
Now let’s make sure that everything works. First we will check that the correct DHCP settings are distributed to a client we want to join to the domain vikash.nl. I will use a Windows Server 2019 as client with the name vdi01.
Check IP-address
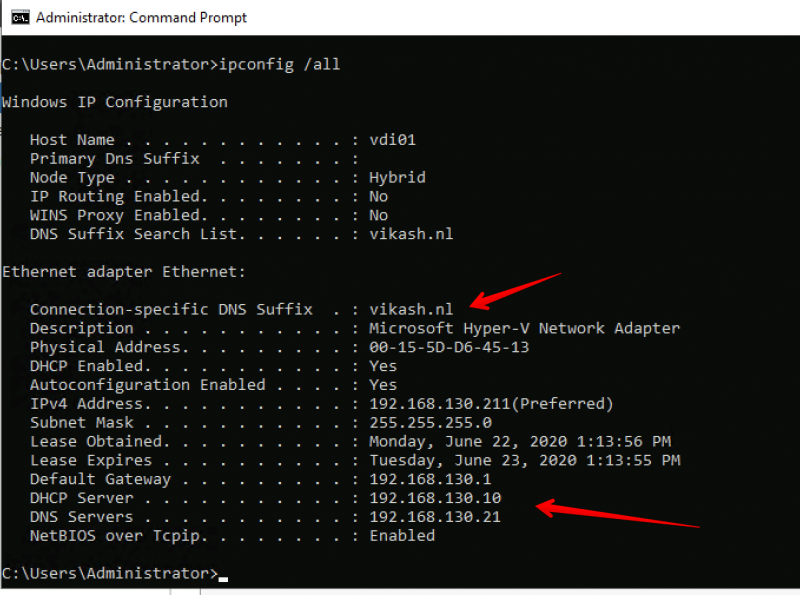
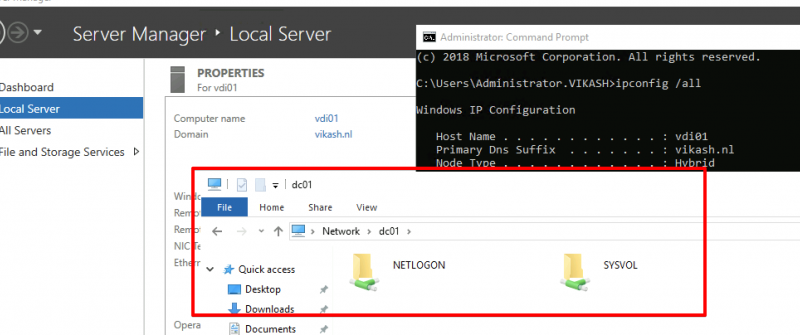
Open up a command prompt on the machine and make sure that the client is getting the correct settings from the DHCP server:
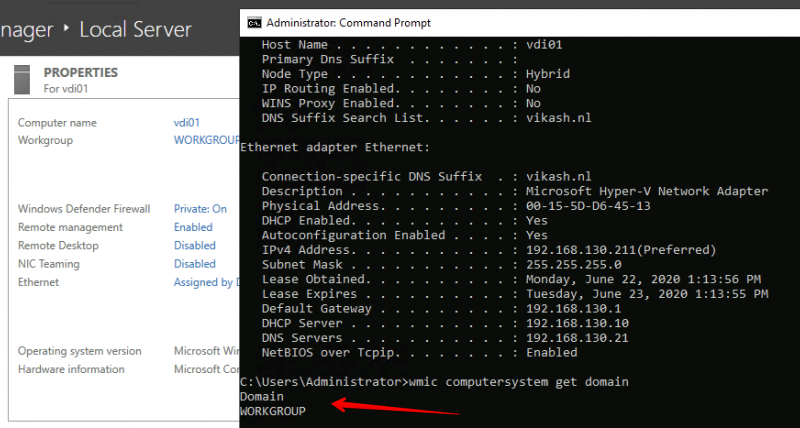
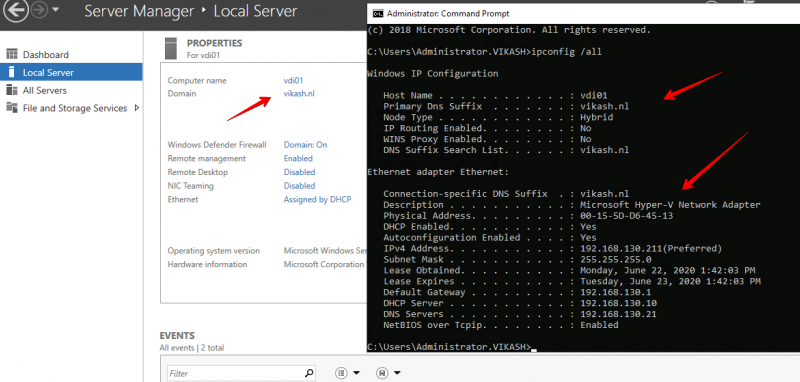
As you can see in the screenshot above the client is getting the DNS Domain Name and the DNS Server settings according to our scope options in the DHCP server. Check that the client is not already domain joined:
Join the client to the domain
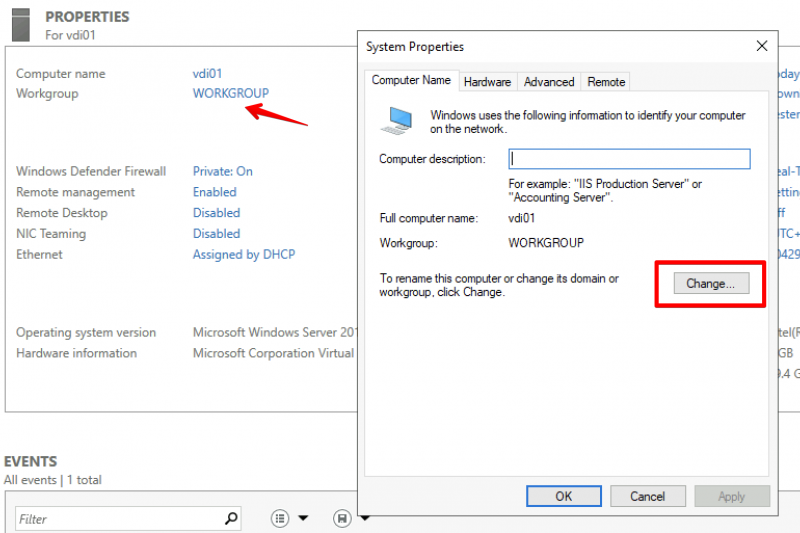
Next step is to join the client (my vdi01) to my domain vikash.nl. Click in the Server Manager on WORKGROUP and then click on Change in the window that pops up:
Select the Domain option here and enter your domain name. Remember that this must be the same as DNS Domain Name entered in the DHCP Scope options and in the Conditional Forwarding on the Pi-hole. In my case this is vikash.nl. Then click on OK.
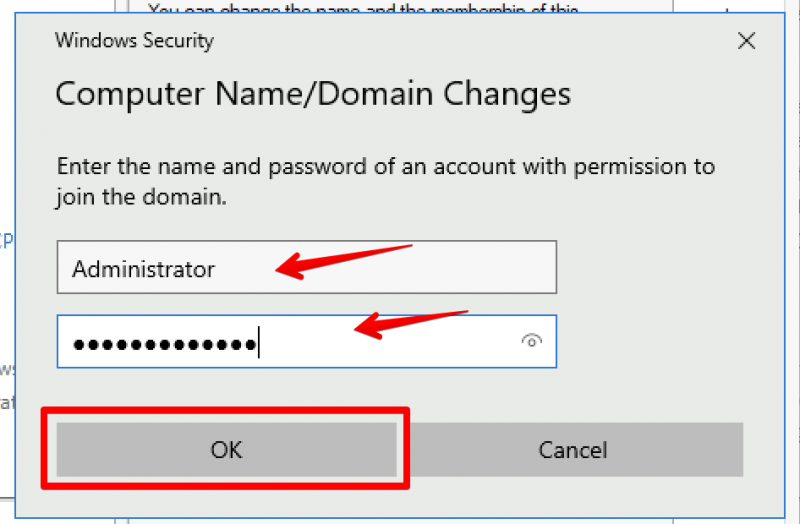
Windows will prompt you to enter Domain credentials which are allowed to do a domain join. In my testlab I use the domain administrator account for that. Enter the credentials and click on OK:
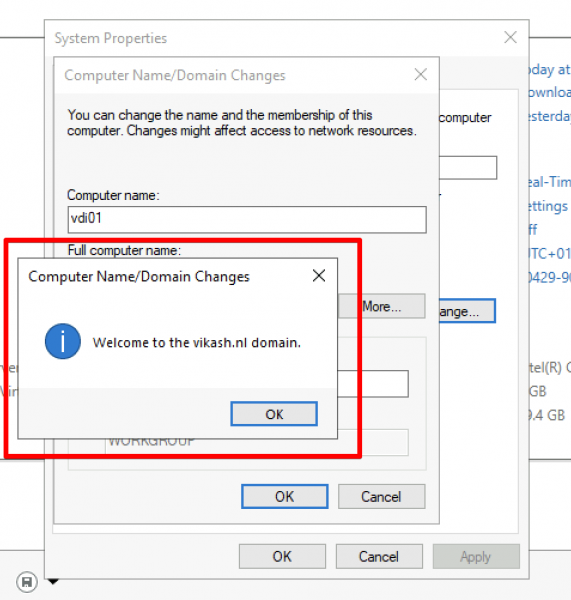
You will get a prompt from Windows telling you that the domain join was completed successfully. It looks like everything is working :). Click on OK and reboot you client.
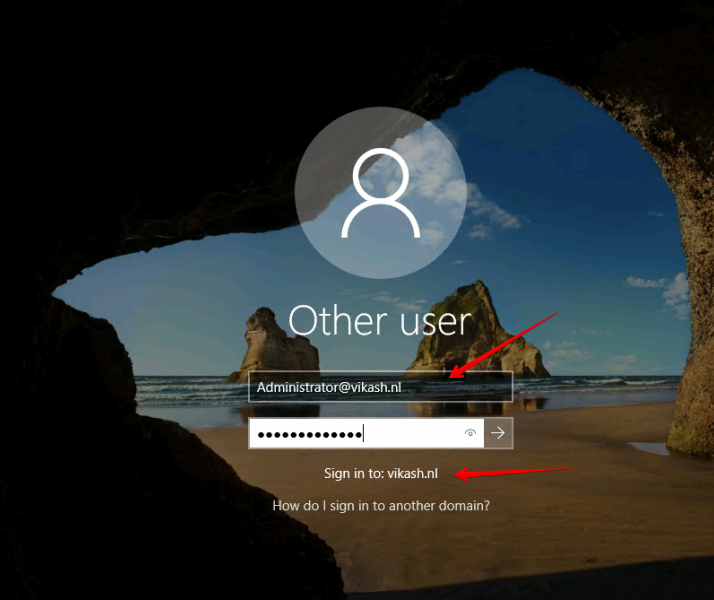
After the client reboots login using a domain account:
Check that everything is ok and the client is a member of the domain:
Check Pi-hole Query Log
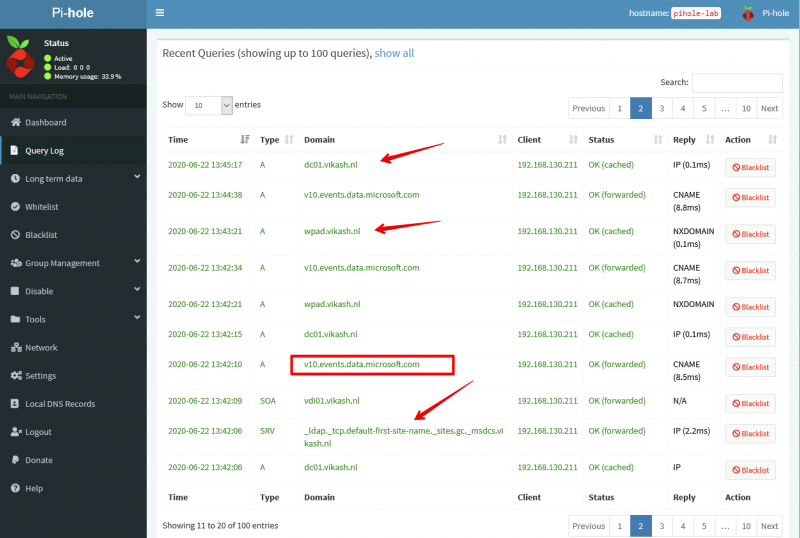
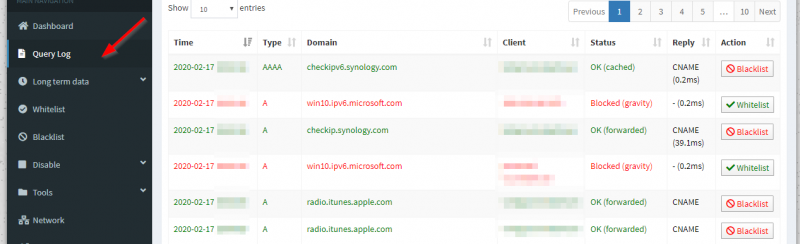
We can see the magic happening when we check the Query Log on our Pi-hole Server. Open the admin page of Pi-hole server and select the Query Log in the left menu:
As you can see in the screenshot above my client with IP-address 192.168.130.211 (vdi01.vikash.nl) is able to resolve internet queries as wel as queries related to my domain vikash.nl. Filesharing is working fine as well:
How amazing is this?! We are using Pi-hole with Microsoft Active Directory infrastructure and that means that we can now benefit from the protection of Pi-hole on enterprise level :). Of course this test is limited but imagine the possibilities. You can now provide all your endusers with a ad-free and tracking free internet experience but still be in control if some specific website needs to be unblocked.
I am a big fan of Pi-hole and I recommend it to everyone. It is an amazing piece of software to get rid of advertisement and tracking on a network level and recently Pi-hole version 5 was released. Check my blogpost here if you want to know how to set it up. That blogpost is based on version 4 of Pi-hole but the same applies for version 5. Just follow the steps there to secure your network and take back your online privacy. Pi-hole 5 has a lot of new features but the one I want to talk about is how to exclude client devices with Pi-hole 5.
Use case
Being able to exclude individual client devices can be extreme useful during troubleshooting. There may be times that you want to bypass the ad-blocking capabilities of Pi-hole like for IoT devices. Many IoT devices are connected to some cloud solution, especially if they are using Apple HomeKit. I’ve had many IoT devices go offline because Pi-hole was blocking them and I did not want to have to whitelist all those domains. My IoT devices are on a separate VLAN and I want them to use my Pi-hole as DNS server but I don’t want anything blocked for them. Pi-hole 5 makes that possible without jumping trough any hoops.
Let’s get started
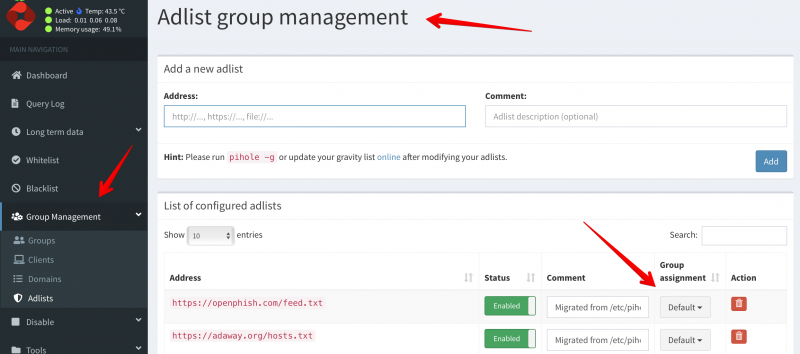
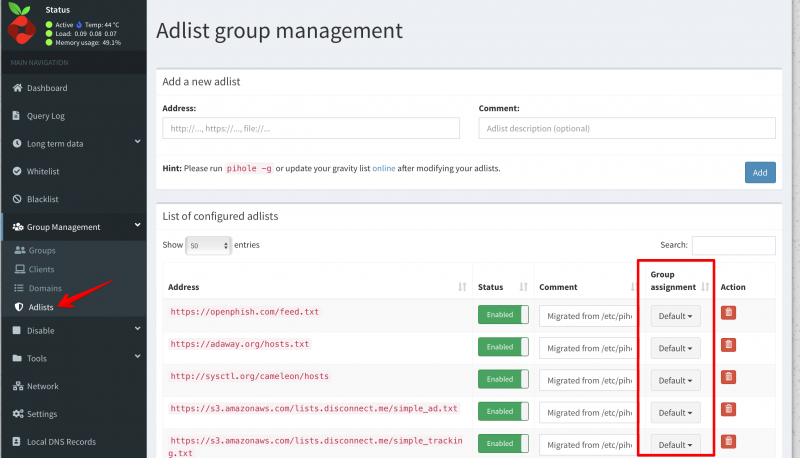
Excluding client devices with Pi-hole 5 is done using Group Management. After installing Pi-hole a default group is created. Blocklists are now called Adlists and all the adlists you add are added to the default group called Default. Check the screenshot below:
As you can see we can now also add a comment to an adlist :). Very nice for documentation purposes. Mine says Migrated from /etc/pihole/adlists.list because my Pi-hole was upgraded from version 4 to version 5. That comment is automatically added during the upgrade proces.
Create a new Group
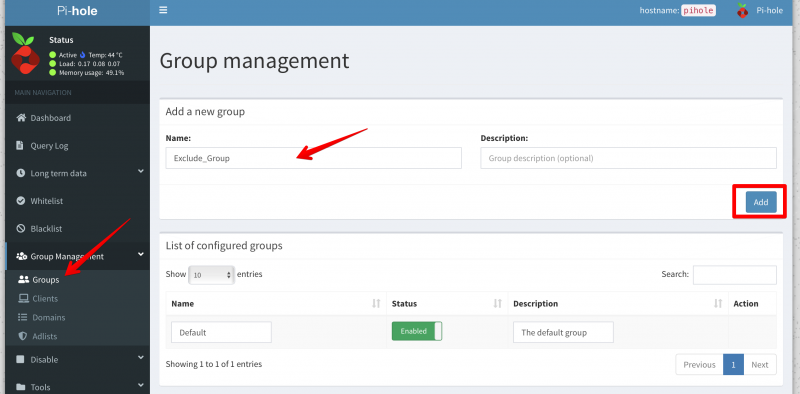
The first this we need to do is create a new group. Go to Group Management and click on Group. Enter a name and description and click on Add.
Make sure the List of configured groups show the new group you added:
Check group assignment
Now we have to make sure that the new Exclude_Group group we created does not have adlists assigned to it.
Go to Group Management -> Adlists and check the Group Assigment column. In the above screenshot you can see that I have all my adlists assigned to the Default group. Next we can add client devices to the Exclude_Group group. Every client device added to this group will have no adlists because all our adlists are assigned to the Default group.
Adding client devices
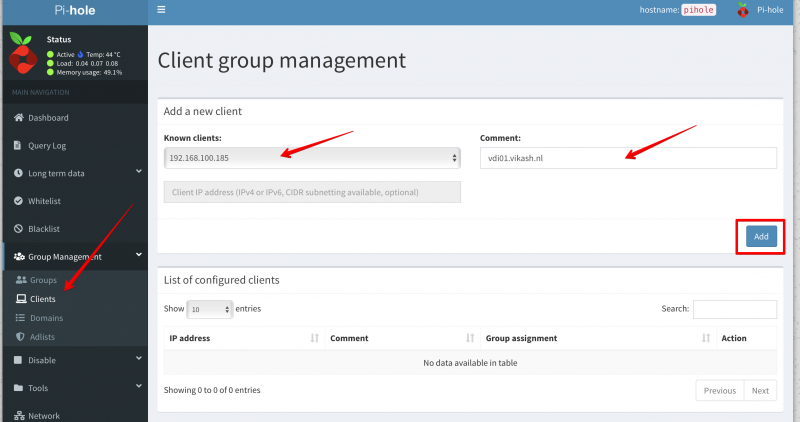
Go to Group Management -> Clients. Find the IP address of the client device on the dropdown menu. You can also enter a custom IP address. My client device has IP address 192.168.100.185. Enter a Comment and then click on Add.
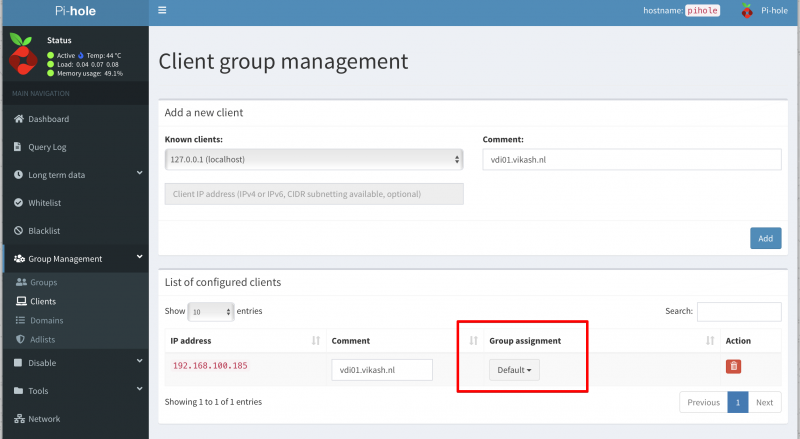
Not that after adding the client device it will automatically be added to the Default group:
Change the group to exclude client device
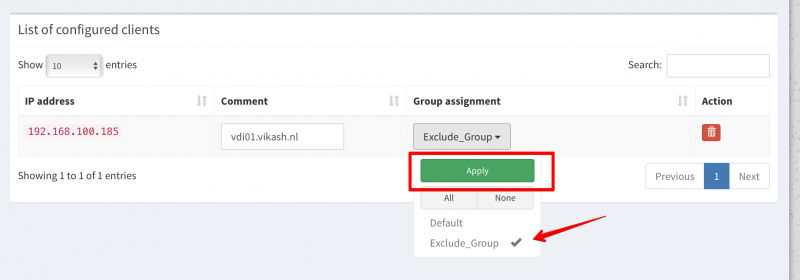
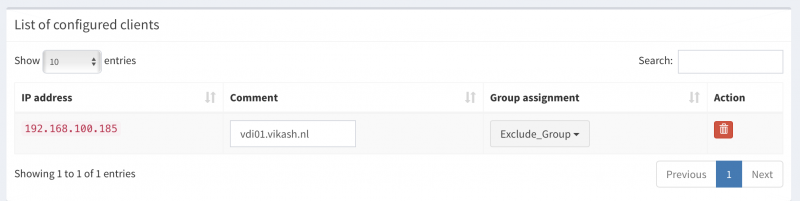
All we have to do now is change the Group assignment for the client device to the group we created earlier on. It is important to deselect the Default group! We only want the client device with IP address 192.168.100.185 be member of the group Exclude_Group. Rember that the Exclude_Group does not have adlists assigned so any member of that group will still use Pi-hole as DNS server without the blocking functionality.
After you have made sure that the client device is only member of the Exclude_Group click on Apply. Your screen should look something like this:
Do some testing
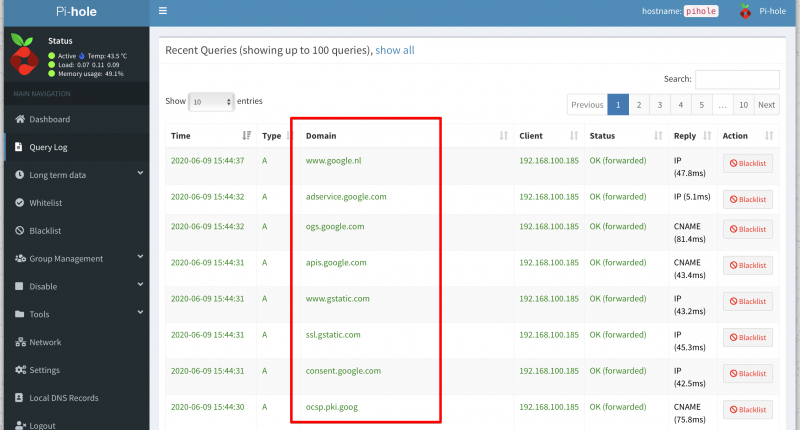
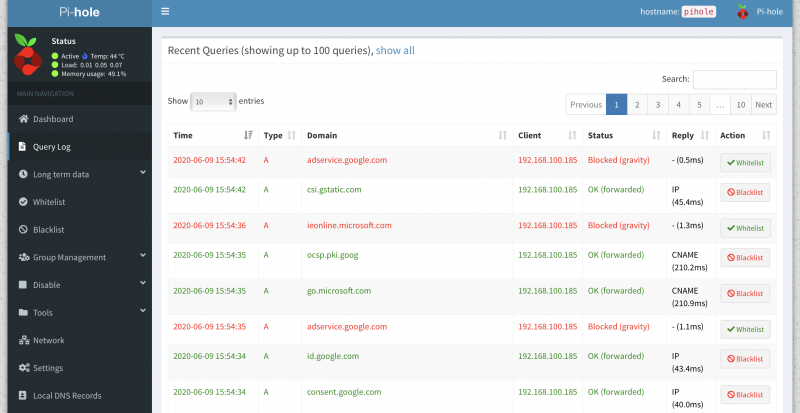
Now that my client device with IP address 192.168.100.185 is excluded we can do some testing. Opening a browser of my client device and visiting https://www.google.com shows the following in the query log of Pi-hole:
Note that the following DNS request is now allowed: adservice.google.com
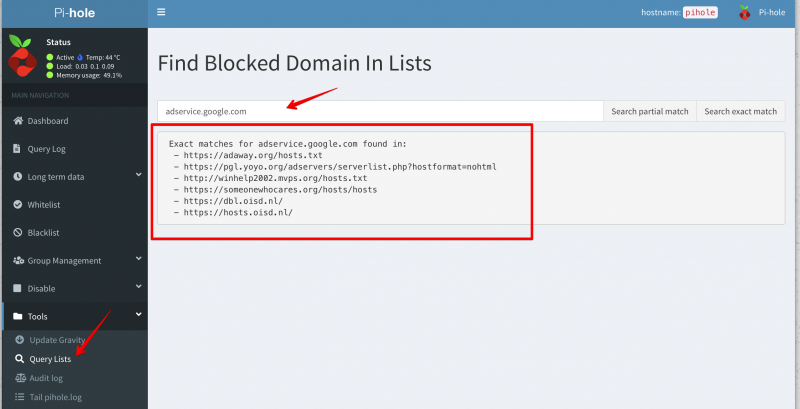
I know that my exclusion is working because adservice.google.com is on several adlists I use:
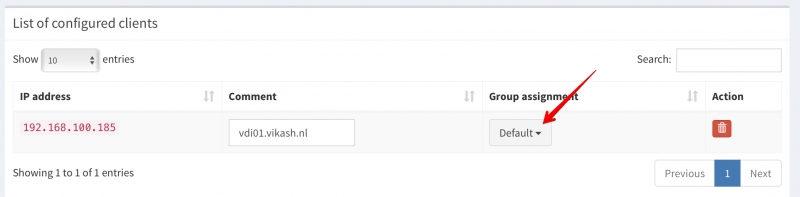
If I change the group of this client device back to Default we will observe the following behaviour:
Well, and that is all there is if you want to exclude client devices with Pi-hole 5 blocking especially if you find that after implementing Pi-hole (or adlists) something broke in your network. Really helpful I’d say.
In a previous blog post of mine here I showed you that I am using Pi-Hole to protect my network and moved away from pfBlockerNG. In this blog post I will show you how to setup Pi-Hole to protect your network and privacy.
What is Pi-Hole?
“Pi-Hole is is a DNS sinkhole that protects your devices from unwanted content, without installing any client-side software.” That is a quote from the documentation website of Pi-Hole and that basically says it all. If you want to know all the details Pi-Hole is then check you their website. Now there is the term “DNS sinkhole”.
DNS sinkhole…what now?
To be able to understand what a DNS sinkhole is you have to first understand what DNS is and does. DNS is short for Domain Name System and it basically does the same thing phonebook does. It translates numbers to names because numbers are a lot harder to memorize. When you want to visit www.vikash.nl your computer will put that request out to a DNS server on your network which will translate that name to the IP address where www.vikash.nl is living. This is also called a DNS query. Pi-Hole is a DNS server so if you setup a Pi-Hole on your network it will answer the DNS queries for all the devices in your network and this means that you can redirect DNS lookup to anywhere you like. You now have the power to redirect DNS queries to ad-serving networks to an alternate IP address basically eliminating those from showing on any device connected to your network :). This process is called DNS sinkhole and also how Pi-Hole works. If you want to read more about it check out this Wikipedia article.
What will Pi-Hole protect you from?
What makes the Pi-Hole unique from your-basic-DNS-server is the fact that it can pull in Blocklists from the internet and based on those build a database of domains which are serving ads, tracking privacy or even serve malware and ransomware! How cool is that. Ads in general are not a problem but nowadays even ads are used to deliver malicious payloads to your computer. Of course you can whitelist websites you want to support and allow Pi-Hole not to block the ads from them.
To sum up the Pi-Hole will use Blocklists to protect your network. Those Blocklists are on the internet and most of them are free. In this blog post I will share the Blocklists I use.
Requirements
Pi-Hole is a magnificent piece of software and it even can run on a Raspberry Pi Zero (hence the name Pi-Hole). If you have a spare raspberry pi laying around set it up. The raspberry pi are running off SD card and those are limited in read and write cycles. That’s why I would suggest to run in on something more robust. I am running it on a Ubuntu 18.04 server virtual machine which is running on Hyper-V 2016 host. This has been rock-solid performance wise and it enables me to make regular virtual machine backups in case something goes wrong like with an update. So my shoppinglist is:
Ubuntu server 18.04 with static IP address
Access to your internet router to change DNS server settings
Let’s get started
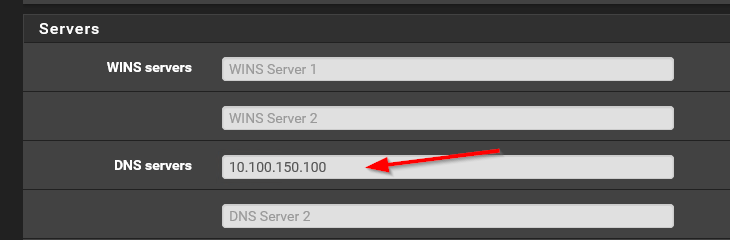
I will assume you have setup an Ubuntu server with a static IP address. This static IP address should be in the same network as where the rest of your devices are. Usually this is your normal LAN. So in my case my local network range is 10.100.150.100 to 10.100.150.200. I am using pfSense as my router so for me it looks something like the screenshot below:
Login to your Ubuntu server using SSH and make sure everything is updated. To do this use the following commands:
sudo apt-get update
sudo apt-get upgrade
Basic configuration
Once everything is updated and running it is time to setup Pi-Hole. This process is very simple. Just execute the following command:
sudo curl -sSL https://install.pi-hole.net | bash
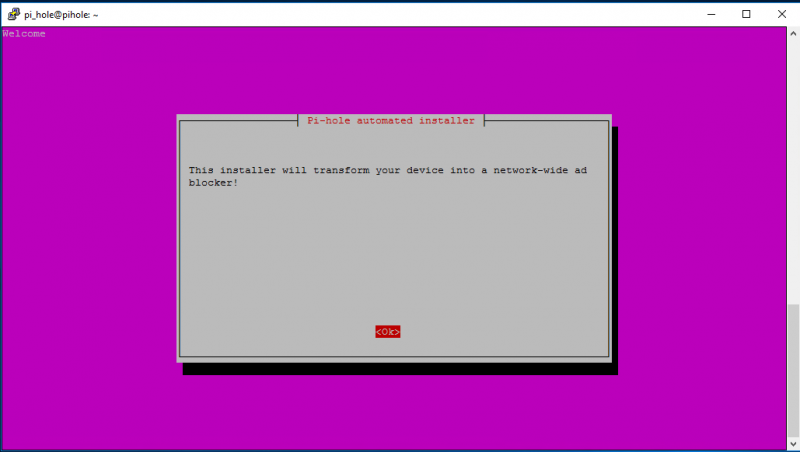
You will see the installation of Pi-Hole starting. Hit Enter for OK.
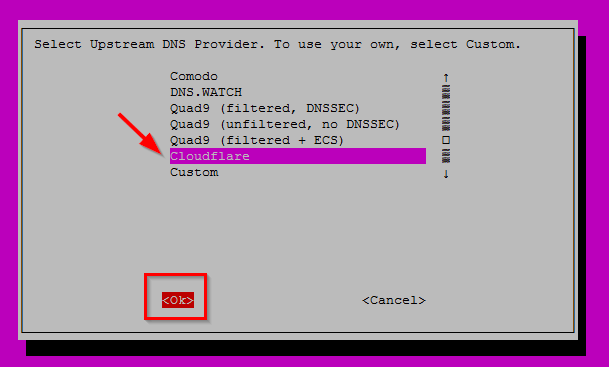
There will be a couple more screen where you just hit Enter for OK. Then you will arrive at the screen below asking you what upstream DNS server you are using. I choose to use Cloudflare. All my traffic is going trough my VPN provider anyway. The reason you need to enter a DNS server here is because Pi-Hole will be used as a caching DNS server on your LAN. So when the Pi-Hole receives a DNS query from a device on your LAN it will check if the hostname requested is in it’s own local DNS database (the one build using the Blocklists). If not then it will forward the request to it’s upstream DNS server which then will answer with the correct IP address. However if the hostname is in the DNS database of Pi-Hole it will sinkhole it.
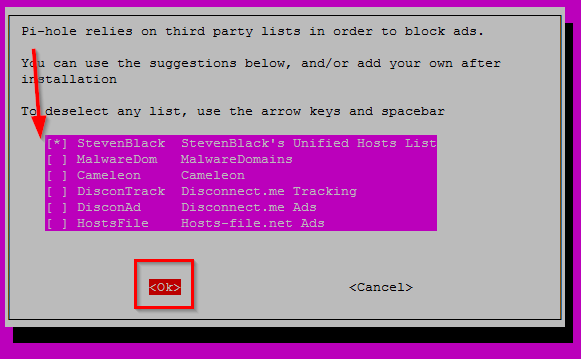
Now you will be asked what default Blacklists you want to enable. I will not be using the default Blacklists but don’t disable everything here! Enable at least one of the default Blacklists because this create the necessary files for Pi-Hole to work properly. So I just select one and hit Enter for OK:
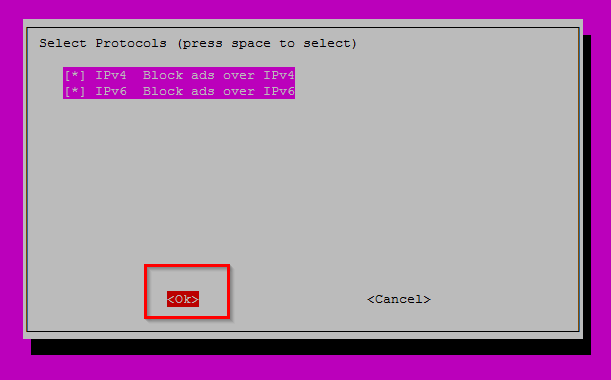
Select both IPv4 and IPv6 and hit Enter for OK:
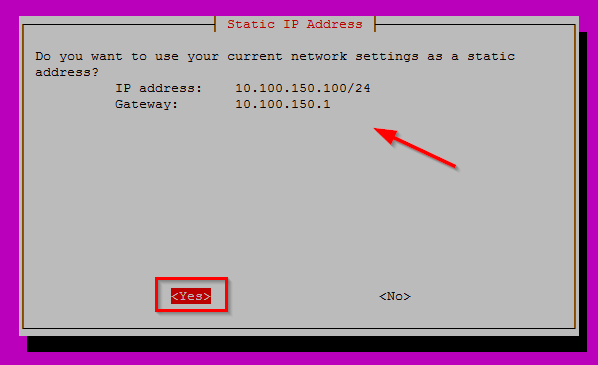
Next step it will inform you that you should have the IP address setup as static. Note that this IP address is also the IP address which all your devices will use as their DNS server. We will set that up later. For now just hit Enter for OK:
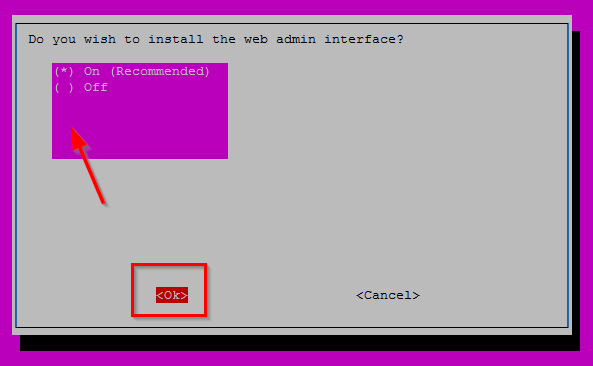
Choose to install the admin interface. Pretty important for management and configuration. Hit Enter for OK.
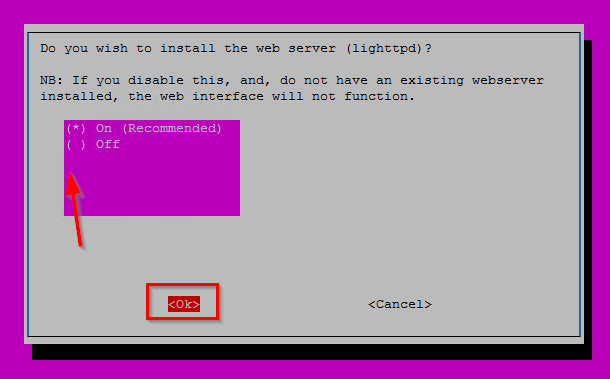
On the next screen choose to install lighttpd webserver. This is the webserver where the management UI is running on. Hit Enter for OK.
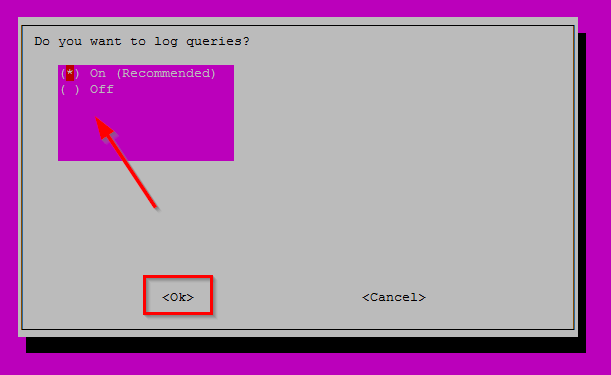
In the next screen choose to log the DNS queries which will be handled by Pi-Hole. This is one of the major features for me and I think the Pi-Hole UI is way ahead of the competition on how to display what is happening in your network in a easy way. Check my blog post here about why I think that.
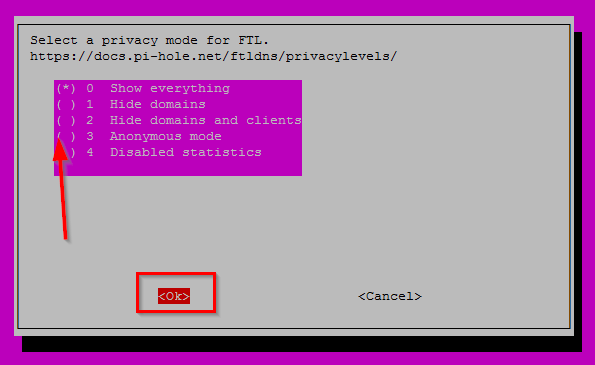
In the next screen choose to Show everything. This is one of the biggest features (again).
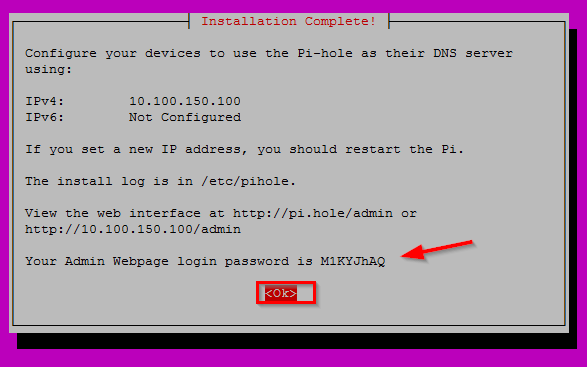
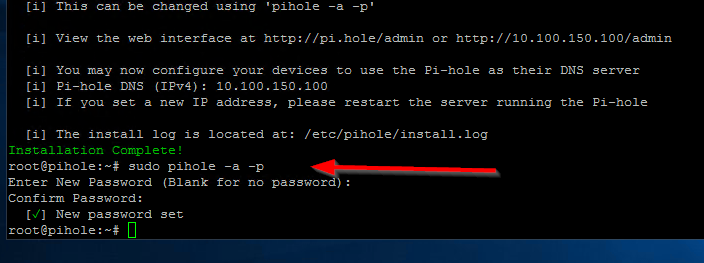
After some more default OK screen Pi-Hole will retrieve packages and start the setup. When it is finished you will be presented with a screen where the admin password is displayed and also the URL to the admin page. This password is used to login to the Admin Webpage. Just hit Enter for OK.
The first thing you want to do is change this password. At the command line enter the following command to change the password for the Admin Webpage:
sudo pihole -a -p
Advanced configuration
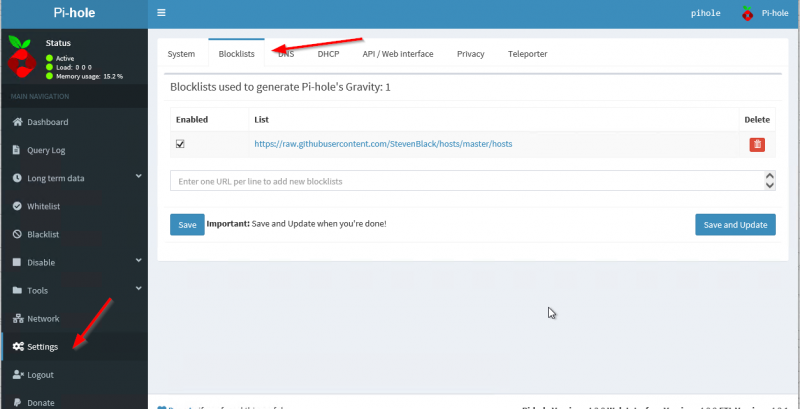
Let’s dive into the advanced configuration settings. Open your webbrowser and login to the Admin Page. Then go to Settings -> Blocklists. This is where the magic will happen and were we will tell Pi-Hole what Blocklists we want to use in order to build the local DNS database for domains we will sinkhole.
A word about Blocklists
Blocklists are used to build the local DNS database and based on that the Pi-Hole will sinkhole certain DNS queries. Be advised that this can (and probably will) break the internet at your home! I want to stress this very much! Depending on what Blocklists you use you will discover that certain websites or apps are not working anymore. I know for example that many Blocklists are blocking all of Facebook or Instagram for privacy reasons and after adding those Blocklists to your Pi-Hole you will not be able to open those websites or use those apps. Luckily (as I mentioned before) we are able to Whitelist certain domains on Pi-Hole. Whitelisting means that regardless of whether a certain domains appear in a Blocklist, it will not be blocked.
That’s why Whitelisting is a major part of implementing Pi-Hole in your network. Especially the first few days / weeks you will have to keep a close eye on the domains which are being sinkholed and add domains to the Whitelist as needed.
My Blocklists
Below are the Blocklists I use. Again, make sure that you understand that this is not a set-it-and-forget-it kind of feature. You will have to “babysit” the Pi-Hole configuration in order to tweak your Whitelist. Below is my Blocklist:
Login to the Admin Webpage and go to Settings and then select the Blocklists tab. Delete the one blocklist feed we have here from the setup earlier. Then enter all the Blocklist feeds from above and click on Save and Update. Wait for it to update.
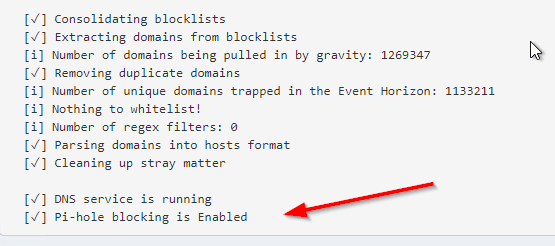
After a successful update you will be presented with a resume of the Blocklist feeds update and then you are “in business”. Pi-Hole is now ready to protect your network and all the devices on it.
My Whitelist
Managing the Whitelist is very important as I said before. To get you started on a base-Whitelist below you have my own Whitelist. It should give you a very good basic starting point.
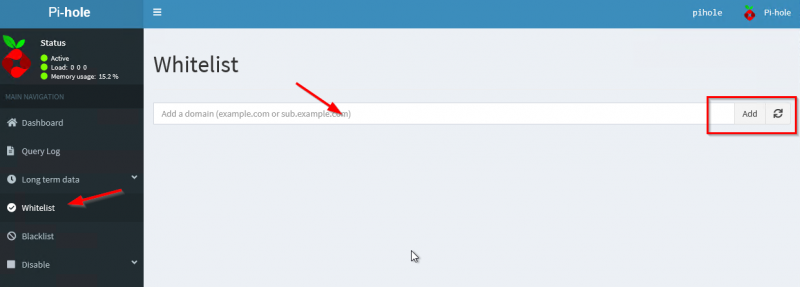
To add the above domains to the Whitelist click on Whitelist in the Admin Webpage and enter the list above. When you click on Add here the list is immediately active. So any changes you make here will be immediately active and you don’t need to update anything.
How to whitelist hostnames
Check your Whitelists by clicking the menu on the left of the Admin Webpage:
Just add my Whitelist list and click on Add.
If you encounter a website or app that is not working anymore after setting up Pi-Hole chances are that something is sinkholed (blocked by Pi-Hole). If you click on the Query Log on the menu you will get a very nice overview of the DNS queries which are allowed or blocked. You can even search for queries for a specific device in your network. Very powerfull interface!
The interface explains itself basically. If you see something being blocked and you want to whitelist it, just click on the Whitelist button behind it and all is done! That simple.
Adjust router to serve Pi-Hole as DNS Server
Now you are all set with Pi-Hole and it is time to change your router settings so it tells all the clients in your LAN that Pi-Hole is the DNS server now. I will use pfSense as my example here but in general these steps should also translate to the brand router you have.
The main idea is to go into the DHCP settings in your router and change the DNS server there to the IP address of the Pi-Hole. Make sure that there are no other DNS servers entered there beside the Pi-Hole and soon you will see devices in you LAN querying Pi-Hole for DNS lookups. For pfSense go to Services-> DHCP Server-> LAN. Scroll down to the Servers section and enter the Pi-Hole in the first DNS servers field. Leave the rest blank.
Apply some tweaks
Pi-Hole updates it Blocklists every sunday. I made a change here to update is every day. I do this because domains are constantly being added and removed from several Blocklists I use and by updating them frequently I can make sure that I don’t miss some critical domain updates. When installing Pi-Hole a user is created on your server names pihole. This user has a cron job which updates Pi-Hole Blocklists.
On the command line on your Ubuntu server to edit the cron file for the pihole user:
nano /etc/cron.d/pihole
Edit the line that contains pihole updateGravity . If you want it to run for example every day on 2 AM change the line to this:
Run systemctl restart cron for the changes to take effect. This may be changed back to default when Pi-Hole get’s a system update so you have to watch for that.
Pi-Hole version update
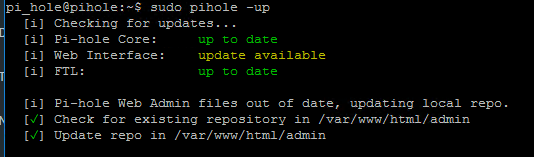
Once in a while Pi-Hole will release a new version. When you login to the Admin Webpage you will get a notification in the bottom of the page like so with the words Update available! glowing in red:
To apply the update you will have to login to your Pi-Hole using SSH and enter the following command:
sudo pihole -up
You will see that everything is updated and you are good to go:
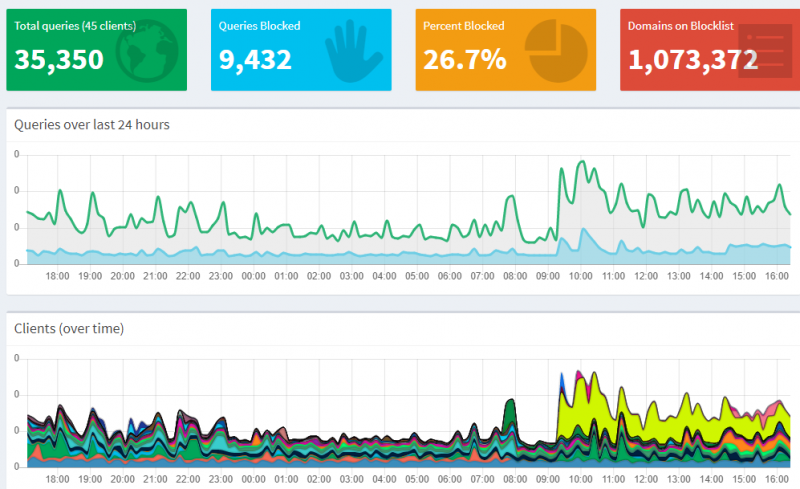
Some cool stats
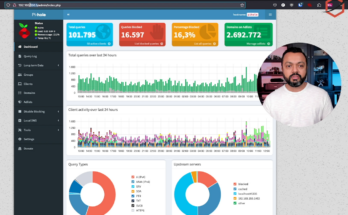
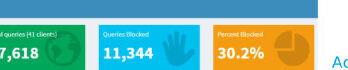
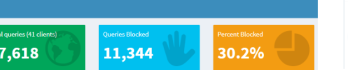
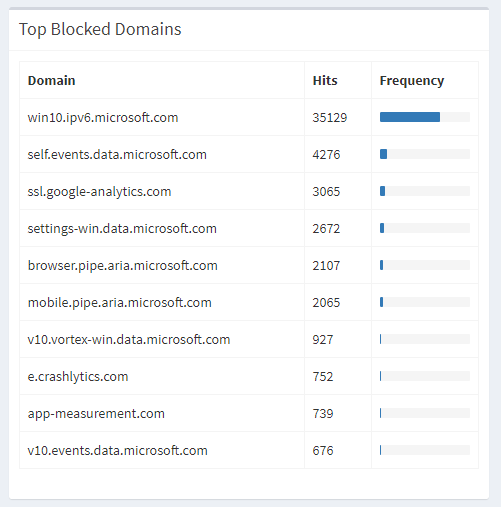
I have Pi-Hole running for some time now and I want to share some cool stats. Here is the overal stats page which give you a detailed overview of how my Pi-Hole is doing in my network:
Here are the top blocked domains in my network and how Pi-Hole is protecting me against leaking telemetry data to a big tech company.
Wrap up
Overall using Pi-Hole has made me more aware of privacy and gives me the ability to protect all the devices in my network from ads, privacy tracking, malware and ransomware. In order of first-line defense I think this is a valuable addition in protecting your privacy and data.
If you implement Pi-Hole in your network and break the internet I cannot be held responsible for it. I want to stress again that it is very important to keep a close eye on your Query Log to make sure that something isn’t being wrongfully blocked. Pi-Hole has a lot of more options and features but I believe with this blog post I have make sure that you have the basic configuration drilled down in order to keep your network safe and maintain your online privacy.
For a while now I have pfSense firewall running at home. I really love the performance, stability and security pfSense provides. It is just rock-solid! But let me tell you why I moved from pfBlockerNG to Pi-Hole. What I also love in pfSense is the ability to install packages and add even more useful features to the platform. So I went ahead and installed the pfBlockerNG-devel package. At the time of writing this blog post the latest version of pfBlockerNG-devel is 2.2.5_29. Note the “devel” in the name because this is the branche of pfBlockerNG which is actively being developed.
Ads on themselves can be OK I think. It all depends on how ads are being used and in the end you need to find funding. After all this site is also using ads. Adding pfBlockerNG allows you not to only block ads but also block web tracking and ransomware. That there is added security and privacy you get when using pfBlockerNG. It will do this for your whole network using something called DNSBL (short for Domain Name System-based Blackhole List). Every device in your network will benefit from this and be protected. But pfBlockerNG does so much more like also giving you the ability to block internet traffic coming from certain IP addresses. These IP addresses translate to specific countries and regions so it can be very handy in protecting your network from all those hackers trying to get in your network.
I went ahead and set up both and for some time everything was working well. I enjoyed ad-free and tracking-free internet on all the devices in my LAN. But then something happened…
The internet broke down (well a little bit)
I have several iOT devices at home including Ikea Tradfri smart lights. Suddenly these lights because unreachable in the Apple Homekit App on my iPhone. The rest of my Homekit enabled iOT devices were doing fine. The first time this happened I thought it is probably a bug so let’s power cycle the Ikea Tradfri gateway. This was a success and the Ikea smart lights were available again. Nice!
Not so nice when I discovered an hour or so later that the Ikea Tradfri smart light were unreachable again. So now I’m thinking that maybe pfBlockerNG is blocking some hostname (the DNSBL feature). This is possible because maybe one of the DNSBL feeds I am using has got an update and some hostname which Ikea Tradfri gateway uses is bow blacklisted. Luckily pfBlockerNG gives you the ability to whitelist hostnames.
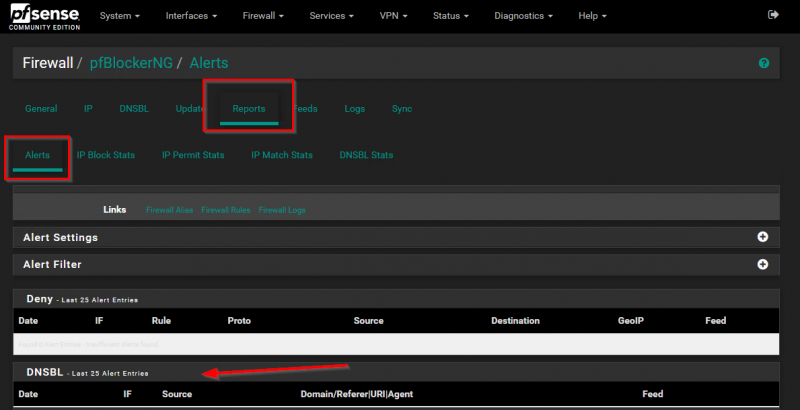
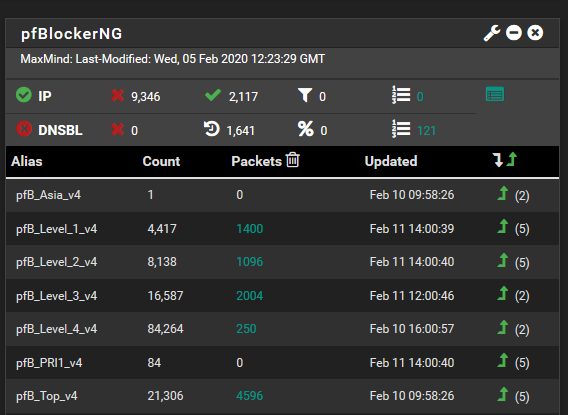
I went into the management interface of my pfSense firewall and selected the Reports tab in pfBlockerNG settings. The Reports tab shows a very nice list of hostnames which have been blocked by pfBlockerNG. There is a nice filtering option as well. See the screenshot below.
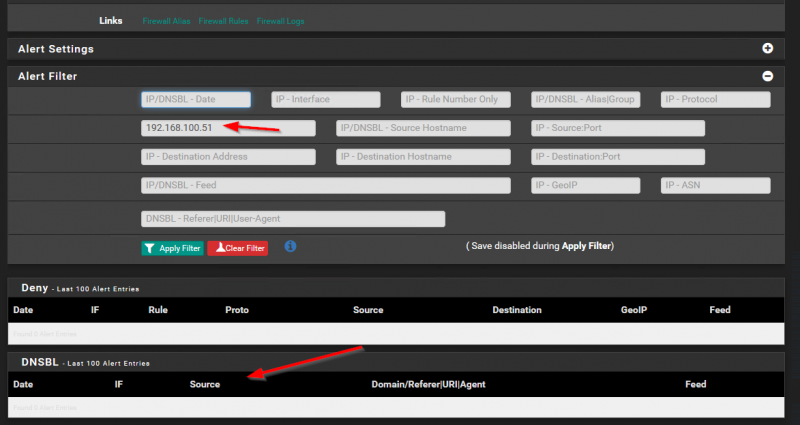
My Ikea Tradfri gateway has 192.168.100.51 as IP address. This is static setup in the DHCP server on my pfSense. So I enter this IP address in the Alert filter to see if pfBlockerNG is blocking DNS requests from my Ikea Tradfri gateway. The result was 0 so according to pfBlockerNG nothing from my Ikea Tradfri gateway was blocked. See screenshot below.
But still I had the same behavior. When I power cycle the Ikea Tradfri gateway all is well for a short time and then is just becomes unavailable. I continued my investigation and decided to replace the USB power adapter of the Tradfri gateway. That didn’t help. By now I was thinking that I have tried everything but to replace the unit. I went to Ikea and got a new Tradfri gateway. I set it up and went trough the painful experience of connecting all my Tradfri lights and switches to the new gateway. I was just wrapping up when I saw that all my Ikea lights were unreachable again! Imagine my frustration.
Bring on Pi-Hole!
OK now I was furious. Even after replacing the Ikea Tradfri gateway I had the same problem. I was getting more convinced that is has to be something in my network. First step for me now was that I wanted to know all the DNS queries the Ikea Tradfri gateway was making. I tried debugging that in Unbound resolver on my pfSense but there were so many DNS requests flying by that it made troubleshooting nearly impossible.
I needed another DNS server, one specifically for my Ikea Tradfri gateway. And I needed it quick. Since I had a Raspberry Pi lying around I went the Pi-Hole route. Just download the correct image from the Pi-Hole website, extract to the SD-card and startup your new DNS server. Within a couple of minutes I was up and running with Pi-Hole. I loaded the exact same DNSBL lists I was using on pfBlockNG on the Pi-Hole. Using DHCP reservation I managed to set -Pi-Hole as the DNS server on the Tradfri gateway.
Pi-Hole showed me all the DNS queries the Tradfri gateway was doing, which ones were allowed and which ones blocked. I was specifically interested in DNS queries being blocked. I saw immediately that a lot of DNS queries were being blocked to webhook.logentries.com. That DNS query did not came up when I was troubleshooting on pfBlockerNG to find out the blocked queries. I added webhook.logentries.com to the Pi-Hole’s whitelist and waiting a couple of hours. Ikea smart lights were working fine now. Even after 24 hours all my Tradfri lights were now working fine.
Now let’s remove webhook.logentries.com from the Pi-Hole’s whitelist I thought and see what happens. Within the hour my Tradfri lights were offline again. Root cause found :).
Why I made the switch to Pi-Hole
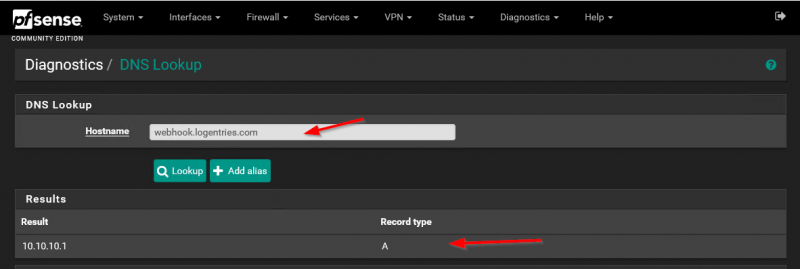
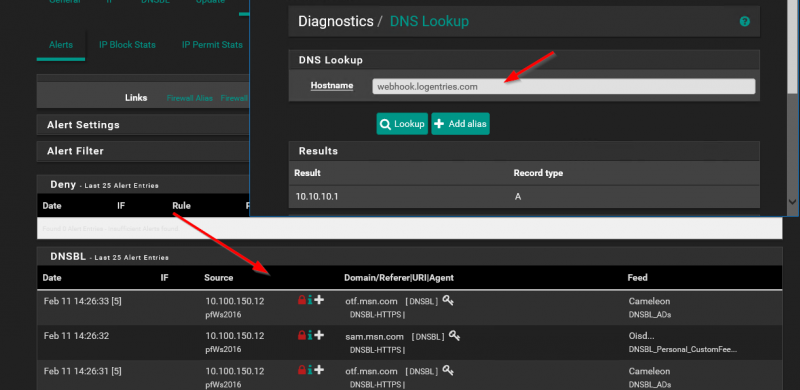
I began to investigate why pfBlockerNG was not showing the blocked DNS queries. I discovered that when I did a DNS lookup on pfSense with pfBlockerNG enabled the request for webhook.logentries.com was being “sink holed” to pfBlockerNG, but it was not showing up in the Reports tab as blocked (or allowed). Check the screenshots below what happens on pfSense.
As you can see above the DNS request is blocked by pfBlockerNG because it is “sink-holed” to the DNSBL VIP pfBlockerNG is using (10.10.10.1). But when I check the Reports tab in pfBlockerNG, I don’t see the blocked DNS request.
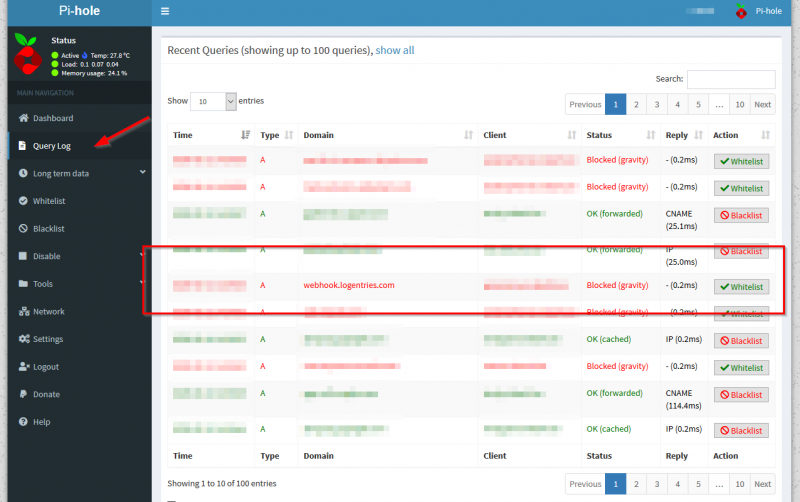
Now when I do the same DNS lookup against the Pi-Hole I can see the DNS lookup immediately in the Query Log tab:
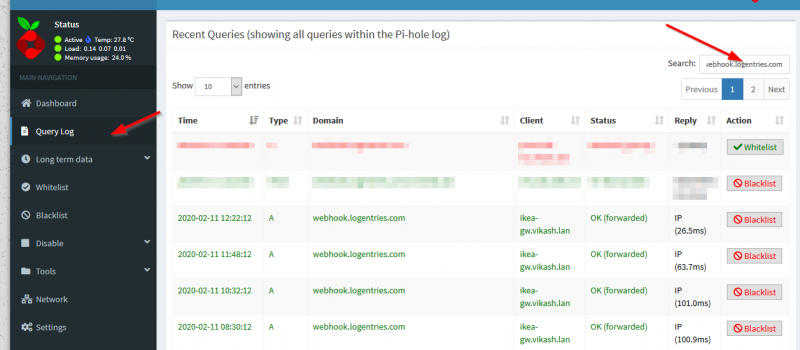
The gui on the Pi-Hole makes it really easy to troubleshoot as it shows immediately which client is doing what DNS queries and which ones are being blocked. The gui is also very easy in filtering options.
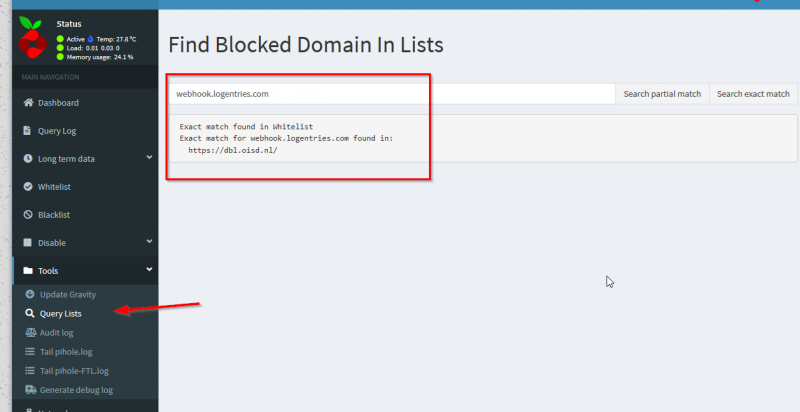
And you can find very easy in which DNSBL feed a certain hostname is so you know what feed is blocking your internet traffic. It even tells you if the dns name is whitelisted. Makes management so much more easy.
This gui compared to pfBlockerNG was refreshing to me. Amazing how much time I spend troubleshooting on pfBlockerNG while the Pi-Hole showed me within minutes what was happening and where the problem was! Great tech :).
In the end
I moved from pfBlockerNG to Pi-Hole. Don’t get me wrong, I still love and use pfBlockerNG. But I now only use it to block IP addresses from certain countries and regions. It is still very useful for that.
But I don’t use the DNSBL option anymore because I have no faith in it’s reporting capabilities. And that starts to count very heavy when you are troubleshooting why something is not working in your network. Since I started using Pi-Hole I did find some other dns hostnames which were also blocked and were not reported by pfBlockerNG. One of them was to the download server of Ubiquiti for firmwares. Pretty important to know that sort of stuff.
I just can’t be bothered to make tcp dumps of my network traffic on pfSense and then use some kind of tool to analyze and try to find the needle in the haystack. So I recommend you use Pi-Hole for the DNSBL part as it is amazing at that. From the pragmatic perspective it is blazing fast and has great reporting options about what is happening in your network.
This website uses cookies to improve your experience. We'll assume you're ok with this, but you can opt-out if you wish.AcceptRejectRead More
Privacy & Cookies Policy
Privacy Overview
This website uses cookies to improve your experience while you navigate through the website. Out of these, the cookies that are categorized as necessary are stored on your browser as they are essential for the working of basic functionalities of the website. We also use third-party cookies that help us analyze and understand how you use this website. These cookies will be stored in your browser only with your consent. You also have the option to opt-out of these cookies. But opting out of some of these cookies may affect your browsing experience.
Necessary cookies are absolutely essential for the website to function properly. This category only includes cookies that ensures basic functionalities and security features of the website. These cookies do not store any personal information.
Any cookies that may not be particularly necessary for the website to function and is used specifically to collect user personal data via analytics, ads, other embedded contents are termed as non-necessary cookies. It is mandatory to procure user consent prior to running these cookies on your website.