Reading Time: 14 minutesIn this blog I will show you how to setup Citrix Endpoint Management (Citrix XenMobile Server 10.9). The new name for Citrix XenMobile is Citrix Endpoint Management. This version was released by Citrix on the 13th of September 2018. A few things are new in this version:
- Access to XenMobile Tools from the Console.
- Add Google Play Store apps using a package ID.
- New public REST API’s.
You can read all about what is new here. XenMobile Server is a complete Enterprise Mobility Management (EMM) solution that provides both Mobile Device Management (MDM) and Mobile Application Management (MAM) through a single virtual appliance. You can run the virtual appliance on XenServer, Hyper-V or VMware. It supports all the major hypervisors as you can see so you have no excuse there for not using it :). This version of XenMobile has a single management console for your devices, apps and data.
So before we can start the setup and configuration we have to make sure we meet the requirements:
- One of the hypervisors I mentioned before.
- 4x virtual CPUs.
- 4GB RAM minimum. 8GB is recommended.
- 50 GB disk space.
- Citrix License Server 11.15.x or later.
- MS SQL Server 2012 SP4 or higher (if you plan on using an external database).
- SSL Certificate (with the hostnames we are going to use in this blog or you can just use a wildcard certificate).
So this will get your XenMobile server up and running. Depending on your needs you will need additional components like Citrix NetScaler or mobile applications. I will discuss this in upcoming blog posts.
Where am I running this setup? I have Citrix XenServer running in my testlab so I downloaded Citrix XenMobile virtual appliance for XenServer. In my test lab I have Active Directory running on Windows Server 2016. Nothing is redundant or high-available as this is just my test lab :). Let’s start.
Import the virtual appliance
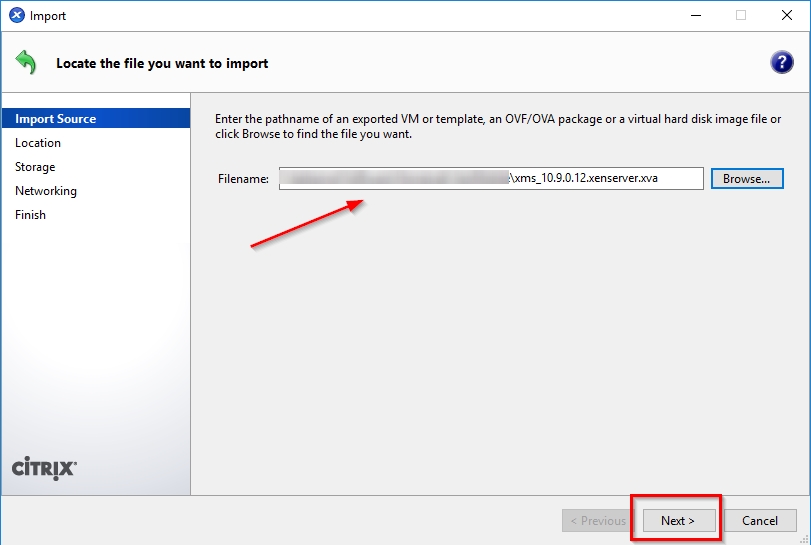
Locate the virtual appliance file you just downloaded.
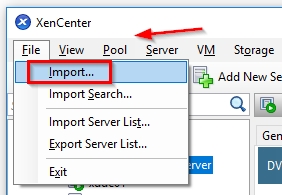
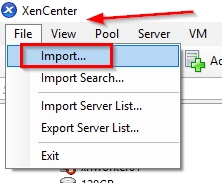
Open Citrix XenCenter and choose File -> Import.
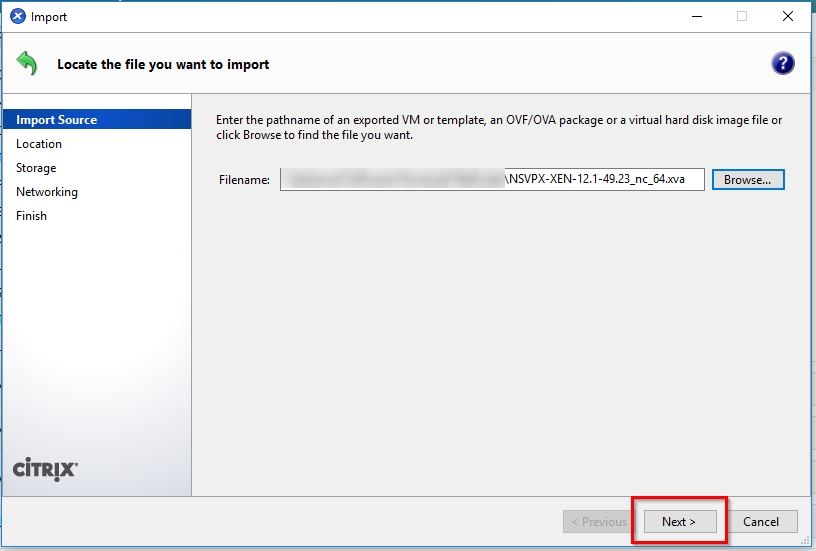
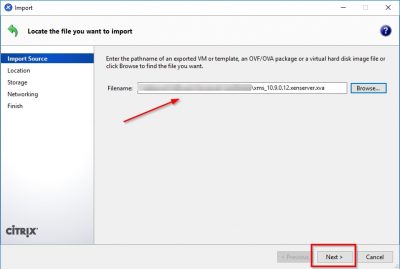
Click on Browse to select the virtual appliance file. Click on Next.
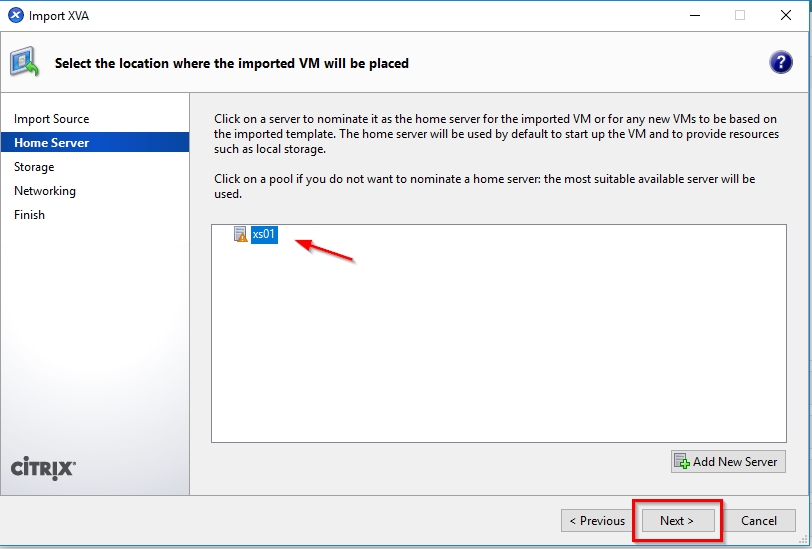
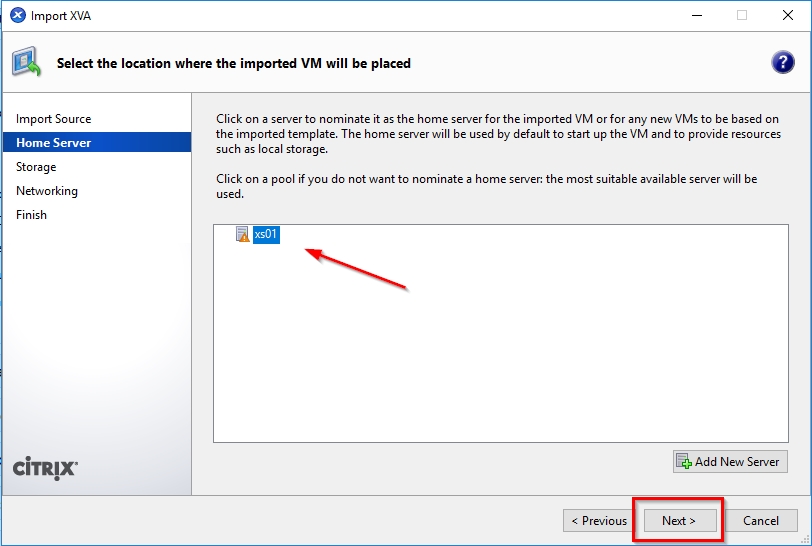
Select the XenServer host on which you want to import the virtual appliance. In my case I have only on host, so this is automatically selected. You might notice that there is an orange triangle displayed in front of my XenServer host. That is because I am running the free version of Citrix XenServer. The orange triangle reminds me that Citrix XenServer is running on “free-mode”. After selecting your XenServer host click on Next.

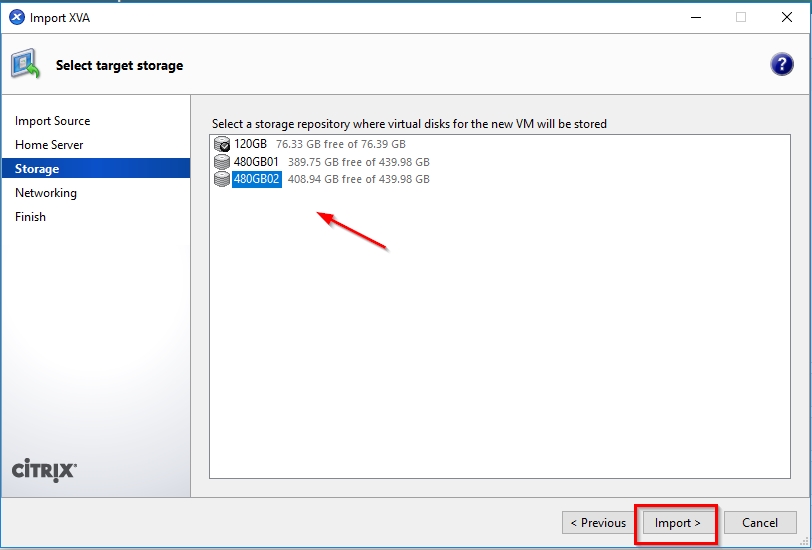
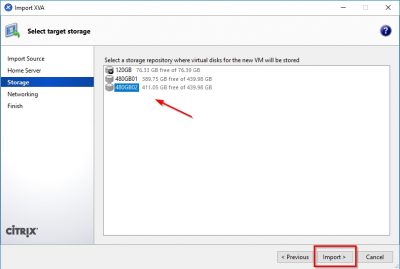
Select the storage repository on which the virtual appliance will be stored. Click then on Import to start the import process.
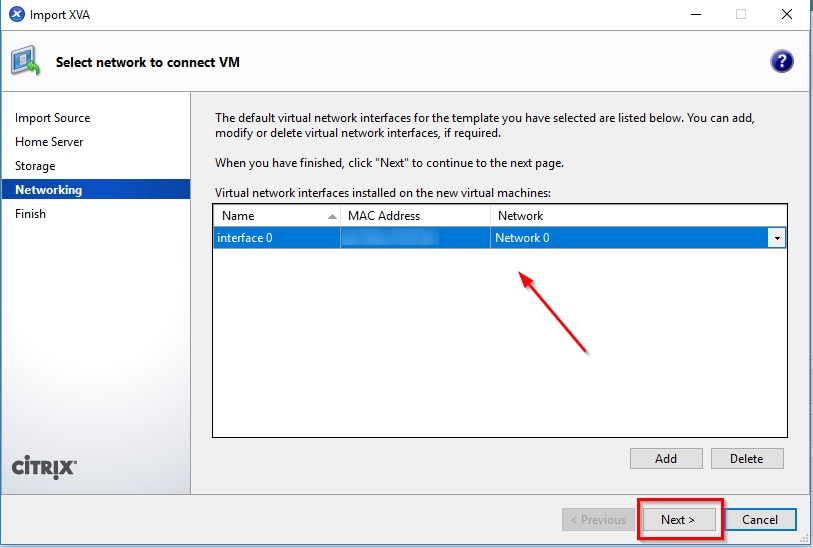
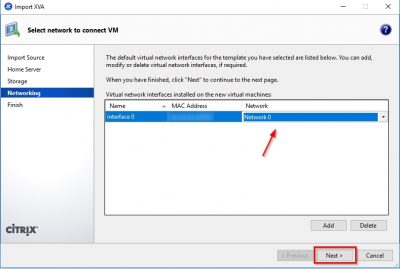
After the import you will be asked to select the network interface the virtual appliance will use to communicate on the network. Use the drop down in the Network column to select the network and then click on Next.
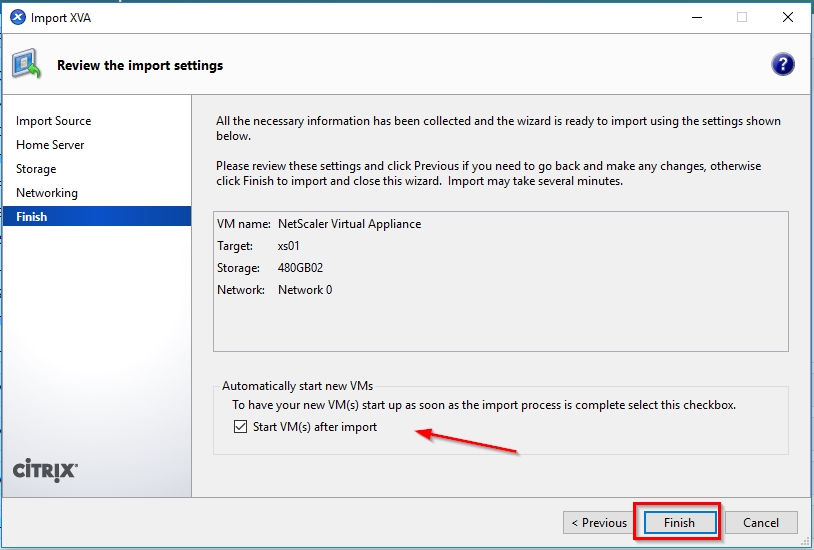
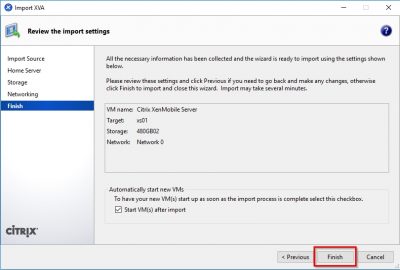
Check the information in the review window and then click on Finish. Notice that the checkbox Start VM(s) after import is selected. So, when you click on Finish here XenServer will spin up the virtual appliance.
First-time use wizard Citrix XenMobile Server 10.9
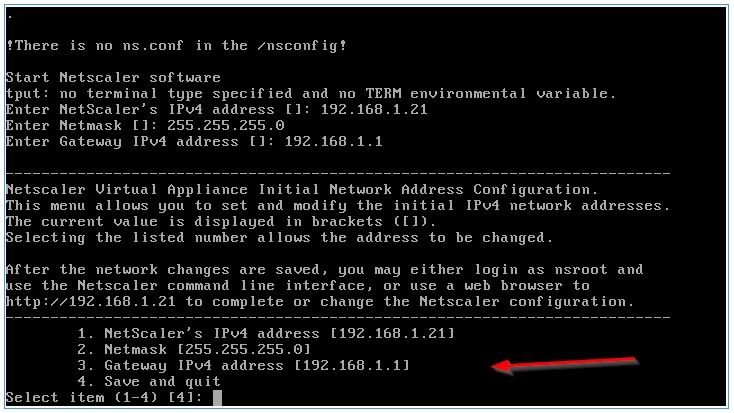
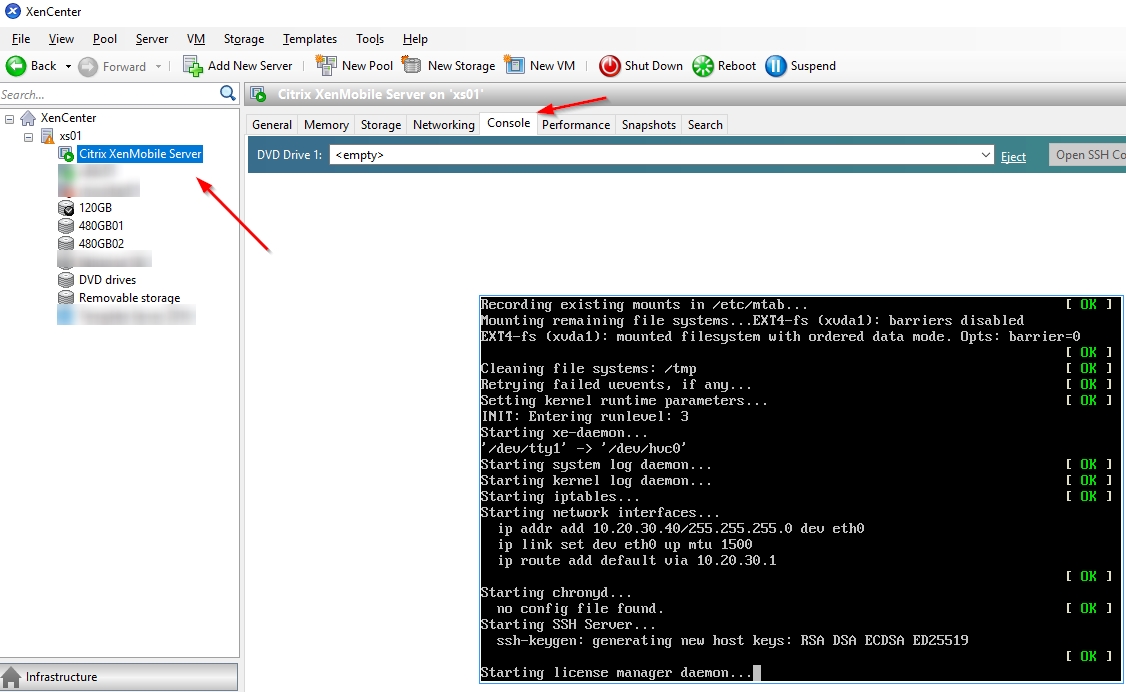
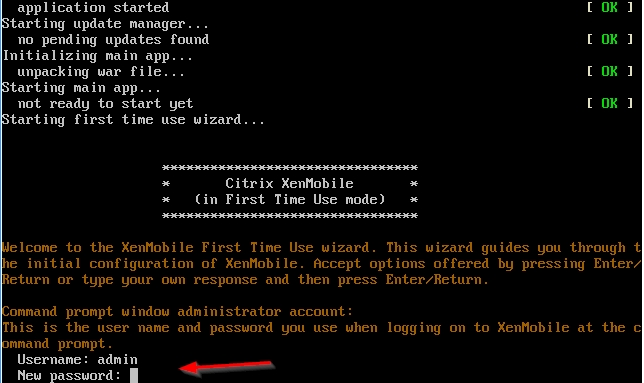
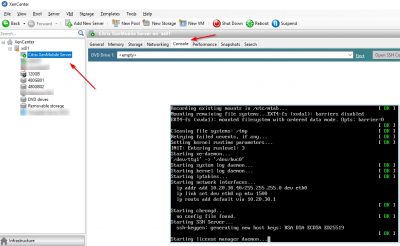
So, after the import has completed and the virtual machine has booted it is time for the first-time setup. This will be done using the virtual machine console in Citrix XenCenter. We need to setup the IP address and subnet mask, default gateway, DNS servers, and other settings for XenMobile using the command-line console in XenCenter.
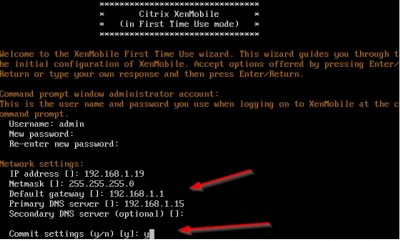
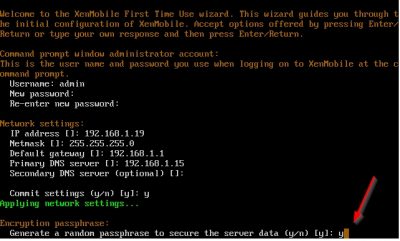
The wizard will start automatically, and you will be asked to enter a new password for the user “admin”. This is the default administrator user. Enter a password and hit enter. You will be asked twice to enter the same password. Hit enter after that and the wizard will continue.

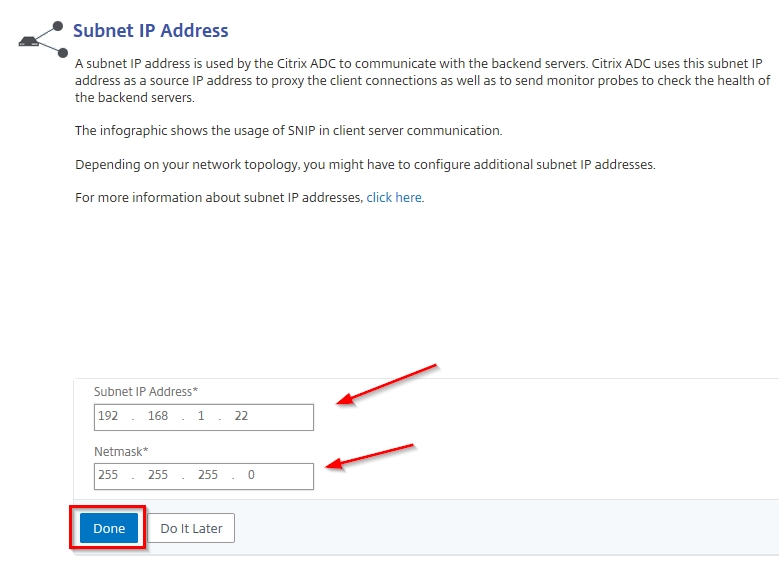
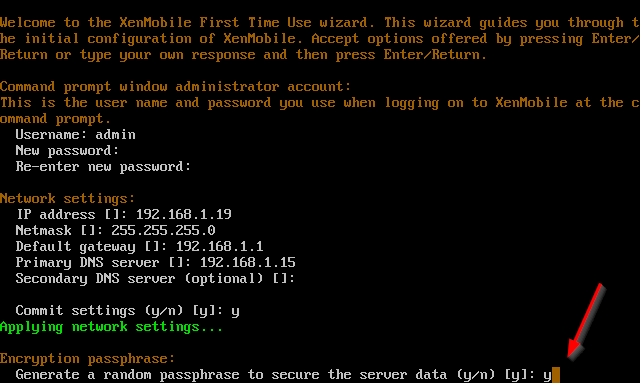
Then you will be asked to enter the network configuration. After every entry hit enter. The IP address I will use in my test lab is 192.168.1.19. When you have entered all the network information you will be asked to commit the settings. Press y if you are sure and hit enter.
Then the wizard will ask you to generate a random passphrase to secure the server data. This passphrase is then used to encrypt, and decrypt part of data stored on the appliance. Note that you cannot view the passphrase if it is automatically generated. So, if you are planning to extend you XenMobile environment in the future make sure you enter your own passphrase! For now, I choose y because one XenMobile server is enough for a testlab. In my experience one XenMobile server is enough in production as well but of course this depends on your specific situation.
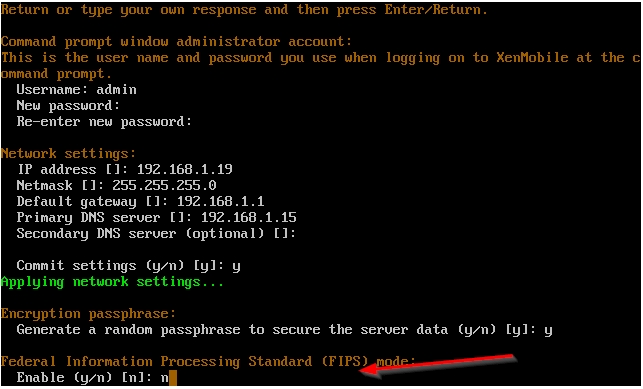
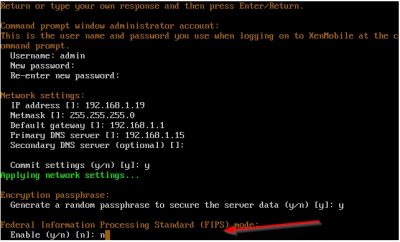
The wizard will now ask you if you want to enable FIPS (Federal Information Processing Standard). You need this if you must comply by law to security requirements for cryptographic modules used in security systems. Click here if you need more details on this. I don’t need this feature, so I select n and hit enter.
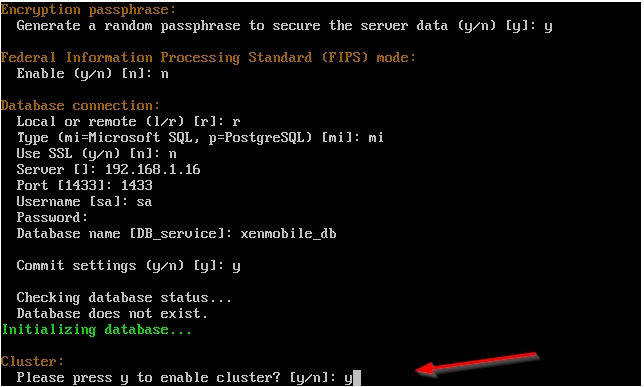
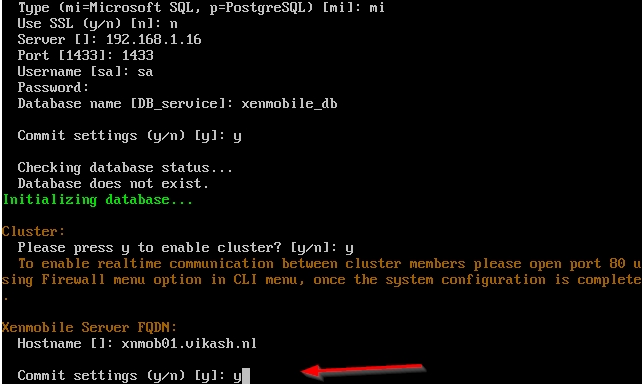
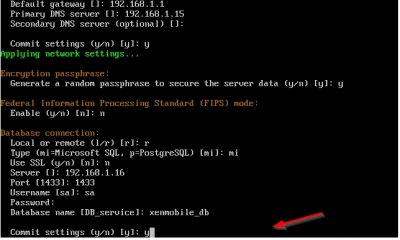
Next up the wizard will ask if you want to use a remote or a locale database. I am using a remote database because I have a dedicated Microsoft SQL server running in my test lab. Choose r for remote database. Choose mi for Microsoft SQL. Using Microsoft SQL is recommended in production environments by Citrix. Enter your database connection information and then press y to commit the settings.
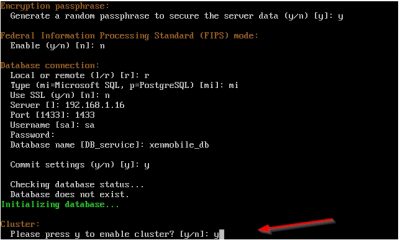
The wizard will ask you if you want to enable cluster setup. This is the case when you have multiple Citrix XenMobile servers in your environment. Choose the setting that applies to your situation and hit enter. In my test lab I have enabled this, but I won’t be using it here.
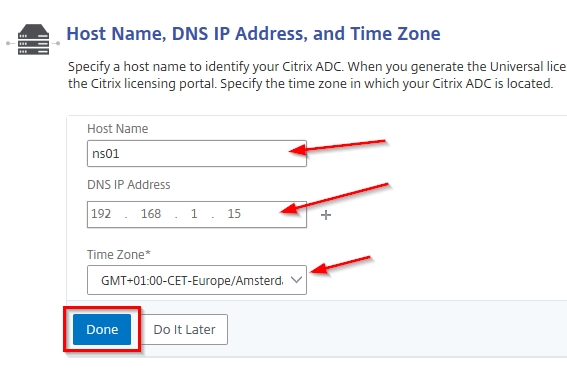
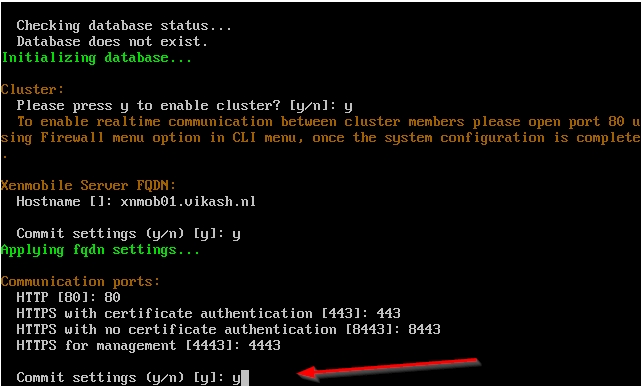
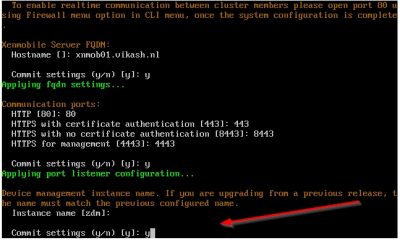
Next the wizard will ask you for the XenMobile Server host name. This is the host name all your users will connect to for enrollment. A common host name chosen here is “mdm.domain.name”. This is because this is the FQDN for Mobile Device Management (MDM) and it is easy to remember. In my case I am using xnmob01.vikash.nl. This name must be present in the SSL certificate you will use. If you are using a wildcard certificate you are fine. Press y and hit enter to commit the changes.

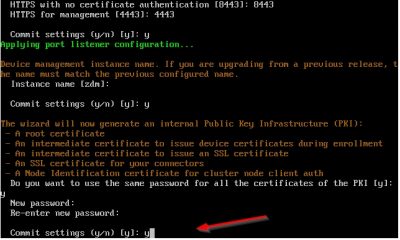
Next step is about the communication ports. I just leave this to the default ports and commit the changes by pressing y and hitting enter.

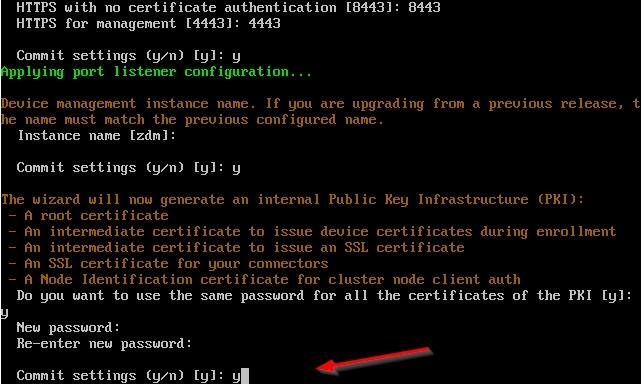
Enter the name you want to use for the device management instance. This is used to setup XenMobile Autodiscovery Service. I will set this up in a later blog. For now, I choose the default instance name zdm. Enter the instance name you want then press on y and hit enter to commit your settings.
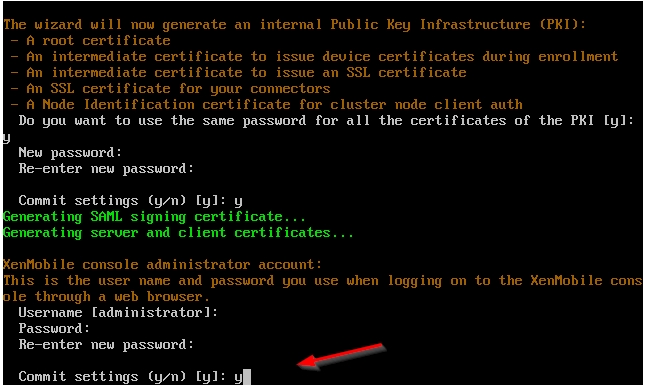
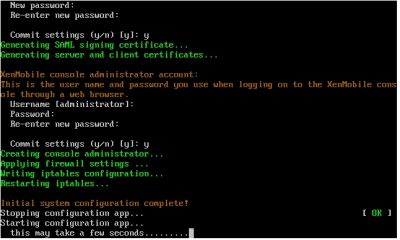
The wizard will now setup the internal Public Key Infrastructure (PKI). It will automatically generate the required certificated (how nice is that!). Later on, we will add our own certificate. For now, choose y to use the same password on all the certificates it generates. Enter the password and then press y and hit enter to commit the settings.
The wizard will now create an administrator account for logging on to the XenMobile console using your web browser. This is the account you will use to manage the XenMobile server from a web browser. I just choose the default username here (administrator) and entered the password I want twice. Once again press y to commit your settings.

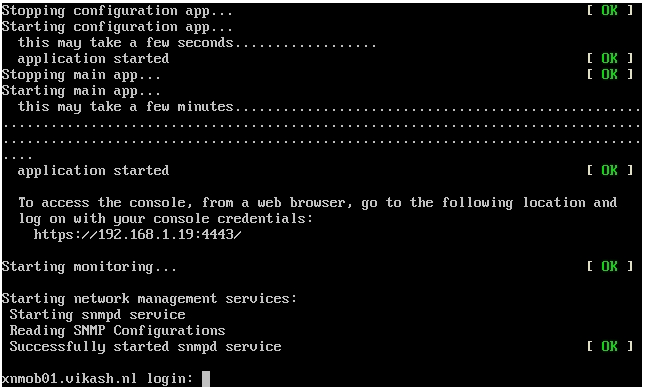
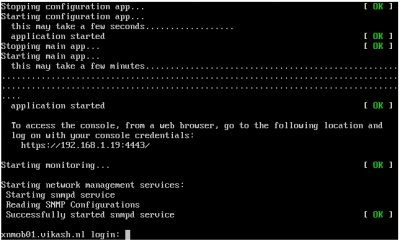
The wizard will continue with the setup and all you must do is wait.
After the wizard completes the setup you will see a logging prompt. This means that everything on the command-line is setup and we can now continue the configuration using a web browser. This screen will also tell you what the URL is for the management console. In my case this is https://192.168.1.19:4443.
Continue setup of XenMobile Server 10.9 from web browser
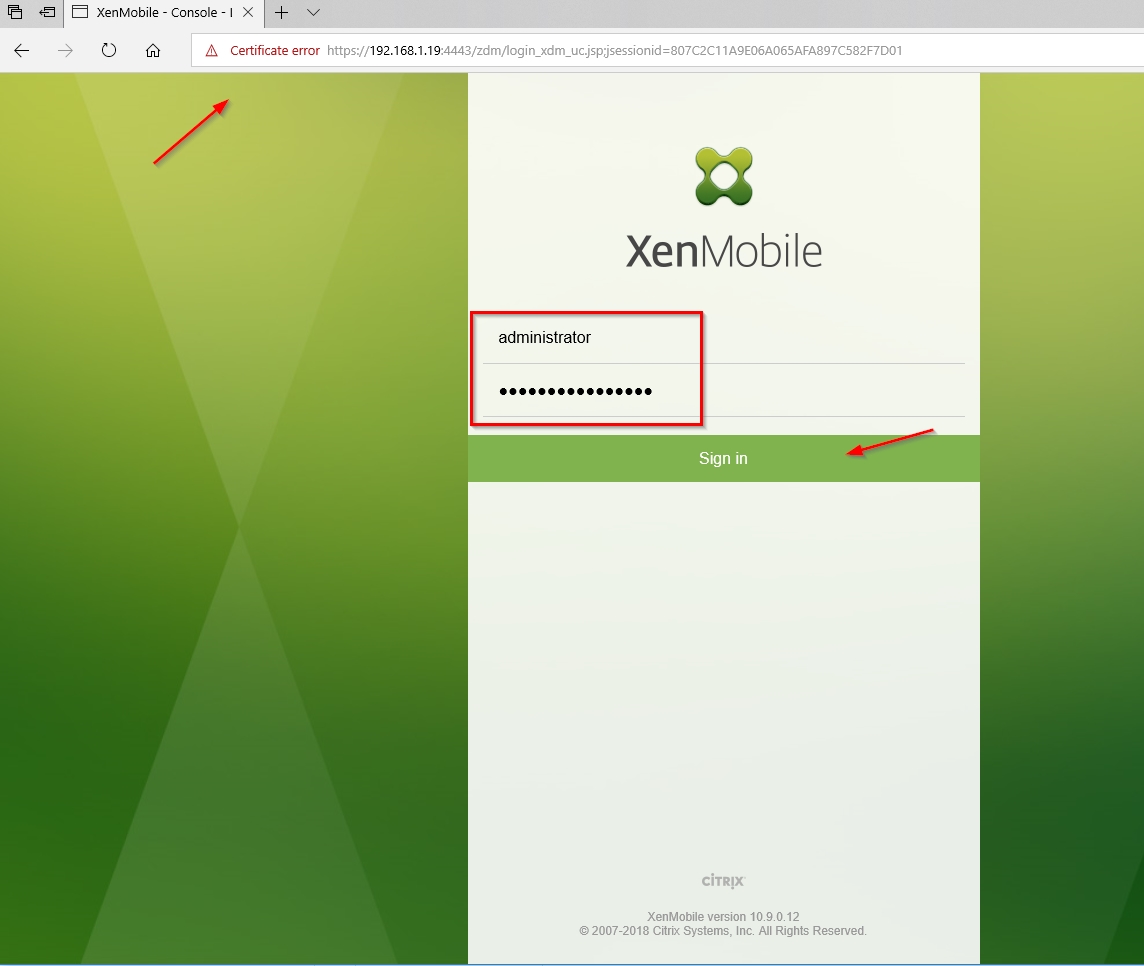
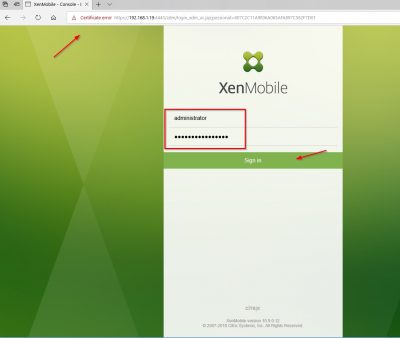
Next step is entering License information and adding SSL certificates. Open a web browser and go to the management console URL. In my case that is https://192.168.1.19:4443. You may get a prompt telling you that the certificate for this website is not trusted. You can safely ignore this warning. We know that this is the certificate which the setup wizard automatically generated using the internal PKI. Enter your administrator account details here and click on Sign in.
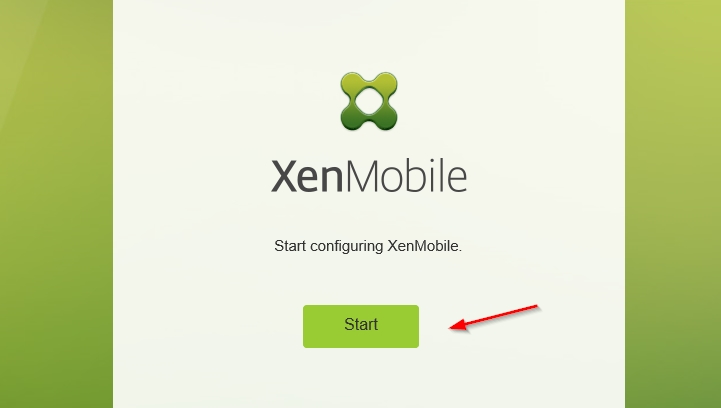
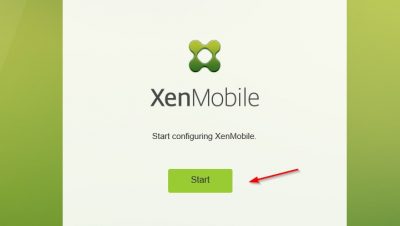
Click on Start to continue.
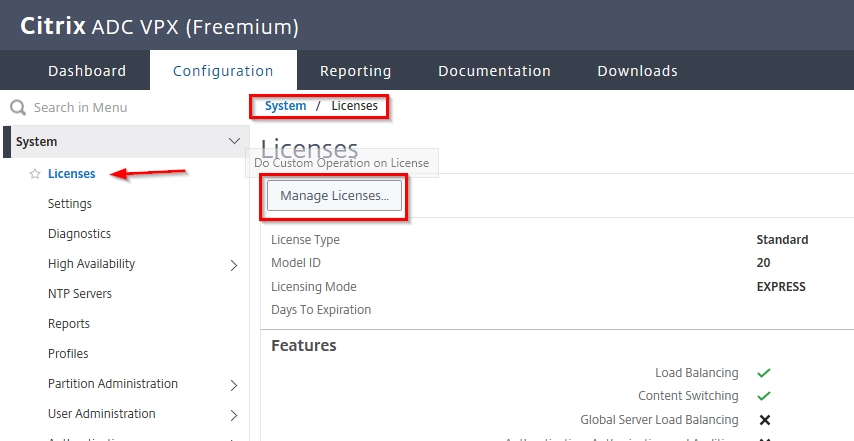
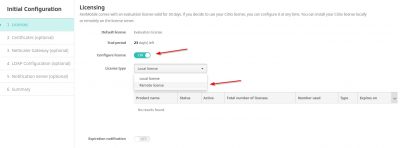
Configure a License for XenMobile
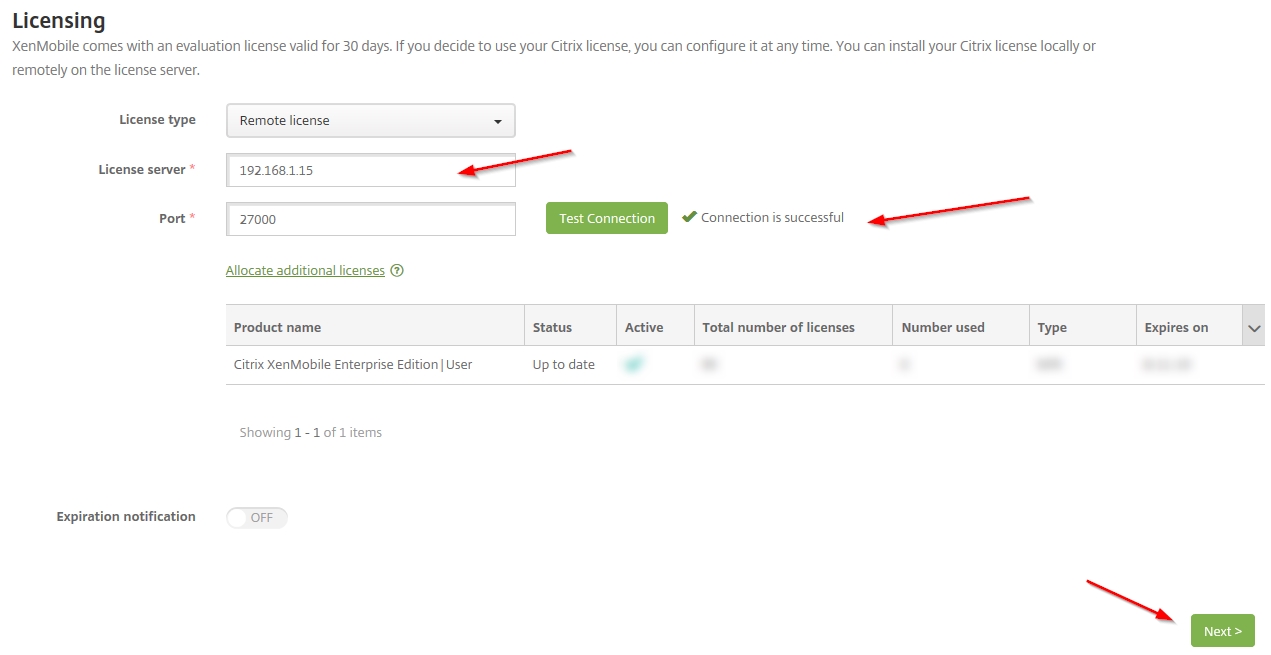
We must start with the license configuration. If you don’t have a license XenMobile will have a trial license for 30 days. If you have a Citrix License server running with XenMobile licenses, then click on Configure License and then choose Remote license.
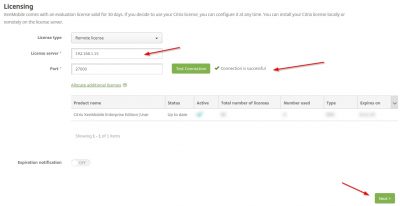
Enter the information of your license server and then click on Test Connection. If you have XenMobile licenses on your Citrix License server, they should appear here. Click on Next.
Install SSL certificate
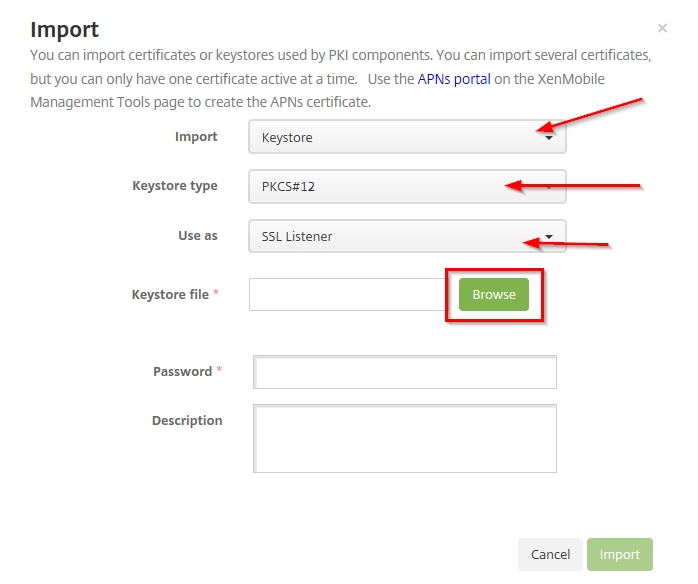
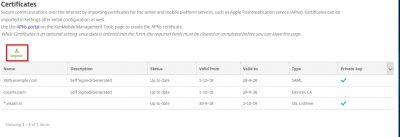
You will now be asked to import certificates. In this screen I will import my own wildcard certificate. This is the certificate I will be using for the MDM and MAM services made available using XenMobile Server. Later on in the post we will request and import the APNs certificate which is used for Apple’s Push Notification service. For now, click on import.
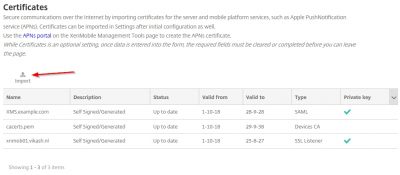
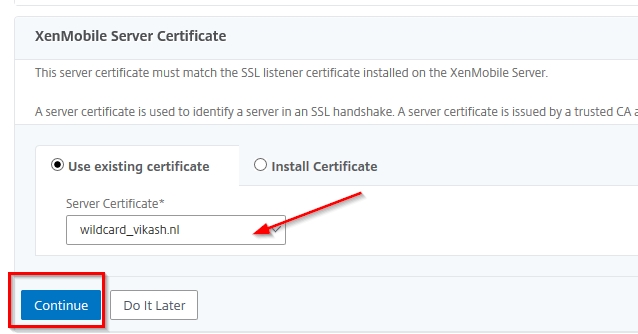
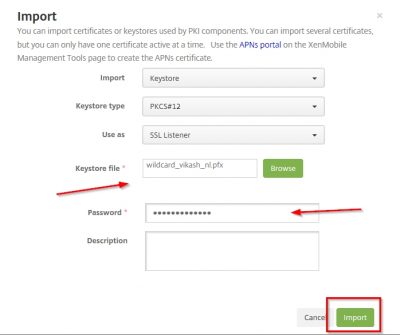
Now pay close attention here. The certificate you will be using for MDM and MAM, in my case my vikash.nl wildcard certificate, you must set it as the SSL listener certificate. And because I have my certificate in a .pfx format I will choose the option KeyStore as import method. I suggest you use the .pfx file format also as it makes life easy when dealing with SSL certificates. Set the KeyStore type to PKCS#12 and set Use as to SSL Listener. Then click on Browse.

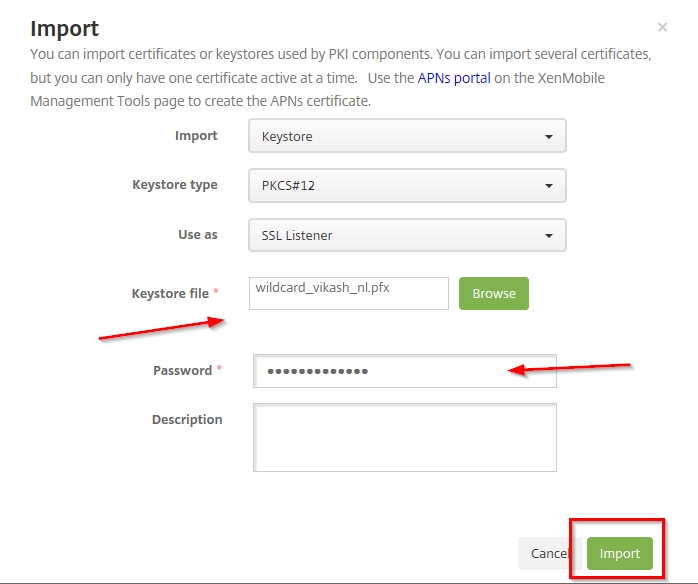
Locate your .pfx file, enter the encryption password for the .pfx file and click on Import.
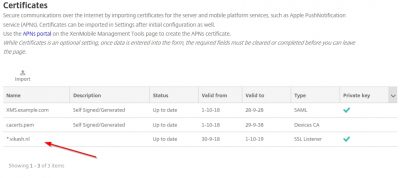
You will get a warning popup about replacing an existing SSL Listener certificate. Because we don’t have one in place, yet this warning can be dismissed. If you are renewing SSL certificates (like in a production environment) pay extra attention here. In that case make sure that the FQDN names are the same in the renewed SSL certificate! We can click on OK here. The Certificate window will now list your SSL certificate. In my case it is my wildcard certificate. You will see that XenMobile Server also has selected my SSL certificate as the SSL Listener and informs me that is has the private key as well. Very nice.
Install an APNs Certificate
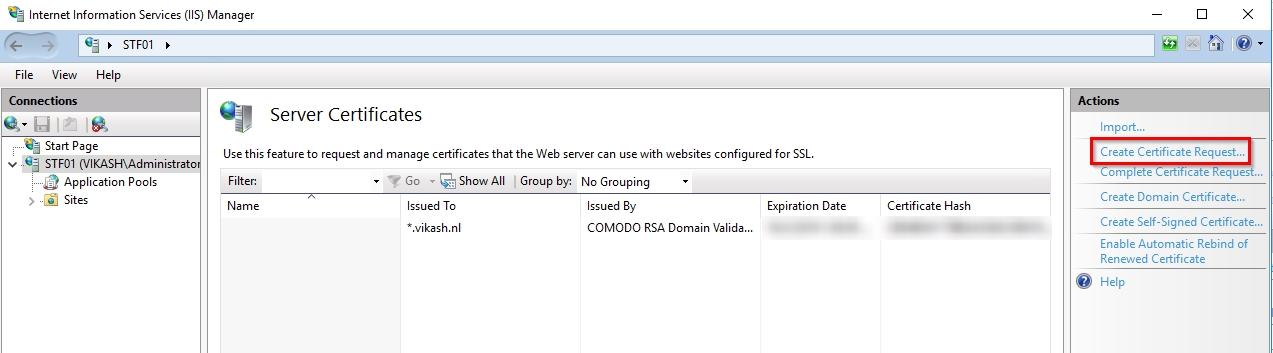
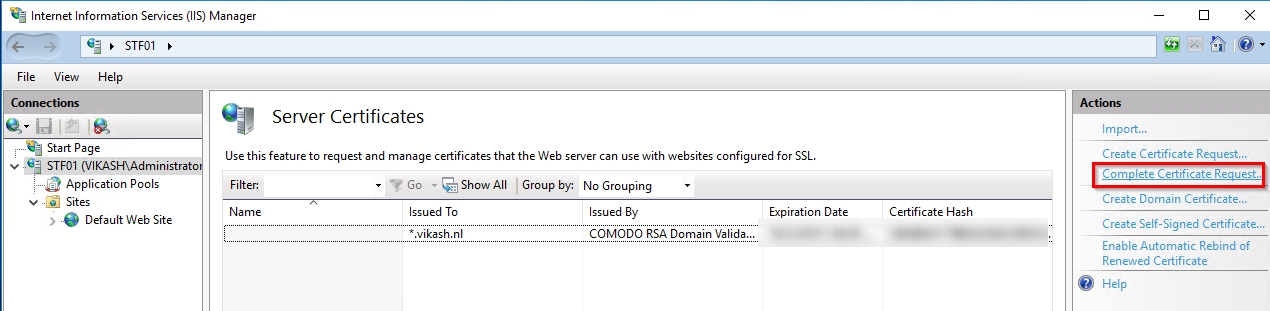
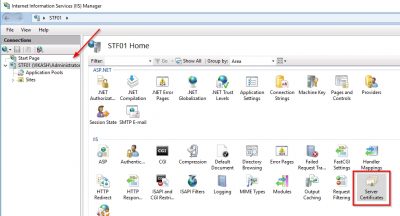
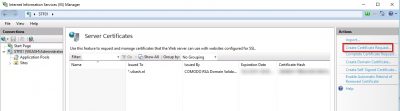
Before we install the APNs certificate we need to request it. First, we need a Certificate Signing Request (CSR) file. I will do this using Microsoft IIS on a Windows Server 2016 webserver I have running here (named STF01). Open Internet Information Services (IIS) Manager and select Server Certificates.
Click on Create Certificate Request.
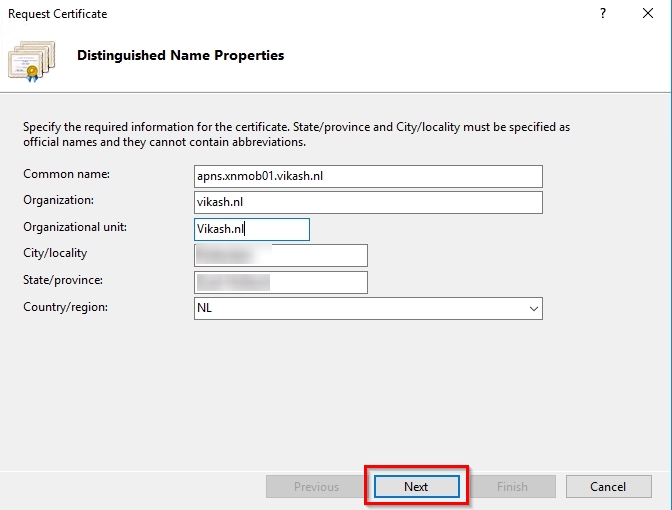
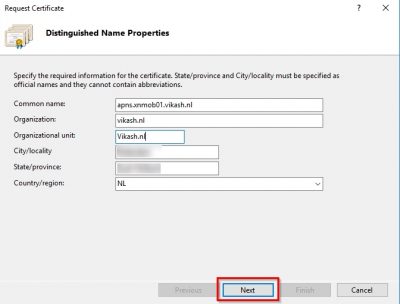
The Common name is important. You must be able to reach that later on from the internet. Fill in the information in the required fields and click on Next.
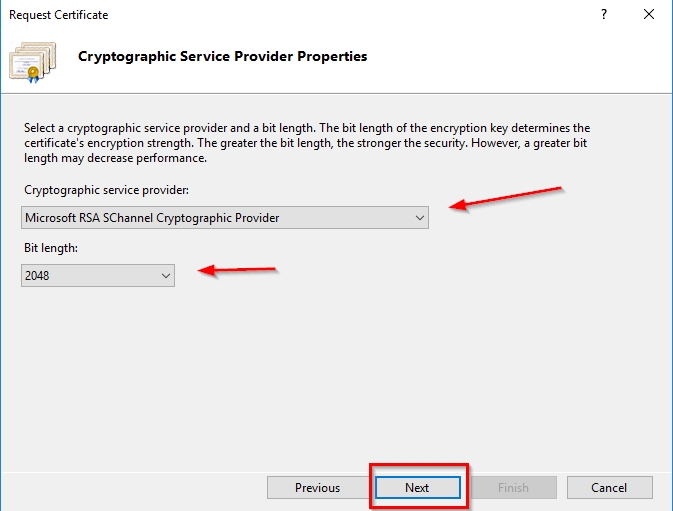
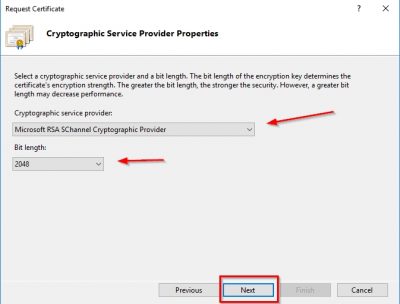
Select Microsoft RSA SChannel Cryptographic Provider for the Cryptographic Service Provider and 2048 for bit length. Then click on Next.
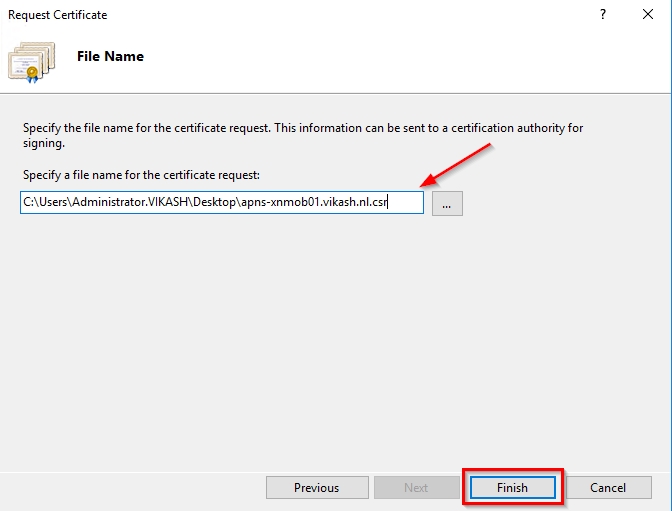
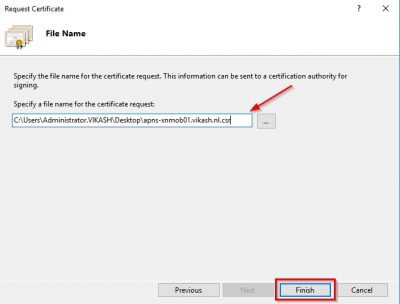
Specify the location and filename to save the CSR file. Click Finish. Leave the IIS manager console open in this view. We will come back to this later.
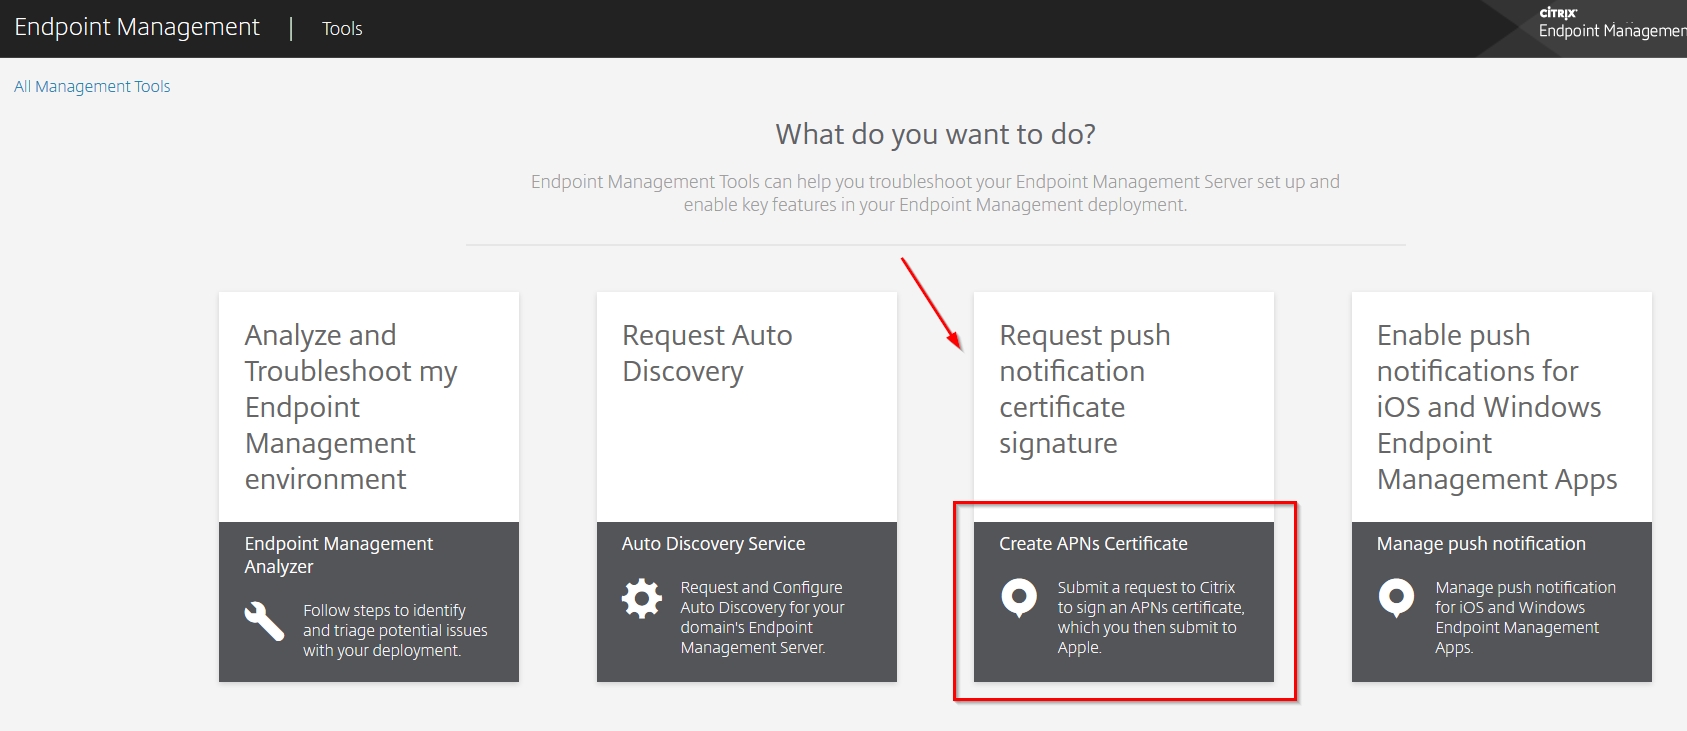
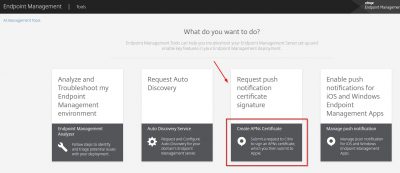
Now we must upload the CSR to Apple. Go to https://tools.xm.cloud.com/ and log in with your Citrix account. Click on Request pus notification certificate signature.
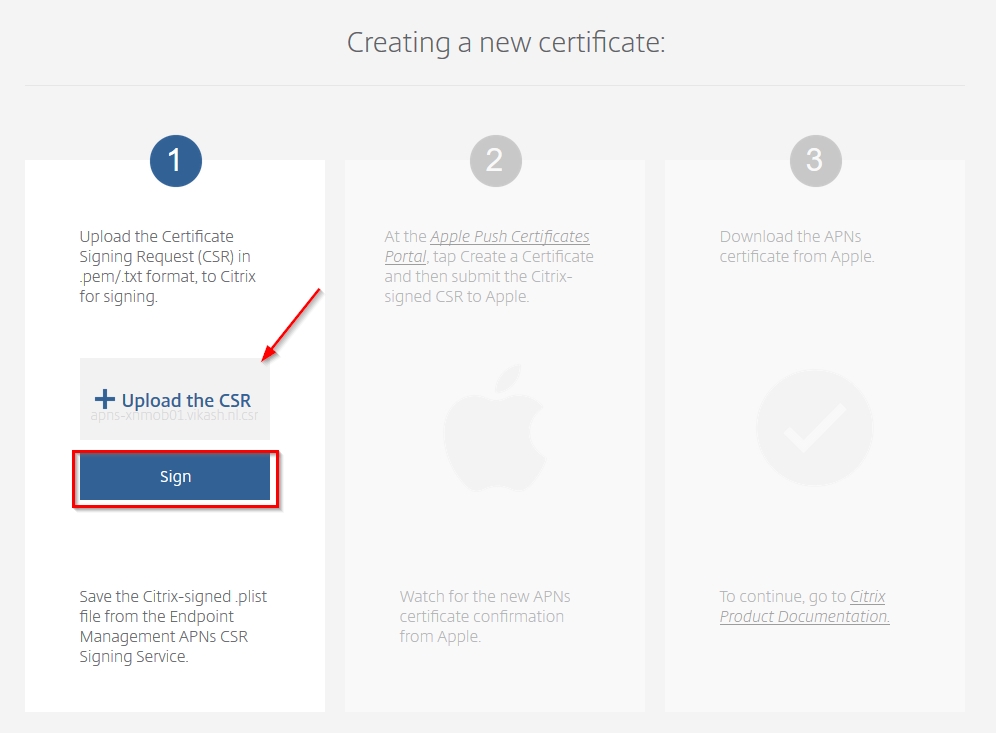
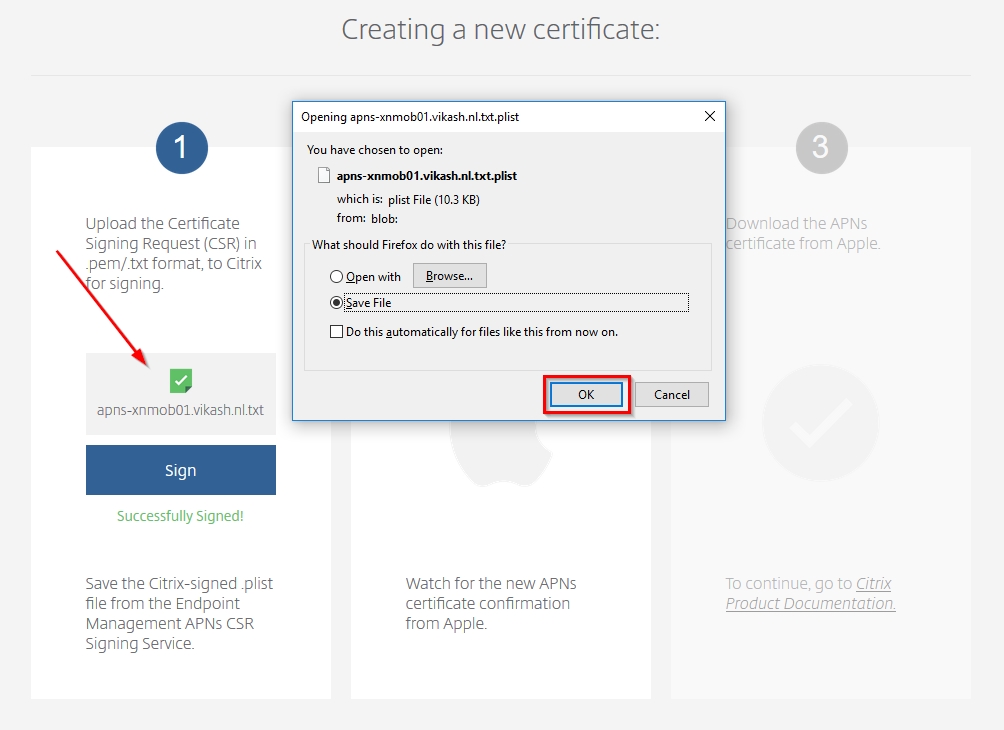
Before we upload the CSR make sure to change the file extension to .txt (or .pem) otherwise it will not sign. Then click on Upload the CSR to locate the CSR you generated in the above steps. Then click on Sign.
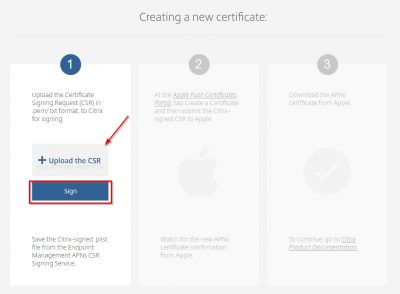
You will see a message that the CSR is successfully signed and you will be prompted to save the singed file (or it will be automatically saved in your browser download directory). This file will have the extension .plist.

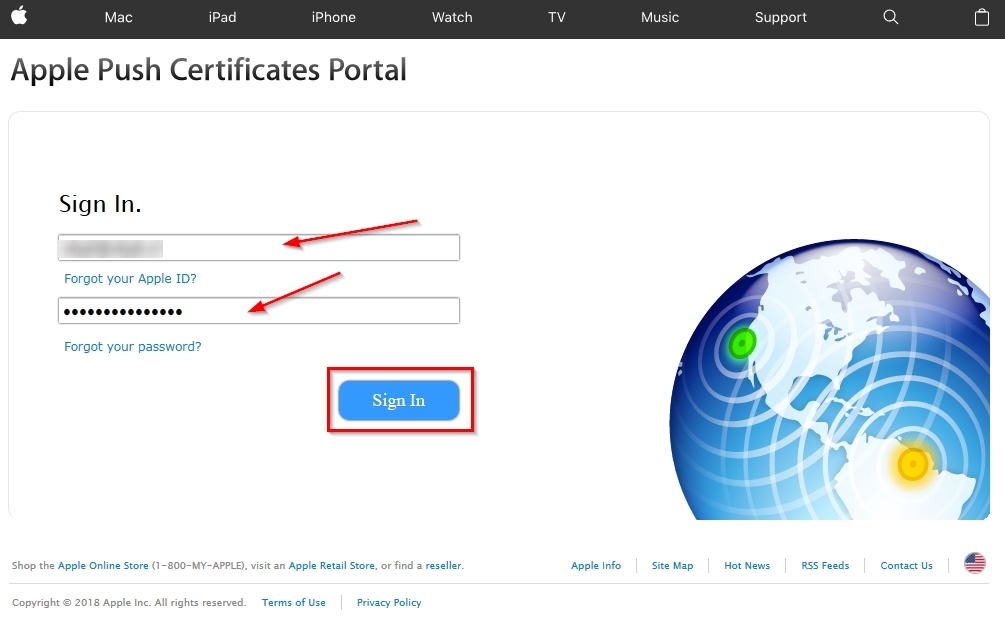
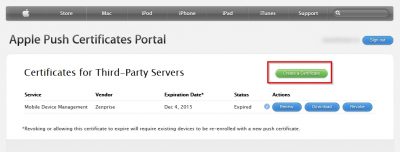
Click on the second column on the bold and underlined text Apple Push Certificates Portal to head over to the Apple Push Certificates Portal. It will open in a new tab or window. Sign in using you Apple ID to continue.

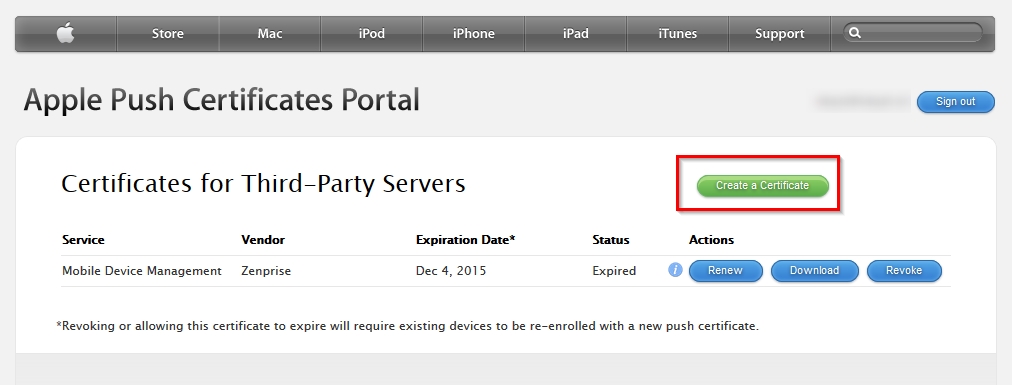
Click on Create certificate to start.
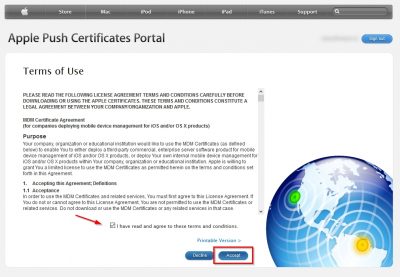
Agree with the Terms of Use and click on Accept.
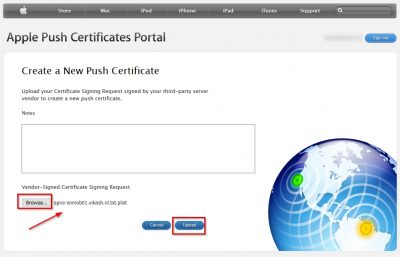
Next you will be asked to upload the signed CSR file (the .plist file). Browse to the file and then click on upload.
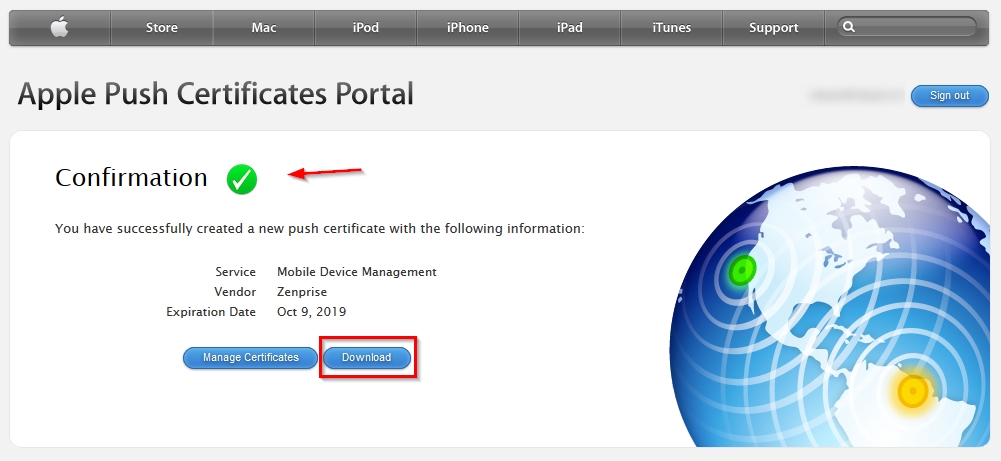
If everything goes well your push certificate should be created. Click Download to save it locally. The filename of the certificate you download here should something like MDM_ Zenprise_Certificate.pem.

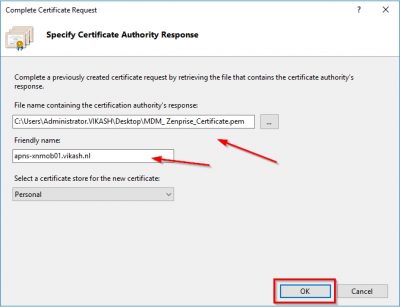
Now we need this MDM_ Zenprise_Certificate.pem file to complete the CSR we made earlier on the webserver. This must be the same webserver you generated the CSR on! So, head back to the webserver, in my case it is STF01, to complete the certificate request. IIS Manager should still be open from previous steps in this blog so now you have to choose Complete Certificate Request from the right column.

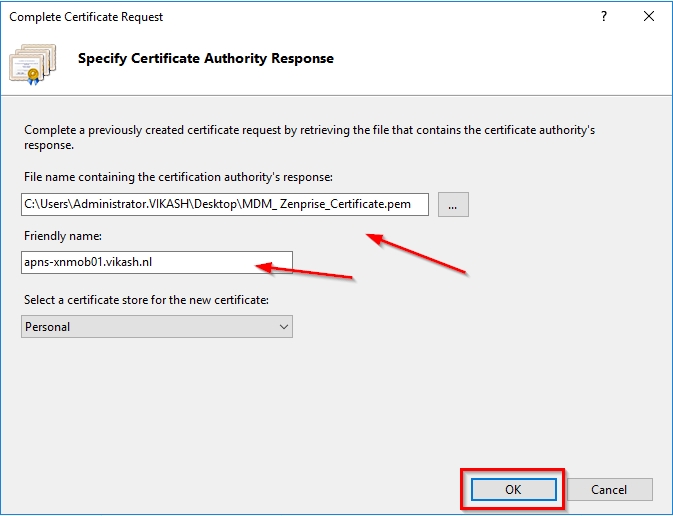
Locate the .pem file you downloaded from Apple and specify a friendly name. This name can be anything. Then click on OK.
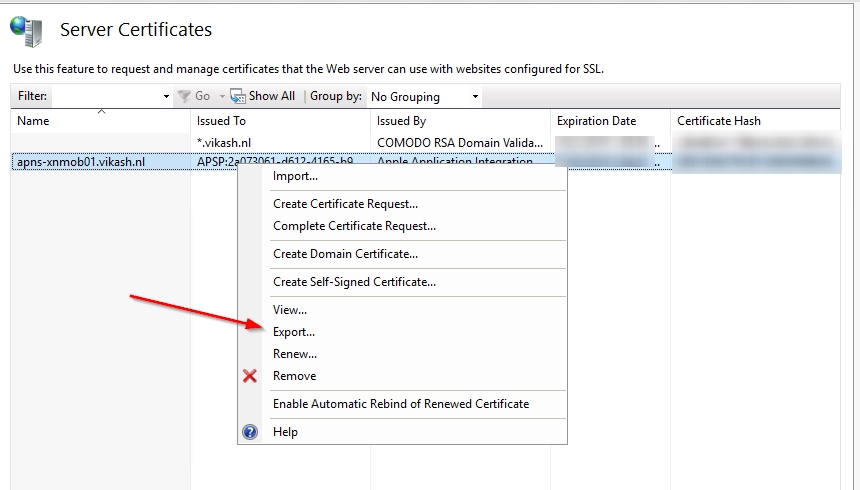
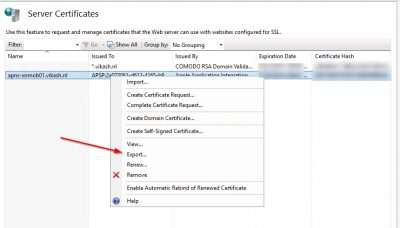
Next step is to export the APNs certificate with the private key, so we can import it in XenMobile. Right click the APNs certificate from IIS Manager and click on Export.
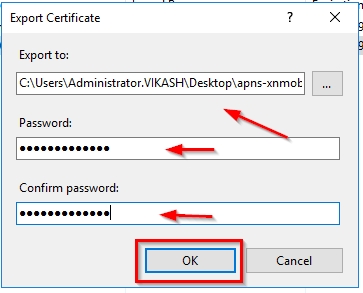
Specify a location, a filename with the extension .pfx and a password. Then click on OK.
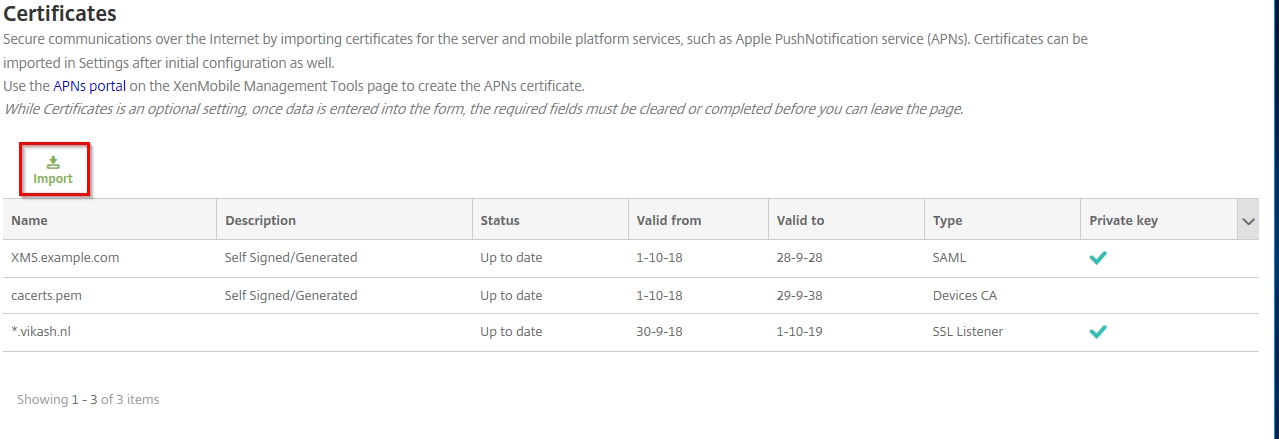
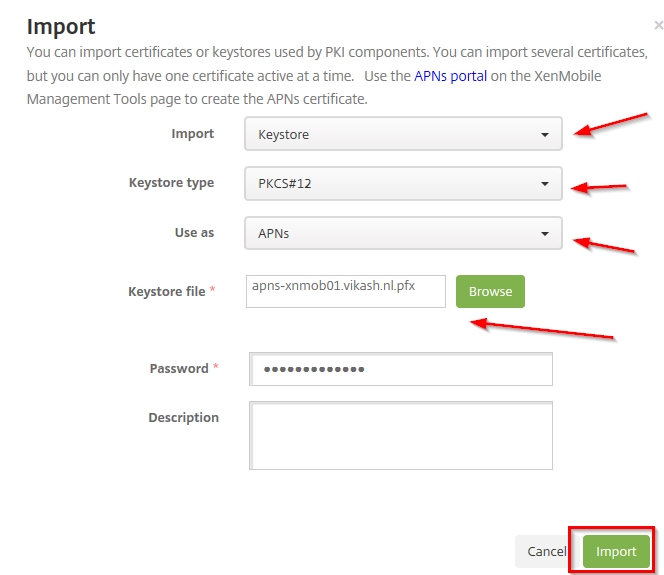
Now let’s head over to the XenMobile web console. The wizard will start automatically after logging in and will take you to the Certificates screen. Click on Import.
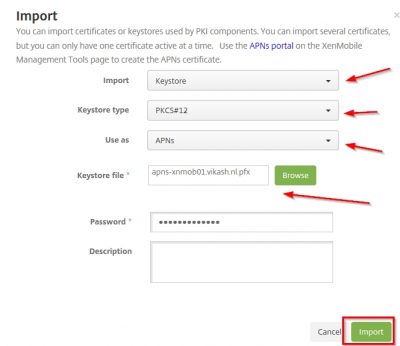
Select KeyStore in the Import box. The type should then be automatically set to PKCS#12. Very important to select APNs in the Use as dropdown menu. Browse to the exported .pfx APNs file from a few steps above and also enter the same password for decryption. Then click on Import.
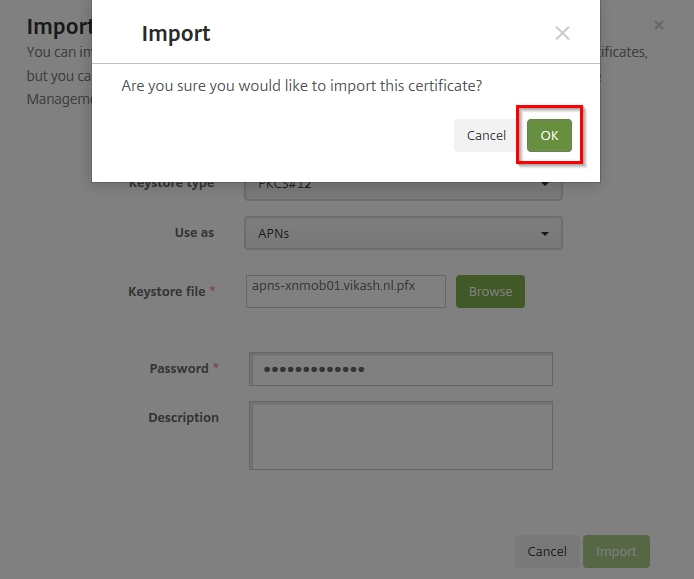
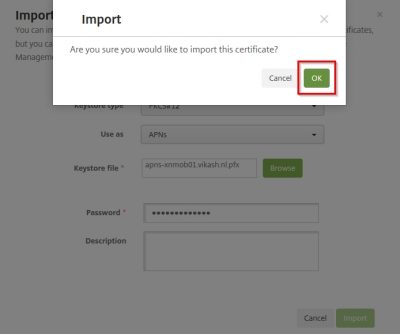
Click on OK in the dialog window to confirm.
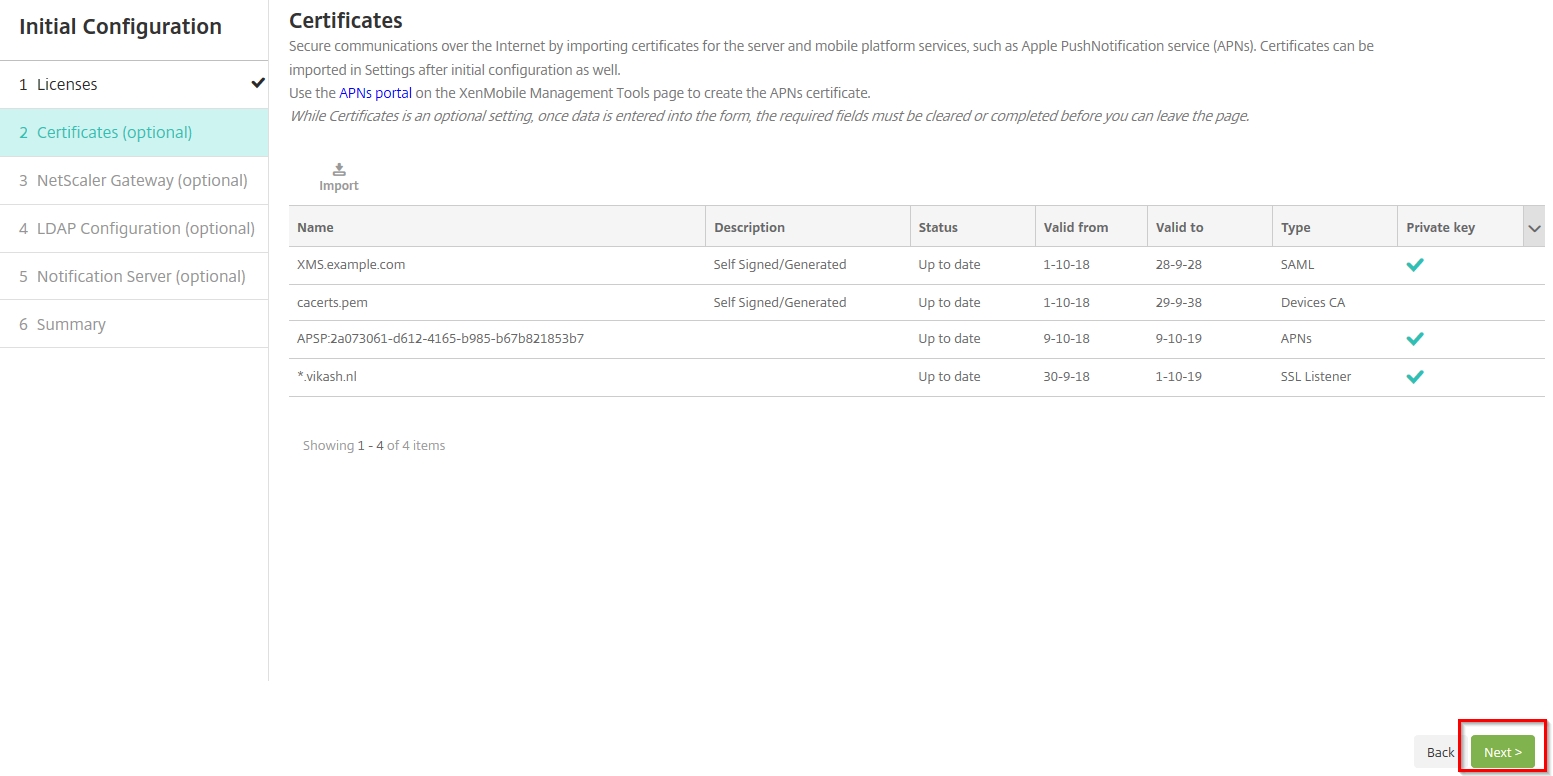
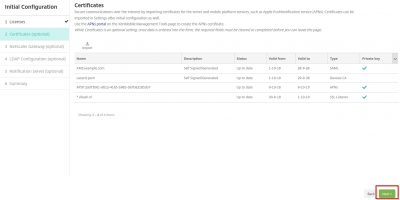
The import will complete successfully, and you should now have all the appropriate certificates installed to continue the Initial Configuration. Click on Next.
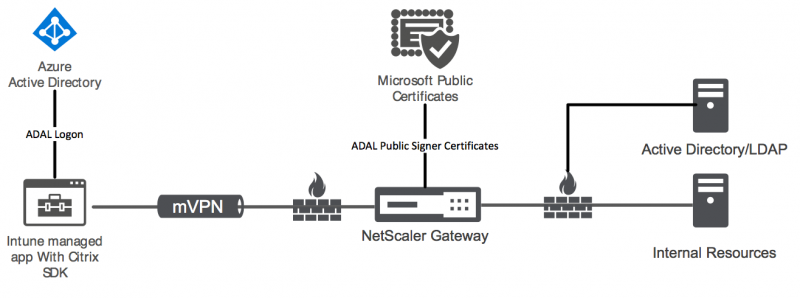
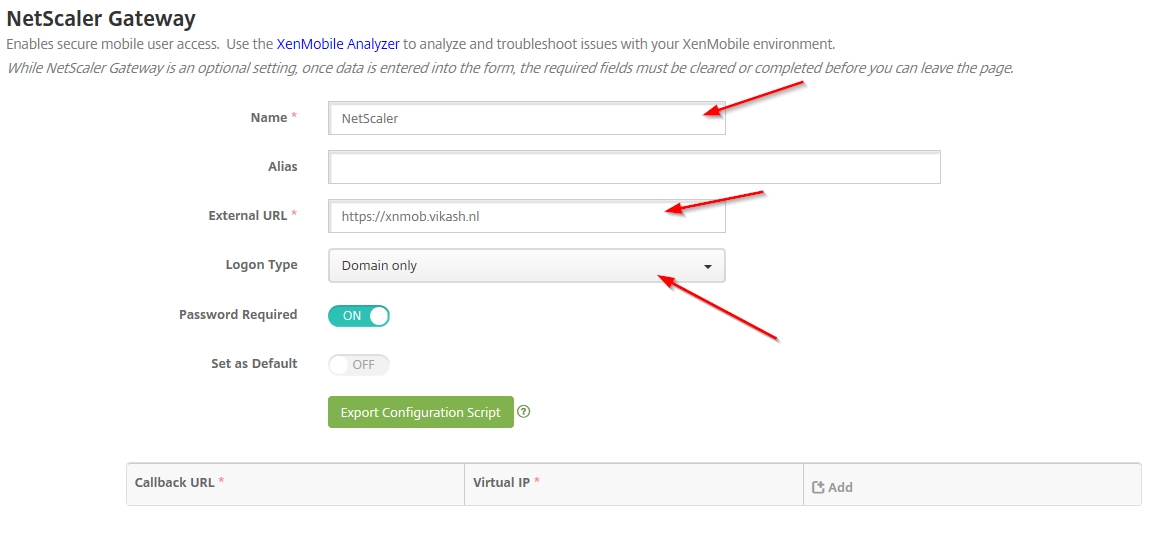
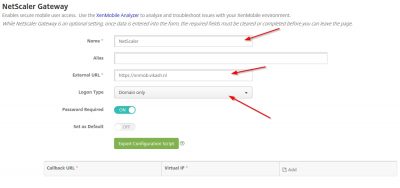
XenMobile NetScaler Gateway Configuration
The next step will lead you to the configuration for NetScaler Gateway. This is of course optional. But while we are here we might as well do the configuration. The actual setup and configuration of NetScaler will be another blog post. Enter a name here for NetScaler. The External URL is important because this will be used for Mobile Application Management (MAM). Note also that this is https. I leave the logon type to Domain only for now. Click then on Next.
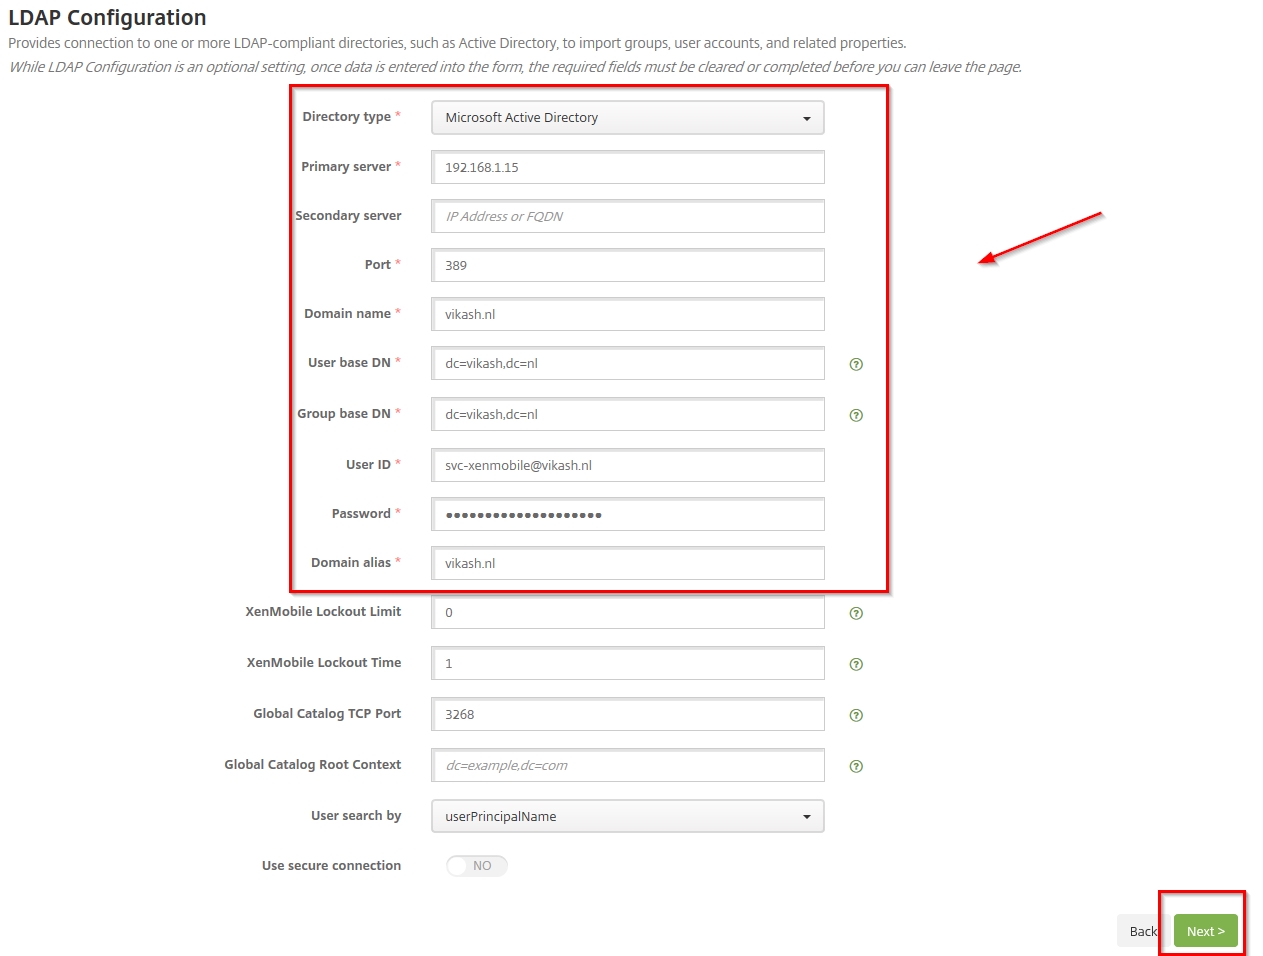
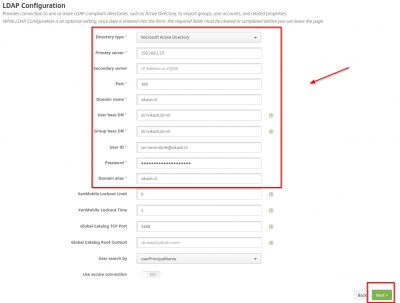
XenMobile LDAP Configuration
For this step to complete make sure you have a service account for XenMobile configured in your Active Directory. Make sure the password expiration is disabled for this account. Also make sure that you have setup routers and firewalls correctly to allow LDAP (or Secure LDAP) communications to and from the NetScaler. There are also other ports which I will point out in my blog post about configuring the NetScaler but for now we will only need the LDAP port. Fill in the fields according to your environment. I only have one domain controller in my test lab so I enter that in the Primary server field. Because my Active Directory is plain and simple I don’t have complex User base DN or Group base DN. Check the advanced properties of the service account using Active Directory Users and Computers management console to see what they are in your environment.
After entering all the required information, we can click on Next.
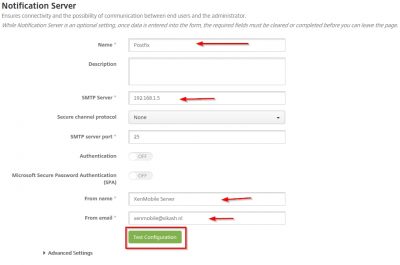
Notification Server Configuration
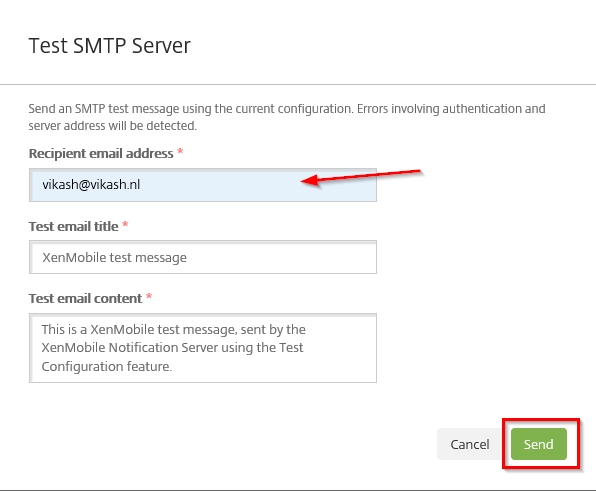
This is the part where you enter your mail server information so XenMobile server can sent notifications. I have Postfix running as my local mail server, so I will enter that information here. You need the IP-address of the mail server and correct port number. Like in the previous step you should make sure that XenMobile Server can communicate on the specified port with the mail server. Enter the information required and click then on Test Configuration.
A window will pop up and ask for the recipient email address. Enter a valid email address where the test mail will be delivered to. Then click on Send.
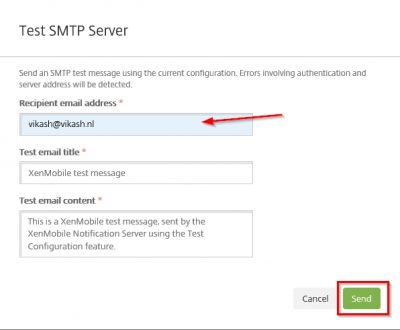
You will get a notification that the mail is sent successfully. Click OK.

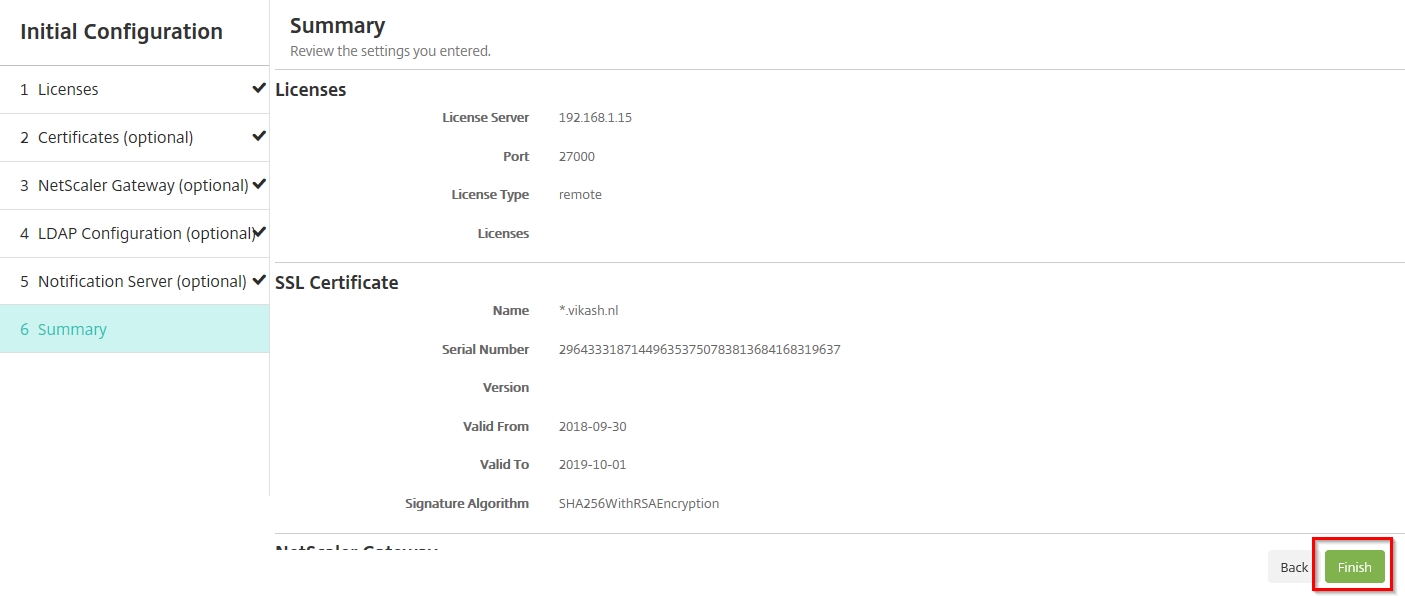
You will be prompted with a summary screen. You can now click Finish in the bottom.

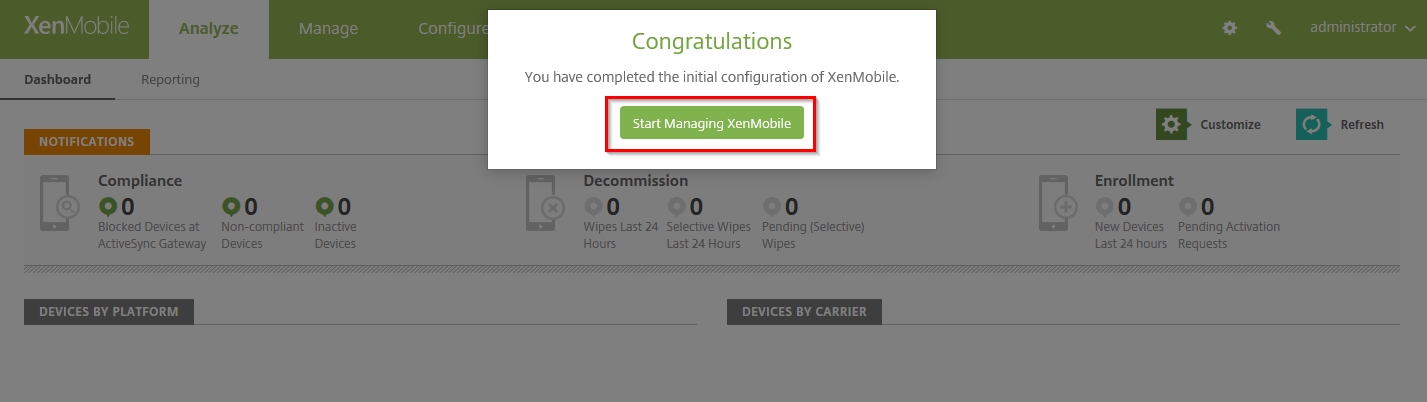
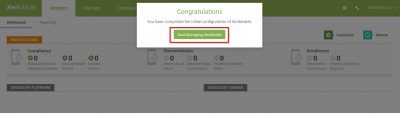
We will now be transported to the main XenMobile management console with a message that we now can start managing XenMobile! How cool is that :).
So now we are almost ready to enroll our devices. The next step is configuring Citrix NetScaler to make XenMobile available in a secure way to our end users. Check that blog post here where I show you how to setup and configure Citrix NetScaler for XenMobile. This concludes this blog post. Feel free to contact me of you have any questions or comments.
You can follow me on twitter or add the RSS feed from my blog and you will be notified when I add new posts.
Setup Citrix Endpoint Management (Citrix XenMobile Server 10.9) Read More