
Table of Contents
In this blog post I will show you how to setup Citrix NetScaler Gateway for Citrix XenMobile Server 10.9. You need Citrix NetScaler for XenMobile Server if you have the following scenarios:
- Micro VPN access for access to internal resources.
- Use Citrix Endpoint Management with Microsoft Intune/ EMS.
- Micro VPN access for business apps to internal application servers or data.
- Use XenMobile Apps for iOS or Android.
In this blog I will go through all the steps needed to successfully implement Citrix NetScaler for XenMobile Server, starting with importing the NetScaler appliance on my hyper visor and ending with a completed setup on the NetScaler ready for production. Before you start you have to setup and configure Citrix XenMobile Server 10.9. Check my blog post here to setup XenMobile Server 10.9.
Before we can start you have to make sure that you have the requirements in place. Nothing is more annoying than finding out that you forgot something during installation. This is the requirement list:
- Minimum NetScaler 10.5 build 66.9. I am using NetScaler 12.1 build 49.23.
- Platform/Universal license.
- Public SSL certificate.
- Several IP addresses. I will make a list for you.
- DNS host names (FQDNs) which are accessible from the internet.
Let’s make a list of IP addresses we will need on the NetScaler. These IP addresses are all private IP addresses in my case, but also at customers I visit. This is because the NetScaler is always placed behind a firewall which does all the NAT stuff to map external IP to internal IP. So, in the end you will need a public IP of course which you will then map on your firewall to the NetScaler. This goes beyond this post. Check your firewall documentation how to do this. Below is the IP address list I will use for my setup:
| Function | IP address |
|---|---|
| NetScaler IP | 192.168.1.21 |
| Subnet IP | 192.168.1.22 |
| XenMobile Gateway Virtual IP | 192.168.1.23 |
| XenMobile Gateway Virtual IP for MAM | 192.168.1.24 |
| XenMobile Gateway Virtual IP for MDM | 192.168.1.25 |
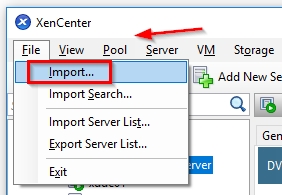
Import Citrix NetScaler on Citrix XenServer
Make sure you download the correct NetScaler appliance (VPX) from Citrix. I have Citrix XenServer running so I downloaded the appliance for XenServer. Let’s start by importing the virtual Citrix NetScaler on XenServer. Start Citrix XenCenter and click on File->Import.
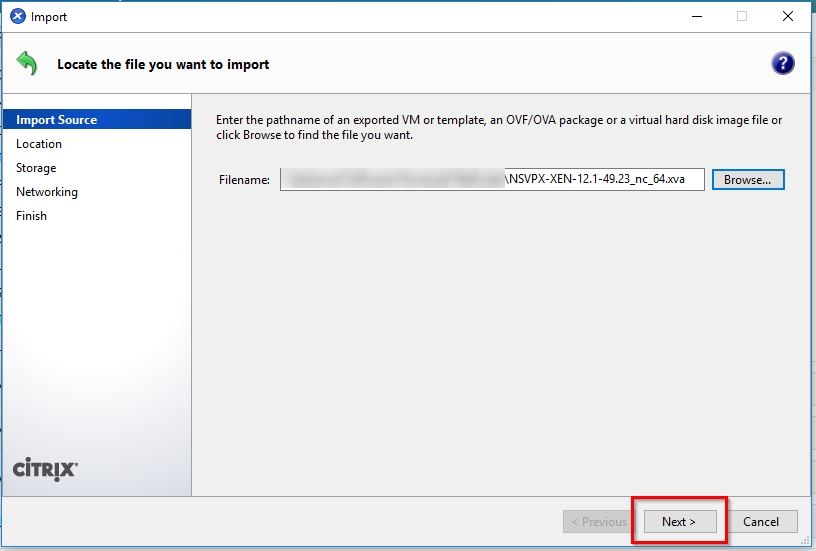
Locate the .xva file you downloaded from Citrix website. Browse to it and select it. Click then on Next.
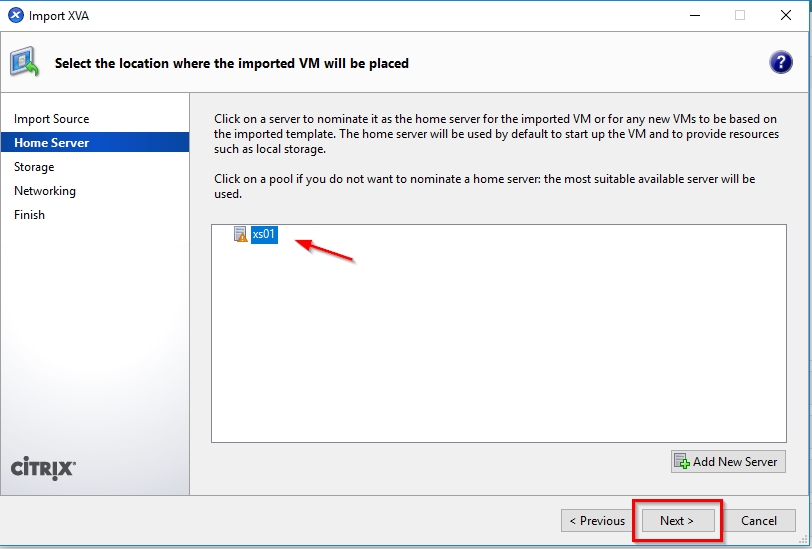
Select the XenServer host you will import the appliance to. I have only one XenServer host running in free-mode so I will use that. Click on Next.
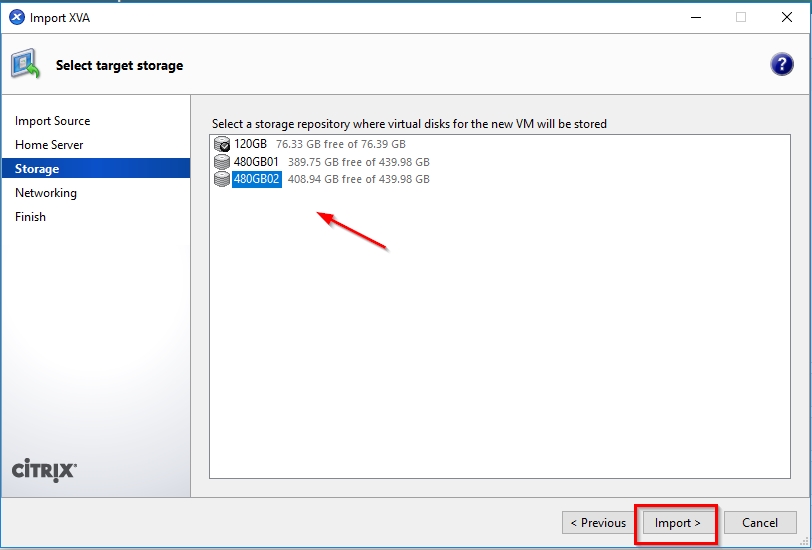
Select the storage you will import the NetScaler on. Click then on Import.
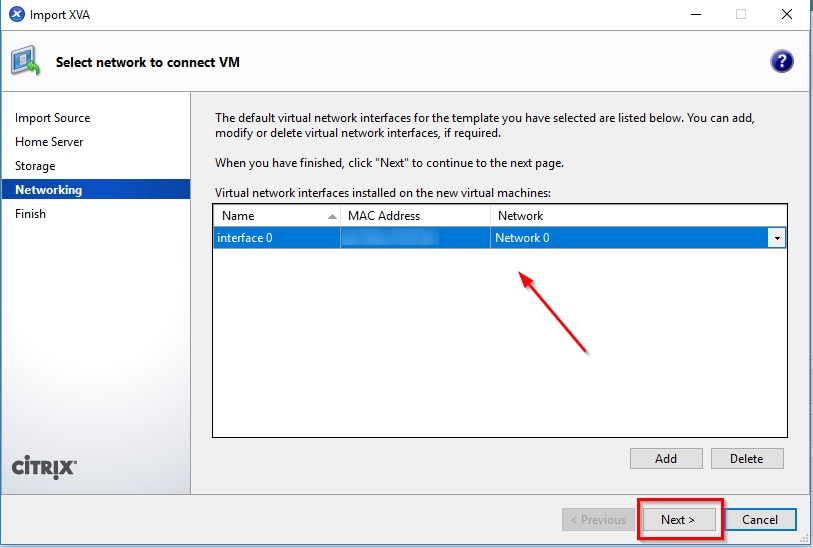
Select the network interface you will use to let the NetScaler appliance communicate on the network. Click then on Next.
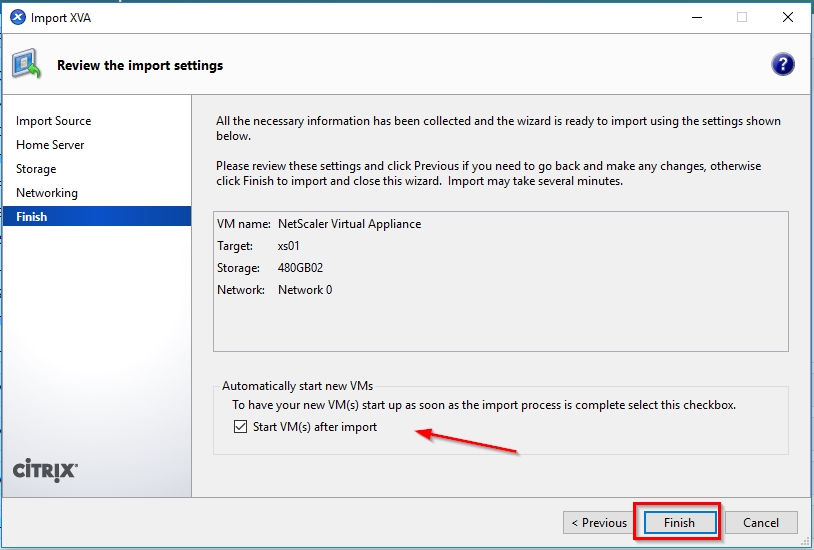
Review your selections and if everything is ok you can start the actual import. Check Start VM after import to continue the setup. Click here on Finish.
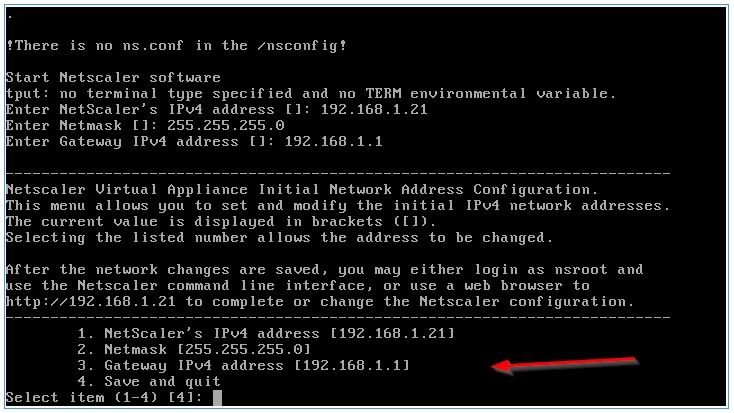
After the import is finished, go to the console using XenCenter. The appliance will boot and, on the command-line, will ask you to configure network settings. The IP address here is the one we reserved for the NetScaler IP (NSIP). Enter the IP and hit enter.

Enter all the network configuration information (like netmask and gateway) and choose option 4 to save. The NetScaler will now reboot. After the reboot we can continue the initial configuration using a web browser.
Initial setup Citrix NetScaler
Open a web browser and go to http://<NSIP>. I am using 192.168.1.21 for my NSIP. Login using nsroot as username and nsroot as password. Make a note for yourself to change this after you are done with the configuration. Click on Log On.

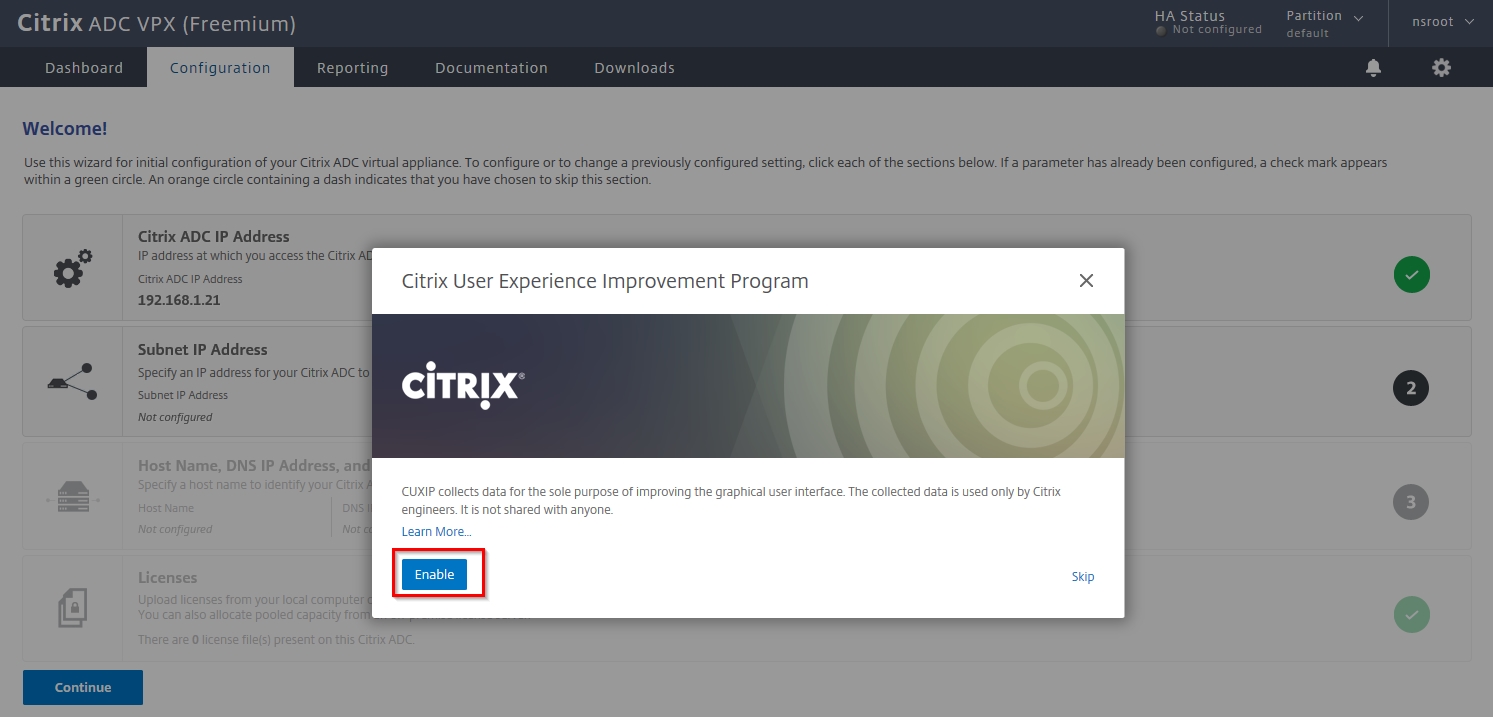
The initial configuration will automatically start, and you will be prompted to opt-in for the Citrix User Experience Improvement Program. I choose Enable but you can skip this of course.
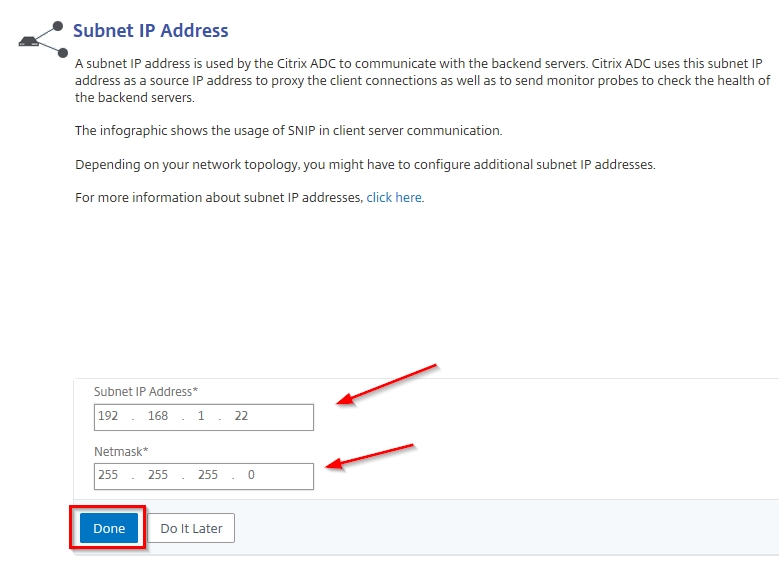
Next step is to specify a Subnet IP. Click on Subnet IP Address.

Enter the IP you reserved to be your subnet IP. I will use 192.168.1.22. Enter the corresponding netmask and click on Done.
Next step is to configure DNS IP Address, host name and Time Zone.
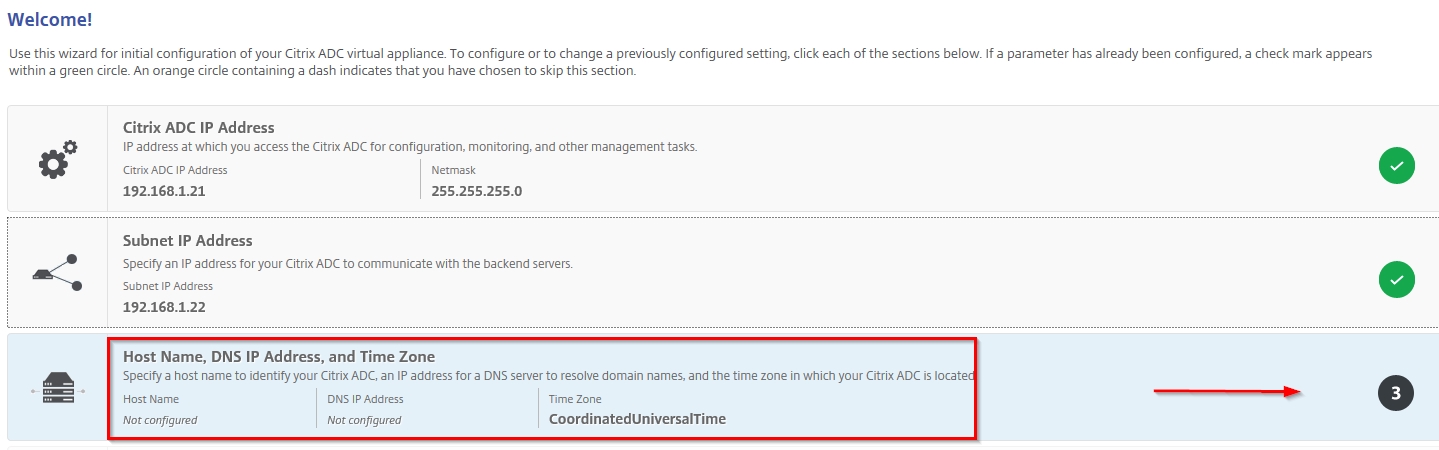
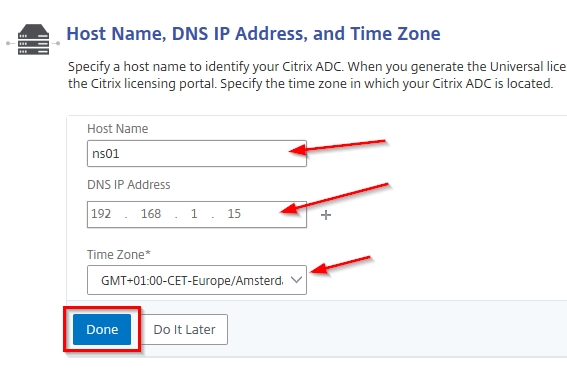
Enter the information matching your environment. In my case my DNS server is 192.168.1.15. The Host Name can be anything you want, it does not matter because we are using a VPX. If you are using an MPX (physical NetScaler appliance) make sure to note the host name because then your license file is linked to the host name. In the VPX the license file is linked to the mac address the virtual network interface. That’s why the Host Name can be anything here. Select the correct time zone and click on Done.
The NetScaler will reboot now to save the settings and let the changes take effect. Click on Yes.
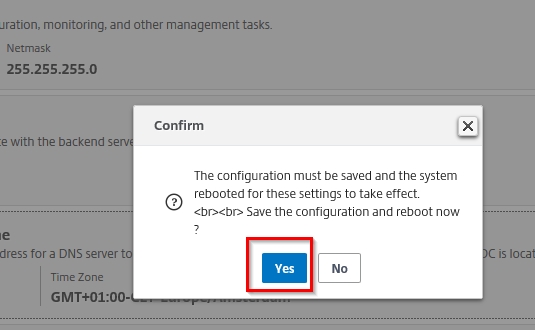
Wait for it to reboot and leave the browser window open :).

Configure Licenses
The next step is to configure licenses. We need certain functions which are unlocked with the correct license for NetScaler. If you are only testing, you can go for a evaluation license for 90 days. During the evaluation period all the features of NetScaler are available to you. The features you need in NetScaler which require a special license are:
- Load Balancing.
- NetScaler Gateway for micro VPN and access to corporate resources.
After the NetScaler has rebooted login with nsroot username and password. Go to System -> Licenses and click on Manage Licenses.
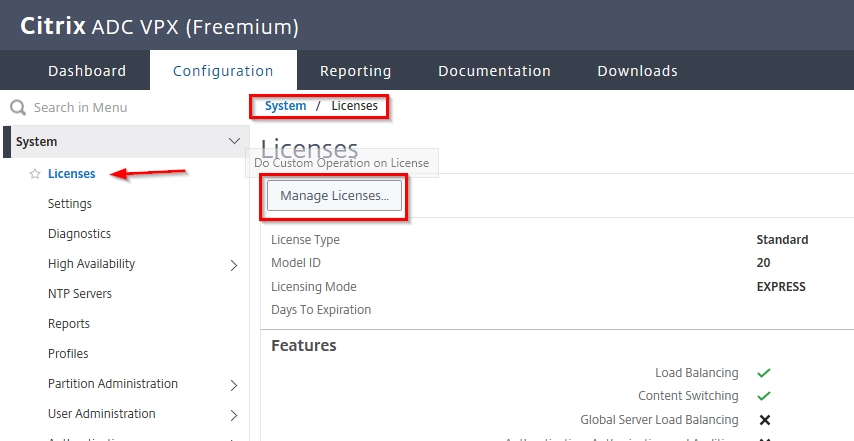
Click on the button Add New Licenses.

Choose the option Upload license file. You must allocate the license file first using the licensing tools in the Citrix website. Make sure that when you allocate the NetScaler license on the Citrix website, enter the correct Host ID. The Host ID is displayed on the right side of the window. It is the mac address of the virtual nic. If you have multiple virtual nic’s configured, it will be the mac address the nic which is first listed by in the properties view of the appliance. Click on Browse to locate the license file.

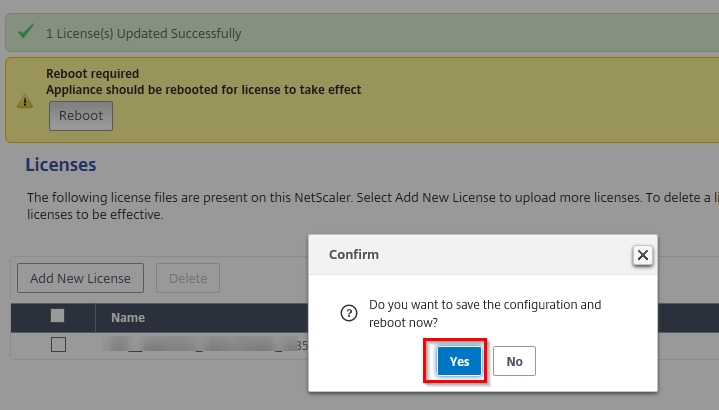
After the license file is uploaded the NetScaler needs to reboot to activate the license file and the corresponding features. Click on Reboot.

Click on Yes.
Wait for the reboot to finish. Leave your browser window open.

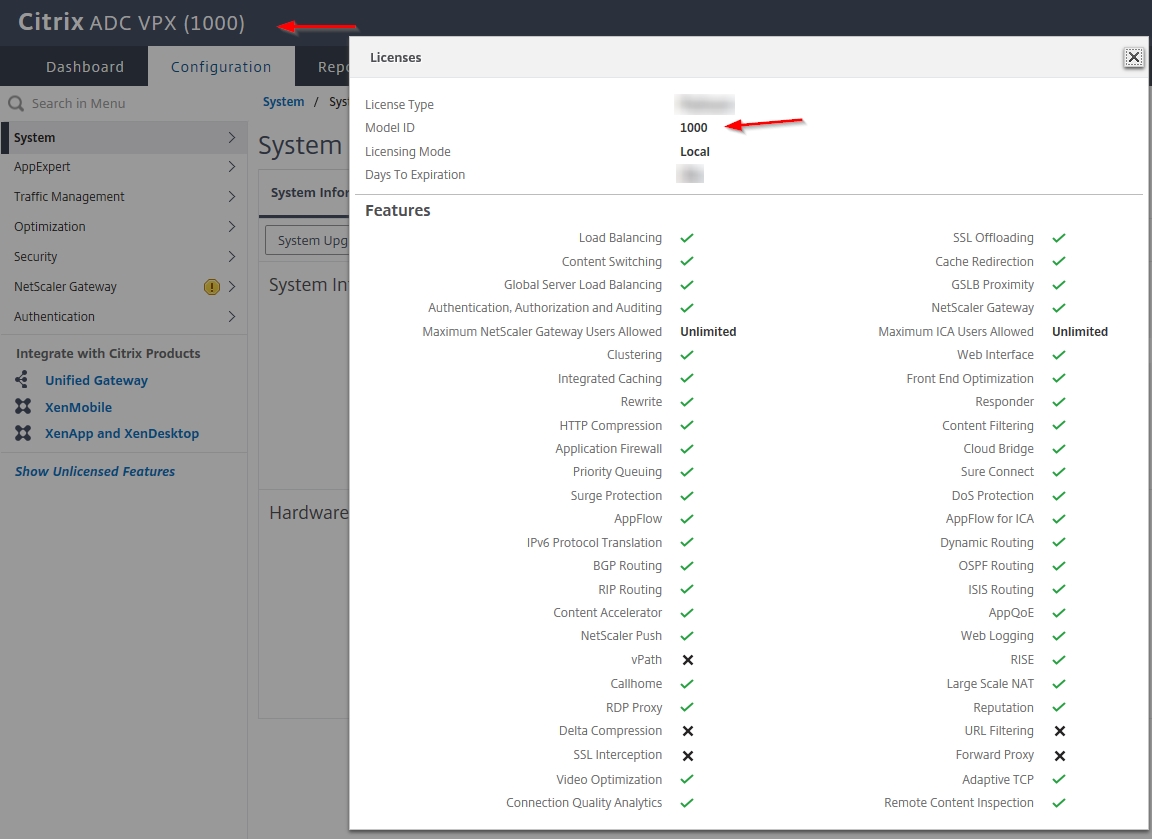
After you login you will see a overview of the new licensed features and the VPX version.
Import SSL certificate
Next step is to import your SSL certificate. I am using a wildcard SSL certificate. If you are not using a wildcard certificate, check my blog post about setup and configuration of XenMobile Server 10.9 here to see what hostnames (FQDNs) you need in your SSL certificate. In the past I have done a blog post and showed how to import an SSL certificate in .pfx format on the NetScaler. Check that blog post here.
After I imported my certificate this is my SSL overview on my NetScaler.

Setup NetScaler for XenMobile
Now it’s time to setup the NetScaler for XenMobile. I have setup XenMobile Server 10.9 in a previous post here. In that blog post I showed you the ins-and-outs of the setup and configuration process of XenMobile Server. And to make the XenMobile resources available to our end-users we need to integrate NetScaler and XenMobile. NetScaler supplies an authentication mechanism for remote devices to the internal network and other MAM functionality.
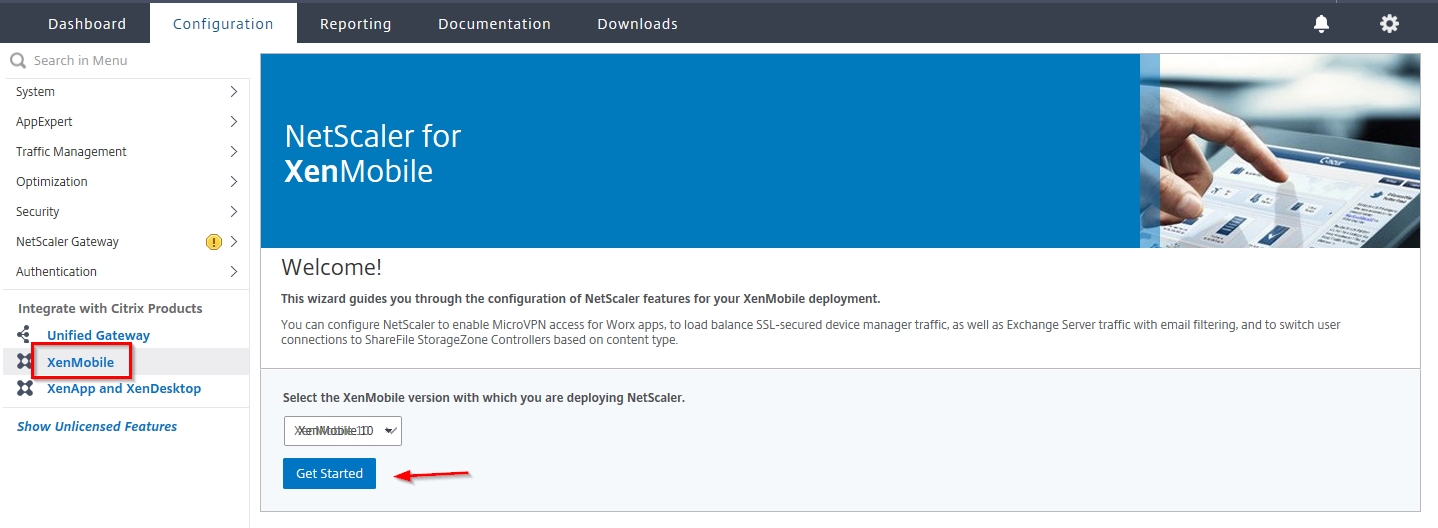
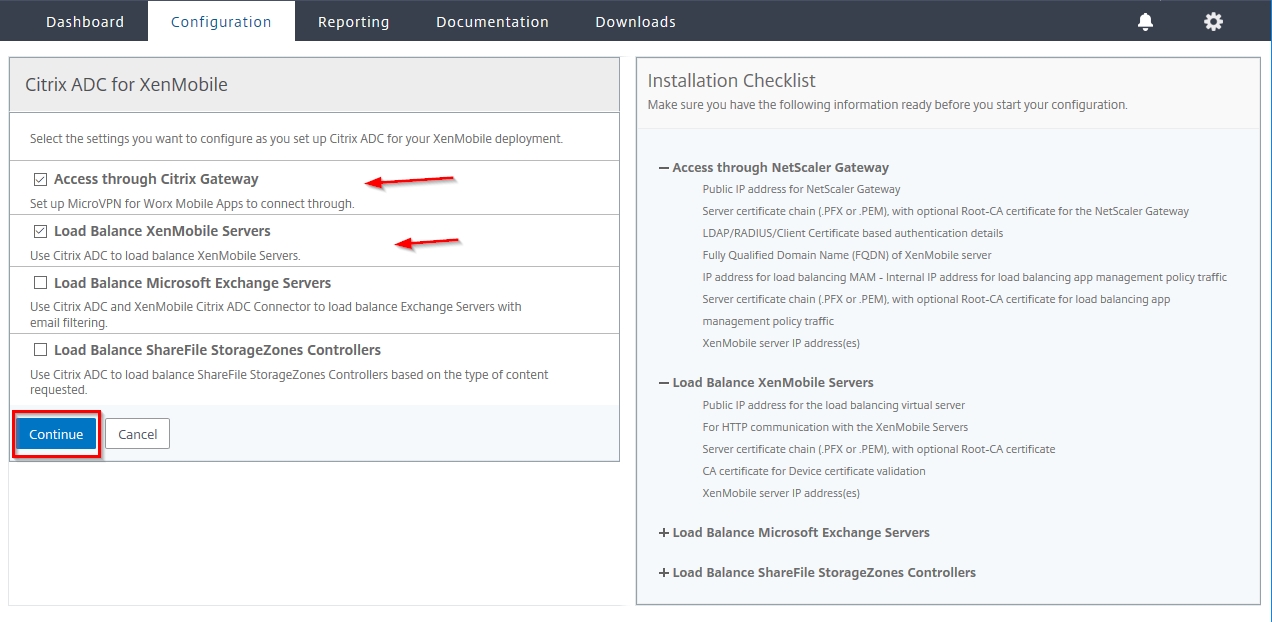
For my blog I will use the XenMobile wizard which is supplied with NetScaler. This wizard is very good at getting the job done (pragmatic approach) and gets better with every new version of NetScaler. Login in to NetScaler using your browser and scroll down in the left column and click on XenMobile. Then click on Get Started.
Make sure that the options Access trough Citrix Gateway and Load Balance XenMobile Servers are checked. Then click on Continue.
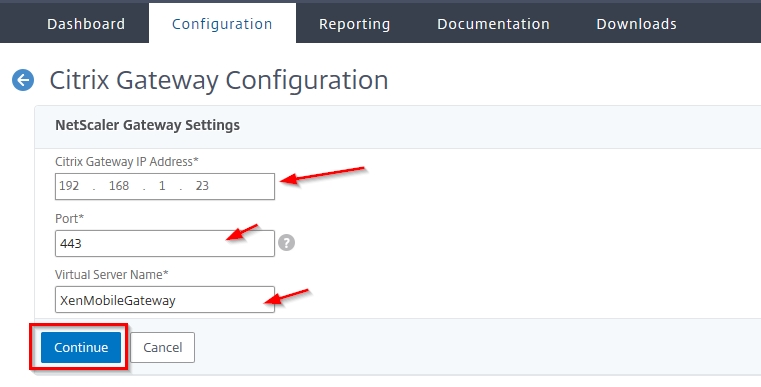
Enter the IP address you will use for the Virtual Server (VIP) for NetScaler Gateway. Leave the port on 443. Click on Continue.
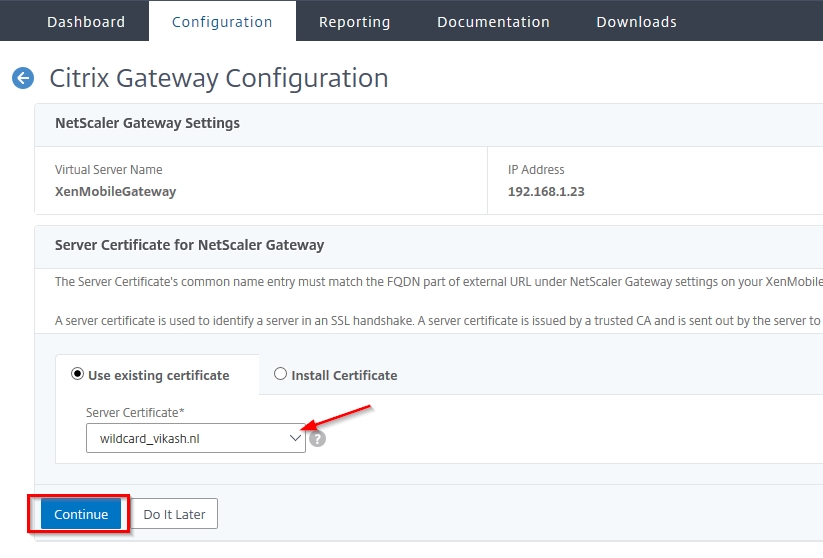
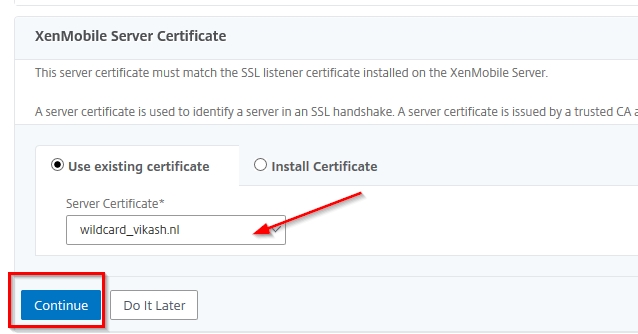
Select the certificate you want to use for the NetScaler Gateway VIP. This is my wildcard SSL certificate which I previously imported. Click on Continue.
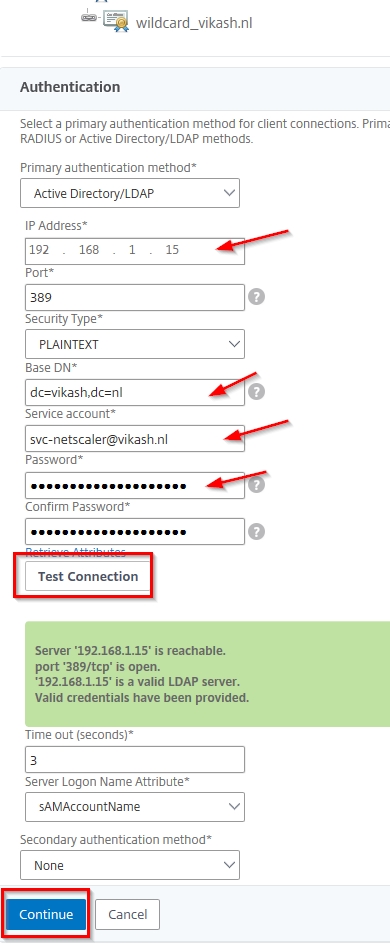
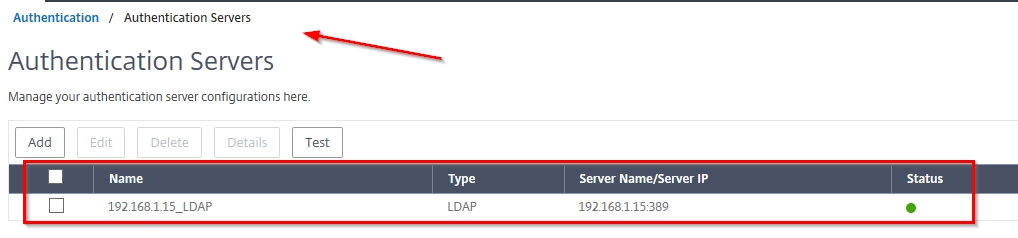
The next step is to add your Active Directory/LDAP configuration. This is used for by NetScaler for user authentication in your Active Directory. Make sure that you have a service account in your Active Directory configured which you will use here. Enter the information and Click on Test Connection to test the configuration. Everything should be green. Click then on Continue.
This next step will ask you the FQDN for you MAM functions. Fill in the same FQDN here that you used when setting up XenMobile according to my post here. In my case that is: xnmob01.vikash.nl. Also set the IP address you will be using for the Load Balancer. Click then on Continue.

Next, we must select the certificate for XenMobile. This has to be same certificate you are using on your XenMobile server! In my case I have a wildcard running on my XenMobile Server and the same one on my NetScaler.
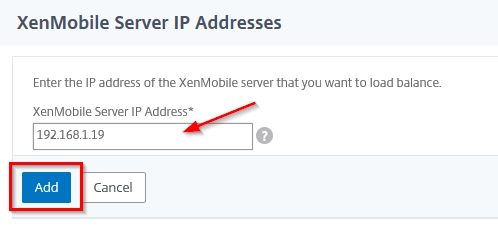
Now we have to tell NetScaler where the XenMobile server is. Click on Add Server.

Specify the IP address for XenMobile Server. I have my XenMobile Server running on 192.168.1.19. Fill in the IP address and click on Add.
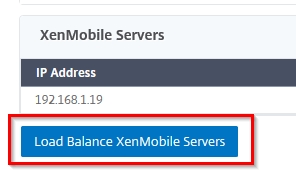
Now it will list the XenMobile Server. Click on Continue.

Click now on Load Balance XenMobile Servers.
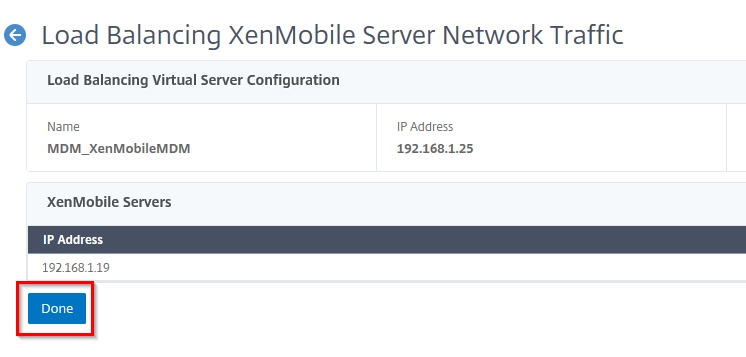
This is the IP address you will use to Load Balance MDM. Specify a name and then click on Continue.
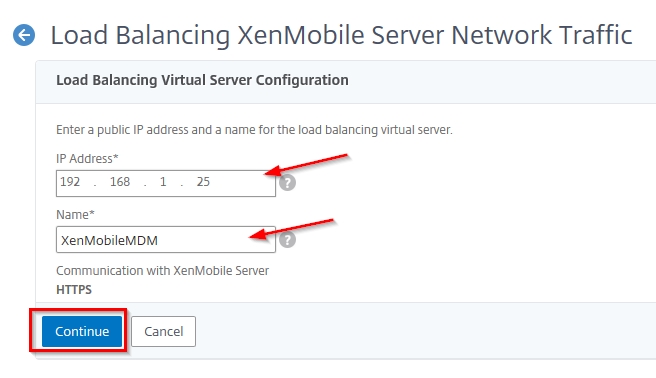
You will get an overview of the Load Balancing Virtual Server Configuration. Click on Continue.

Then click on Done and we are done!
You will be taken to the Dashboard and see the configuration you made using the wizard.
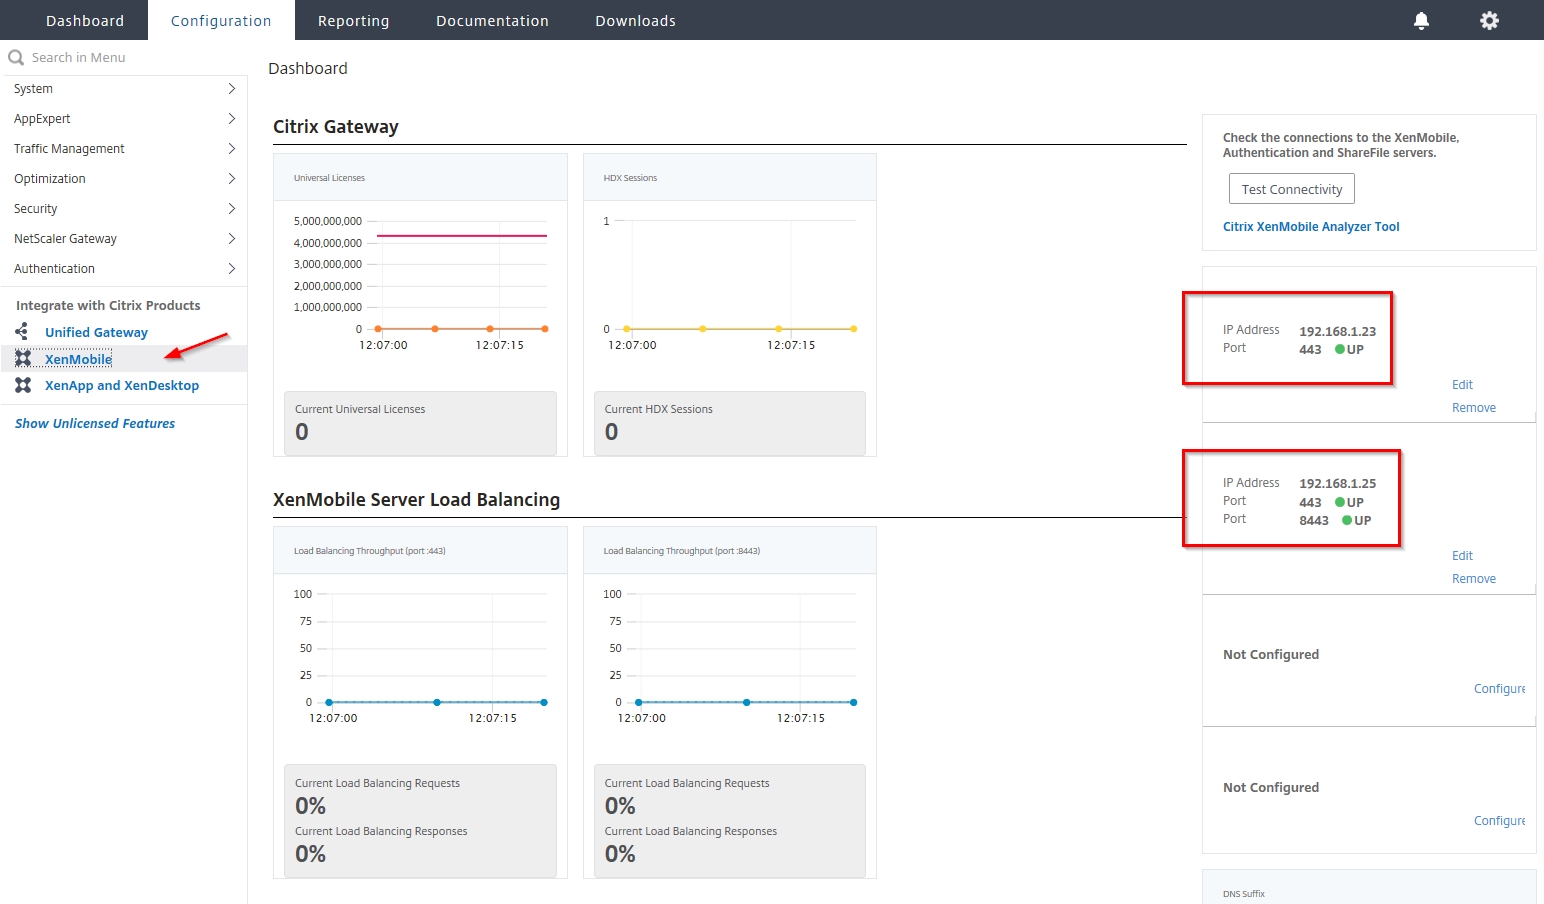
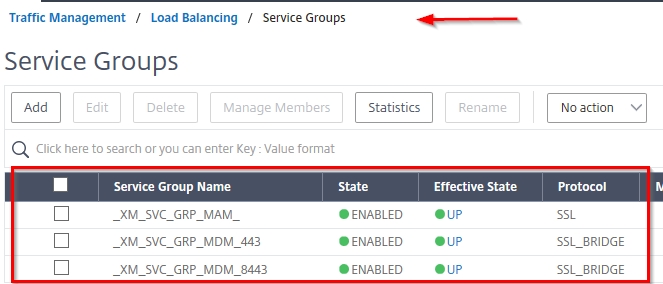
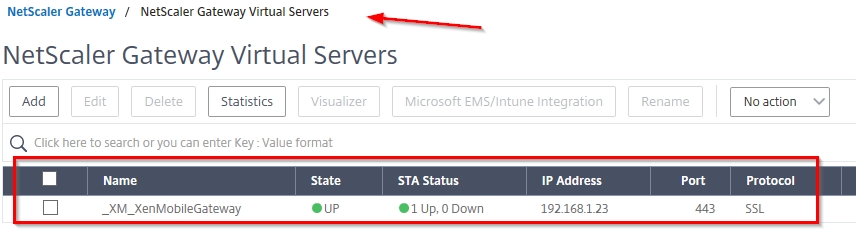
We can see the different components the wizard added. See below the screenshots to get an idea where they are in the NetScaler configuration.


This concludes this blog post. In following posts, I will show you how to enroll devices using XenMobile. Feel free to contact me of you have any questions or comments.
You can follow me on twitter or add the RSS feed from my blog and you will be notified when I add new posts.
Vikash, Its really a good document for beginners. I would like to know how to enroll devices using XenMobile and configure sample policies.
Hi Ravi. Thanks yes! Well maybe I will do a post on that :).