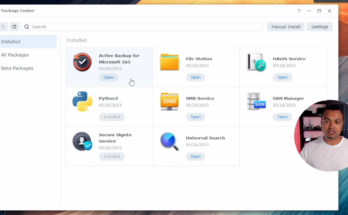
I am sure a lot of you are already running a Synology NAS or Synology storage solution in your infrastructure. Now, if you also are using Microsoft 365 services you are in luck! Synology offers a very robust and easy backup solution for all that data in Microsoft 365. Read more about Synology Active Backup for Microsoft 365 here.
The best thing is…it won’t cost you a thing. Just some time to set it up and you can see all the steps in my video. It’s amazing when IT just comes together.
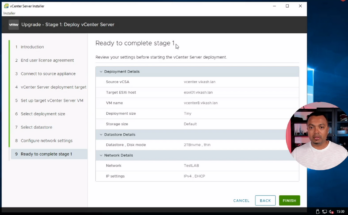
In this video I will show you how to upgrade VMware vCenter version 7 to version 8.
Before upgrading make sure you have backups and snapshot available for your existing vCenter 7 and also keys to run version 8 of vCenter. Check the video to see all the steps needed. Read about VMware vCenter on the official VMware page here.
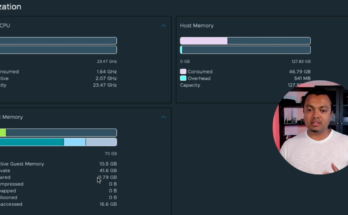
In this video I will show you how to enable Transparent Page Sharing on your VMware ESXi hosts.
I am sure a lot of you guys are using VMware ESXi and like me are running into memory limitations on your ESXi hosts. By enabling Transparent Page Sharing in ESXi you can create some extra headroom and optimize memory usage on your ESXi host. This option can save you some money because maybe…just maybe, this will be enough to get you going without investing in new hardware. It sure helped me a lot!
Read up more about Transparent Page Sharing in the articles from VMware here, and here because there are some things to consider from a security perspective.
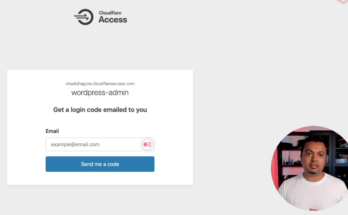
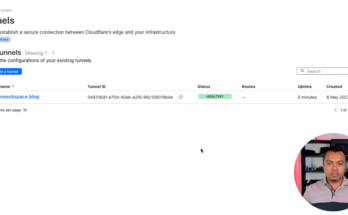
Using Cloudflare Tunnels is an amazing and very easy way to securely publish applications to the internet. I have made a video about how to set that up and you can check it out here. Now, I can imagine that there are some applications you want to protect with an extra layer of security like an extra authentication step. This is exactly where Zero Trust policies from Cloudflare will help you. Check my video below and find out how you can set this up.
Cloudflare Tunnels is great if you want to expose hosted websites or applications to the internet in a secure way without opening ports in your firewall. At the same time your website will be secured with a valid SSL certificate from Cloudflare. The classic way to do this would be you opening up specific ports in your firewall, but with Cloudflare Tunnels you don’t need to expose any port from your firewall to the internet. Setup Cloudflare Tunnels and let Cloudflare take care of security. At the time of making this video the service is free for using the functionality I displayed in this video.
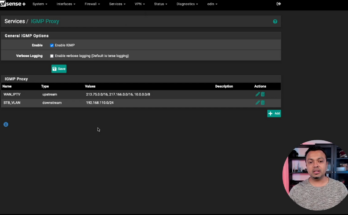
I have internet and IPTV from KPN (local ISP) here in the Netherlands. I chose not to use their router but instead use pfsense. The internet configuration part is pretty straight forward but if you want to get routed IPTV working you have to configure specific settings in pfSense. In this video I will show you how I have set this up for my situation. If you need to setup routed IPTV on pfSense as well, use this video as a guideline and check what the specific VLANs and IP ranges are for your ISP.
This website uses cookies to improve your experience. We'll assume you're ok with this, but you can opt-out if you wish.AcceptRejectRead More
Privacy & Cookies Policy
Privacy Overview
This website uses cookies to improve your experience while you navigate through the website. Out of these, the cookies that are categorized as necessary are stored on your browser as they are essential for the working of basic functionalities of the website. We also use third-party cookies that help us analyze and understand how you use this website. These cookies will be stored in your browser only with your consent. You also have the option to opt-out of these cookies. But opting out of some of these cookies may affect your browsing experience.
Necessary cookies are absolutely essential for the website to function properly. This category only includes cookies that ensures basic functionalities and security features of the website. These cookies do not store any personal information.
Any cookies that may not be particularly necessary for the website to function and is used specifically to collect user personal data via analytics, ads, other embedded contents are termed as non-necessary cookies. It is mandatory to procure user consent prior to running these cookies on your website.